Fred W B
|
| posted on 16/4/08 at 04:52 PM |

|
|
I left out my "trick" , which was to put the longitudinal stringers 200 mm, far enough apart to fit in the pistol grip driver.
I put the connector blocks (with the two screws) on the transverse stations first, as I build up the framework longitudinally, then when the stringers
went in I just had to put the third screw into the stringers
I am sure the right angle drill will work too, though just mayby a bit difficult to "muscle" . I stopped counting once I went past 1000
blocks x 3 screws each!
Cheers
Fred W B
[Edited on 16/4/08 by Fred W B]
You can do it quickly. You can do it cheap. You can do it right. – Pick any two.
|
|
|
|
|
ghetto_eddie
|
| posted on 17/4/08 at 08:00 AM |

|
|
Fred,
I developed a similar method to what you mentioned, assembling the blocks on the "stiffeners" first, and now just to assemble... but
unfortunately my sections are 175mm apart! shot myself in the foot there!
ime currently on 400 blocks pre-assembled onto my stiffeners! FUN 
I bought my right angle drill adapter last night... shoddy piece of Cr*p but it may just work!
Sorry for clogging up your thread!
Edd
|
|
|
Fred W B
|
| posted on 25/5/08 at 05:51 PM |

|
|
It's been a while, but I have very busy climbing up the learning curve of laying up and working off fiberglass. Having now consumed the majority
of a 25 kg drum of resin, I have about 80 percent of the pattern covered in a generous layer of resin and CSM.
As I was warned, this is messy, tedious and unpleasant work that definitely requires a "knack" to be acquired. It is the most difficult task
psychologically so far on my project. I am definitely very glad I spent as much time as I did getting the shape to my satisfaction before I started
with the resin.
I attach some detail photos. As always the edges and returns take a lot of time. As you can see the pattern looks a lot worse for a while, before it
starts to look better again. At the moment I am grinding back obvious high spots and overlap joints with a flexback wheel in an angle grinder, and
reworking occasional "soft" spots in the surface, where I caught an airbubble in the layup. I'm looking forward to getting this stage
finished so I can get onto the final smoothing of the surface with a long board etc etc etc
Cheers
Fred W B
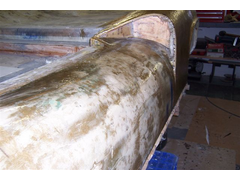 
skin 1
You can do it quickly. You can do it cheap. You can do it right. – Pick any two.
|
|
|
Fred W B
|
| posted on 25/5/08 at 05:53 PM |

|
|
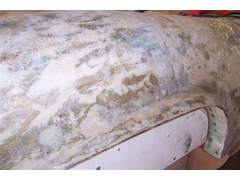 
skin 2
The surface of the return is not complete yet in this shot
[Edited on 25/5/08 by Fred W B]
You can do it quickly. You can do it cheap. You can do it right. – Pick any two.
|
|
|
Fred W B
|
| posted on 25/5/08 at 05:54 PM |

|
|
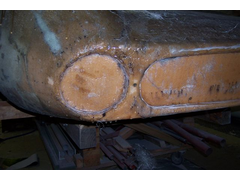 
skin 3
[Edited on 25/5/08 by Fred W B]
You can do it quickly. You can do it cheap. You can do it right. – Pick any two.
|
|
|
Fred W B
|
| posted on 25/5/08 at 05:57 PM |

|
|
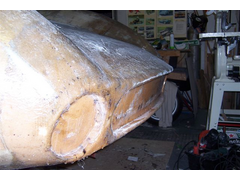 
skin 4
You can do it quickly. You can do it cheap. You can do it right. – Pick any two.
|
|
|
Ivan
|
| posted on 26/5/08 at 12:58 PM |

|
|
Always interested to see your progress Fred 
|
|
|
Fred W B
|
| posted on 8/6/08 at 07:57 PM |

|
|
For the last three weekends, and also some weekday evenings, I have pretty much done nothing else than graft in the garage, in order to get the damn
fiberglass skin finished. Now every square centimeter (except under the nose) is covered, some of it worked off fair, and I have actually started
applying some filler - Yay.
I couldn't resist working off the first section of filler I applied and I'm very happy with the way the surface came up. This is after just
one application of filler.
Cheers
Fred W B
[img][/img]
You can do it quickly. You can do it cheap. You can do it right. – Pick any two.
|
|
|
Fred W B
|
| posted on 8/6/08 at 08:04 PM |

|
|
In this shot the camera maybe makes it look like the lower line of the side pod/door is bowing inwards a bit in the centre, but checking with a
straight edge it is dead flat in the longitudinal direction, except for where you see the guide coat.
Cheers
Fred W B
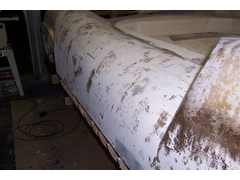 
filler 2
[Edited on 8/6/08 by Fred W B]
You can do it quickly. You can do it cheap. You can do it right. – Pick any two.
|
|
|
02GF74
|
| posted on 9/6/08 at 07:26 AM |

|
|
excellent.
has it been asked before - but with all that sanding going on, how do you manage to keep the garage so tidy?
|
|
|
Fred W B
|
| posted on 9/6/08 at 08:07 AM |

|
|
Thanks 02. I keep an airline handy and blow the dust away periodically. It piles up on the floor against the walls like snow
And of course it goes everywhere. Across the yard, on the cars, on the dogs etc etc. I'm surprised the neighbours haven't complained.
Cheers
Fred W B
[Edited on 9/6/08 by Fred W B]
You can do it quickly. You can do it cheap. You can do it right. – Pick any two.
|
|
|
violentblue
|
| posted on 15/7/08 at 04:44 AM |

|
|
so whats the status?
looking forward to seeing it in one color
(primer?)
a few pics of my other projects
|
|
|
Fred W B
|
| posted on 15/7/08 at 06:11 AM |

|
|
HI Blue
Have now got a layer of filler worked off over almost the entire pattern. Not much to see though, just how many pictures of sanded filler can you all
stand?
I haven't been able to devote much time to the project over the last few weeks, but I hope to get the first layer of surfacer primer on in a
month or two.
Cheers
Fred W B
[Edited on 15/7/08 by Fred W B]
You can do it quickly. You can do it cheap. You can do it right. – Pick any two.
|
|
|
Delinquent
|
| posted on 16/7/08 at 11:14 AM |

|
|
quote:
Originally posted by Fred W B
just how many pictures of sanded filler can you all stand?
Probably more than you'd imagine
|
|
|
mistergrumpy
|
| posted on 17/7/08 at 10:43 PM |

|
|
Wow! Don't know how I missed this thread previously. Been thinking about it today whilst trudging around at work. Am I right in thinking that
after all those measurements that you took you knocked a few mm off them overall to take into account the depth of the filler etc.?
Great project 
|
|
|
Fred W B
|
| posted on 18/7/08 at 05:37 AM |

|
|
thanks Grumpy
quote:
Am I right in thinking that after all those measurements that you took you knocked a few mm off them overall to take into account the depth of the
filler etc.?
That would have been the right thing to do, but we didn't bother. Who knows how close we actually are to the real thing anyway? 
Cheers
Fred W B
You can do it quickly. You can do it cheap. You can do it right. – Pick any two.
|
|
|
Fred W B
|
| posted on 20/7/08 at 04:21 PM |

|
|
A couple more photos. Have now worked off the second go round with filler on the rear clip top surface and the whole left hand side.
[img][/img]
You can do it quickly. You can do it cheap. You can do it right. – Pick any two.
|
|
|
Fred W B
|
| posted on 20/7/08 at 04:28 PM |

|
|
Although it doesn't look like it here, due to the camera angle, I made a template so I could match the top curve of the LH and RH side rear
arches.
Cheers
Fred W B
[img][/img]
You can do it quickly. You can do it cheap. You can do it right. – Pick any two.
|
|
|
:{THC}:YosamiteSam
|
| posted on 20/7/08 at 08:04 PM |

|
|
dont you just love seeing someone building a car like this? to put so much heart and soul into their *baby* and seeing it starting to look like a car
too.
i think there are 2 types of kit car builders - those who make bits for the car and those that buy bits - personally i prefer the making bits type -
because it stimulates the mind the make better things- after all if you can make something like this - you could make just about anything given the
time and patience
|
|
|
Fred W B
|
| posted on 6/8/08 at 11:20 AM |

|
|
Random Thoughts while shaping
I haven’t posted much progress detail lately. The work I’m doing now doesn’t show well in photos, but the shape and surface is getting better and
better. I prefer to post details of what I’ve done, not talk too much about what I’m still going to do. I saw on another car building forum a guy
posted nice renderings of a car body he was going to build. He gave himself a month to build the plug. After two weeks he had a lump of hacked about
foam, and he gave up. Sorry mate – It doesn’t work like that.
All this sanding means you have a lot of time to think while toiling away in the garage. Making a body pattern single handed is a silly amount of
work. To do this I think you do have to be determined, some would say bloody minded. It reminds me of when I was cycling competitively, and later
racing karts. Sometimes while doing the activity (cycling – while feeling bad and just just hanging on the back of a bunch, karting – being nerfed off
the track, or having other issues during a race day) I would think to myself – “this is madness, I’m not enjoying myself, I’m going to give up”. But
then at the end of the day you see you have finished a bit higher up than last time, and you feel better, and so you give it yet another go. Having
like minded mates to chat/drink beer with after also helps a lot.
I have seen a couple of references that state doing a body pattern the old fashioned way takes maybe 1000 Hours. I reckon I am averaging at most about
10 hours a week on the project, so that would be two years. Currently just starting the 20th month of work on the pattern and I hope to finish this
year still, so that 1000 hours seems about right in my case. I read in USA magazine “Hot Rod”'s paint and body issue that rod or muscle car high
end professional paint jobs may have 200 to 300 hours of block sanding alone in them – and that’s on an existing car!
I try to concentrate on just the area I am working on, without thinking about the all the work yet to do. When I get despondent I look back through
this thread and see how far I’ve come, and that improves my resolve to keep going, as does the positive responses from you guys here.
Experienced builders might smile at the notes below, but I put this down for others who may be considering a similar project. Maybe they are just
notes to myself:
There is no “easy way”
Don’t agonize over how to approach or do something. Just start, and move on from there. You may find that eventually the first thing you did has been
changed/replaced, but at least you started.
Get each stage as good as you can before you move onto the next. It’s easy to shape wood/foam, less easy to shape GRP, a pain to correct stuff at the
body filler stage. Getting it absolutely correct at the drawing stage would be first prize.
Don’t expect to get every section 100 percent the first time. Get it good, do another section, work round the car, when you get back to it you can get
it better.
Even when you don’t feel like it, or just have a little bit of time, get in the garage. Things don’t get built if you aren’t in the garage. Even if
you just tidy up a bit, you will do something.
Do everything to the standard you want. If it bothers you every time you look at something, rework it.
If you get tired, or find yourself rushing to finish something at the end of a day, stop. Do it next time. You will make mistakes and have to redo it
if you don’t.
When you think you are just about finished, you aren’t - The last 10 percent takes 90 percent of the time.
Anything can be fixed / reworked.
Cheers
Fred W B
You can do it quickly. You can do it cheap. You can do it right. – Pick any two.
|
|
|
adithorp
|
| posted on 6/8/08 at 12:41 PM |

|
|
"...(cycling – while feeling bad and just just hanging on the back of a bunch,..."
I know that feeling! It's looking good.
adrian
"A witty saying proves nothing" Voltaire
http://jpsc.org.uk/forum/
|
|
|
Benonymous
|
| posted on 6/8/08 at 01:05 PM |

|
|
Impressed
Hi Fred, I'm not only impressed with what you have achieved but also with your work philosophy. The car you are building comes from an era
where design was functional but also aesthetically pleasing. Your ideas about carrying out the work also come from that era of patient craftsmanship.
I know for a fact that one day I'll see a gleaming Lola twinkling in the sunlight on this thread. I don't care how long it takes.
Power to your sanding arm mate!
|
|
|
sgraber
|
| posted on 6/8/08 at 02:53 PM |

|
|
Thanks for that philosophical musing Fred. You've dredged up a rush of memories on my part! I would like to just stand beside you in agreement
on all of your above mentioned points.
That part about just doing a small thing every day even when you don't feel like it, that is a core value that will see you finish this project
and it's the one trait lacking in so many people. Dedication. You've got it in spades! Congratulations.
G.
Steve Graber
http://www.grabercars.com/
"Quickness through lightness"
|
|
|
Fred W B
|
| posted on 22/12/08 at 05:42 PM |

|
|
So, an update!
I have not been making progress as fast as I'd like, getting a consistent uniform shape and radius on the edges around all the openings has been
taking ages. I have got through over 50 kg of body filler so far. I am now working with 120 grit paper and trying to get up to a dark ABF guide coat
that will be the last iteration before the primer surfacer can go on.
Currently I am pretty happy with all the top, side and rear panel surfaces, as well as the cockpit edges. The rear wheel arch edges are pretty much
done, as are the edges of the "hip" ducts. The internal surfaces of these still need some more work, as does the front wheel arches and the
edges of the openings in the front of the nose. After that the only major job left is finishing the inner faces and edges of the radiator exit duct.
I attach some photos
Cheers
Fred W B
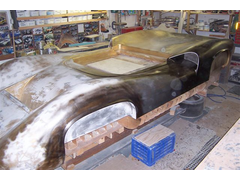 
buck dec 018
[Edited on 22/12/08 by Fred W B]
You can do it quickly. You can do it cheap. You can do it right. – Pick any two.
|
|
|
Fred W B
|
| posted on 22/12/08 at 05:43 PM |

|
|
[img][/img]
You can do it quickly. You can do it cheap. You can do it right. – Pick any two.
|
|
|


