Bob C
|
| posted on 8/2/04 at 10:37 PM |

|
|
Jigs database...
Suggestion for the site really - I'm just sticking my chassis together & I made a jig to locate the front wishbone mounting brackets. I
don't need it any more but it could be useful to others & I'd be happy for anyone to use it, all they'd have to do is come and
pick it up. Is it within the technology of this forum's site to host such a database?
BOb C
PS forgot my camera this weekend or I'd put a piccy of it in action in the photos section..
|
|
|
|
|
200mph
|
| posted on 8/2/04 at 11:40 PM |
|
|
I think there was a dicussion about the possibility of adding a database, and it sounds as though this sort of information would be very useful!
Anything that helps people out is always welcomed.
Mark
|
|
|
ned
|
| posted on 9/2/04 at 09:29 AM |
|
|
it could be a page in a prosrpective wikki thingy...
Ned.
ps I'm about to do my front suspension mounts so a jigg would be really handy, sadly you're a bit far away for me to come and get it 
beware, I've got yellow skin
|
|
|
James
|
| posted on 9/2/04 at 03:01 PM |
|
|
For those that are too far away to borrow it they're pretty simple to make but well worth having.
All you need is 8 bits of 19mmRHS, 2m threaded bar (same diameter as w/bone bolts) and 16 same diameter nuts.
Means w/bone bracket and FU1/2 placement takes about 10mins as opposed to a couple of days of stress without! 
James
|
|
|
Jon Ison
|
| posted on 9/2/04 at 03:04 PM |
|
|
I have a front wishbone jig if anyone wants use of it, i'm at J29 M1, its built 4 cars to date............
ok, 2 jigs, one for btm and one for top, it asumes "Maxi" btm ball joints btw.....
|
|
|
200mph
|
| posted on 9/2/04 at 04:08 PM |
|
|
I wish I'd known, was down that way saturday...
would you happen to have any diagrams?
cheers
Mark
|
|
|
Bob C
|
| posted on 9/2/04 at 04:18 PM |
|
|
wishbone jig
might come in handy Jon - but it will be a few weeks before I'm at that stage - if we had a list/database I wouldn't have to
remember......
Cheers
Bob
|
|
|
Bob C
|
| posted on 14/2/04 at 10:57 PM |
|
|
I've posted pictures of the jig " in action" in the photos section of this website, look in photos>>Bob C>>front susp
jig
It's now "flatpack" here in knutsford - the chassis is 50miles away at my bro's workshop being embellished at weekends...
Like I say, anyone who wants can pick it up. Absolutely anyone can make one like it....
Cheers
Bob C
|
|
|
ned
|
| posted on 23/2/04 at 10:11 AM |
|
|
I jigged my bottom front wishbones at the weekend, this is how i did it. using dimensions from the book, the centreline of the chassis and the
wishbones in situ, with mdf bars across the width...
 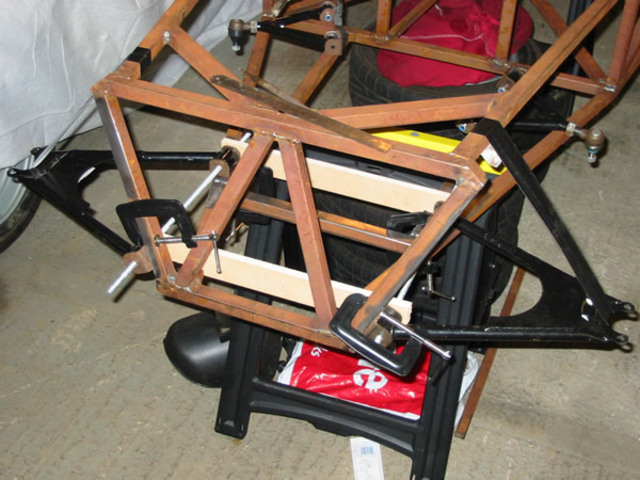
front lower jig
Ned.
beware, I've got yellow skin
|
|
|
James
|
| posted on 23/2/04 at 11:02 AM |
|
|
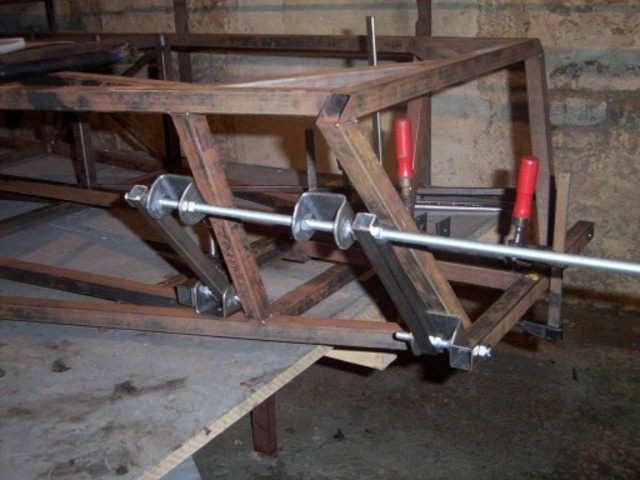
IMHO it's better still if you make the jig 3d and do the top brackets at the same time- you know the whole thing's in line then.
Here's how I did mine a year ago- the bottom is the same as Ned's but I've but in vertical supports so that the whole thing is self
supporting and allow you to align the top brackets as well.
http://locostbuilders.co.uk/photos.php?action=showphoto&photo=bracketjig_fr_small.jpg
and
http://locostbuilders.co.uk/photos.php?action=showphoto&photo=bracketjig_rr_small1.jpg
James
|
|
|
ned
|
| posted on 23/2/04 at 11:43 AM |
|
|
James,
I'm gonna do the top wishbones next time, using the current jig i will add the vertical bars to it to get the height right. i still need to cut
fu1,2 which is the tricky bit. I need to do some searching of old posts and decide on that can of worms known as castor...
Ned.
beware, I've got yellow skin
|
|
|
Mark Allanson
|
| posted on 23/2/04 at 06:25 PM |
|
|
Cut the appropriately named FU tubes, but don't weld them in, not even tacked. Set up the jig so the uppers are in the right place, slide in the
FU, wnd tack it in and tack the bracket on.
Rescued attachment BracketJig.jpg
If you can keep you head, whilst all others around you are losing theirs, you are not fully aware of the situation
|
|
|