pajsh
|
| posted on 30/3/07 at 07:59 PM |

|
|
Welding shortened sump ??
I'm preparing my shortened sump (sort of Mark Allenson's way) for welding tomorrow and am not sure the best way to do it.
When I cut the plate for the bottom should I leave a 2mm lip all around for a nice fillet weld on the outside or should I try and get the plate
flush.
I presume the weld is best on the outside.
As I don't weld I want to get it ready for someone else to do.
Picture attached for reference (sorry it's a bit biggggg!
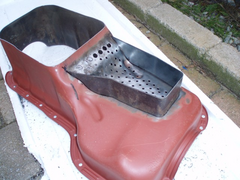 
SumpMod2
I used to be apathetic but now I just don't care.
|
|
|
|
|
mark chandler
|
| posted on 30/3/07 at 08:21 PM |
|
|
Best to leave a lip, if you try and butt weld its more lightly to leak as you cannot flow the weld so easily.
If mig welding you need to start once and work your way around in one go, if you stop when restarting go back on yourself 1/2" before moving
forward as Mig suffers from cold start which leaves pin holes.
When done hold it up to the sun and look for pin holes, also get it spotlessly claen before you start, make sure the wire is not rusty in the welder
etc. You only want to do this once, not have damp patches once its all bolted up !
Good luck.
[Edited on 30/3/07 by mark chandler]
|
|
|
nitram38
|
| posted on 30/3/07 at 08:28 PM |
|
|
If you can, get someone to tig weld it.
Mig can leave holes as suggested, but these can be filled using braze or silver solder.
After everything is cooled, try some thinners as this will find holes quickly and show up on a dry surface.
|
|
|
jacko
|
| posted on 30/3/07 at 08:46 PM |
|
|
Do a search on this . Just a tip screw it to a flat bit of wood to stop it warping. If the welder knows his-her job they will have no problems if
you make the plate a good fit to the bottom . on the inside i bolted a piece of s/steel hinge so it stoped the oil going to the front but can swill
to the back were the pick up pipe is hope this makes sense
Graham PS the hinge was 75mm open so laid flatish so if the sump got hit under neath it would not trap the hinge PS the hinge was 75mm open so laid flatish so if the sump got hit under neath it would not trap the hinge
[Edited on 30/3/07 by jacko]
|
|
|
jacko
|
| posted on 30/3/07 at 09:03 PM |
|
|
Looking at your photo the front tank wants to be the same hight as the back part and cut some metal away in between the two parts or the oil will get
traped in the front [ new tank ]
Jacko
|
|
|
stevebubs
|
| posted on 30/3/07 at 11:46 PM |
|
|
quote:
Originally posted by nitram38
If you can, get someone to tig weld it.
Mig can leave holes as suggested, but these can be filled using braze or silver solder.
After everything is cooled, try some thinners as this will find holes quickly and show up on a dry surface.
Machine oil and parafin are supposedly good for this also as both are significantly thinner than engine oil..
|
|
|
worX
|
| posted on 31/3/07 at 05:08 AM |
|
|
Have you calculated the new volume?
When I did mine, I cut the bulbuous low bit out more and made a larger "new" piece in and relocated the drain plug in the side of that.
I may not of needed to go that much lower than yours but I seem to remenber thinking it needed to at the time - I also shortened the Oil pick-up, but
I assume you've already got this covered?
cheers,
Steve.

|
|
|
907
|
| posted on 31/3/07 at 06:33 AM |
|
|
Hi
IMHO
The area I've marked with black arrows is the least supported and will sink in the direction of the blue arrow.
I would clamp down to a flat base and place a support, maybe a small scissor jack, under this area.
I would start welding here and work away from it.
The top plates I would cut to the size of the hole and the joint would then be an outside corner,
mainly because with it clamped down it would be easy to get to all the welds. It would also show a nice
penetration bead inside which always gives you confidence that the weld is strong.
I would TIG it, but that's because I've got one. Nothing wrong with the MIG if set right.
Do those big holes meet the cap plate?
If not I'd slot them so you avoid a sludge trap.
That's a nice neat job by the way.
Paul G
 
Rescued attachment SumpMod2-arrows.jpg
|
|
|
pajsh
|
| posted on 31/3/07 at 08:38 AM |
|
|
I can't weld so I will have to "find a friend". I know one guy who uses gas but I'm not sure how good he is. He is retired
craft teacher (old skool!) so I think he should be OK.
I've not calculated the volume but based on the bit I cut off I think it's pretty much the same. The new bit fits inside the old cut off
piece and is about twice the height. I didn't think it mattered that much as I've seen ones with no extensions at all.
The big holes are pretty close to the front cap plate line but I wanted to leave some meat to weld to. It is something I was a bit unsure of and I
might open them up to slots when it's welded. Trouble is they come through just where the original internal baffle is and so I don' t want
to weaken that too much. The reason for the step is due to constraints with the existing sump guard in the car.
I'm also going to make a windage plate for the inside similar to the RS alloy sump. My eldest's DVD player broke last week so the casing
(fortunately metal) will make a nice locost version complete with drainage slots!
I was going to bolt it down to a flat piece of wood (probably an old worktop) but I will now make a block to wedge up the inside too.
Thanks guys.
I used to be apathetic but now I just don't care.
|
|
|
907
|
| posted on 31/3/07 at 11:03 AM |
|
|
If the holes are higher then I like worX's idea of an extra drain plug.
Gas in this case would be my 4th choice as it tends to give a wide heat spread, which equates to more distortion.
It's a pity your not nearer as you have done the hard work. An hour would see it finished.
Paul G
|
|
|
DarrenW
|
| posted on 31/3/07 at 05:32 PM |
|
|
The new bit doesnt look big enough to me. I made mine a lot bigger than that following Marks example.
|
|
|
MikeRJ
|
| posted on 31/3/07 at 08:23 PM |
|
|
quote:
Originally posted by nitram38
If you can, get someone to tig weld it.
Mig can leave holes as suggested, but these can be filled using braze or silver solder.
I reckon I must have been very lucky when I did my crossflow sump . I used the highest setting on my Clarke 151 MIG to get decent penetration, made
sure all surfaces were clean as possible and I had no detectable leaks after the first pass. Washed the sump out with some cellulose thinners
initially with no sign of leaks, then filled the sump with water mixed with a squirt of washing up liquid to reduce surface tension and not a drop out
in 24 hours.
|
|
|
nitram38
|
| posted on 31/3/07 at 09:03 PM |
|
|
It doesn't always leak, but my suggestion is a way to sort it out without pulling your hairout trying to chase the weld.
|
|
|
MikeRJ
|
| posted on 1/4/07 at 01:58 AM |
|
|
quote:
Originally posted by nitram38
It doesn't always leak, but my suggestion is a way to sort it out without pulling your hairout trying to chase the weld.
Absolutely, I would have brazed my sump if I had the facility, much the best way to do it.
|
|
|