coyoteboy
|
| posted on 16/11/15 at 01:23 PM |

|
|
Measuring up for main replacements
So I've stripped an engine I'm working on (blown ringlands) and I'm looking at mic'ing up the crank to check for what shell
sizes I need but:
1) None of my tools have accuracy suitable. Even the £300 set of external micrometers, while having resolution of .001mm, have an accuracy of
0.05mm.
2) Stock crank dims are 54.985-55.001mm, oil clearance of 0.015-0.033mm (which is VERY tight!).
Measuring with verniers I get 54.85 (clearly outside of spec), measuring with lower res external micrometer I get 55.01mm (clearly outside of spec).
I'm more tempted to believe the micrometers but it cant' be above original spec. I'd also doubt it's that far below original
spec because there's no obvious wear on the journal (lovely and smooth, no lips) but I've also no idea if it's been ground before
but it doesn't match any standard oversize grind either. Part of me is tempted to just drop in standard shells and measure clearance to check
but there's a good chance it'll be miles out from stock clearance.
Thoughts?
|
|
|
|
|
Nickp
|
| posted on 16/11/15 at 02:15 PM |

|
|
Any markings on the shells? ie 010 +10.....?
|
|
|
owelly
|
| posted on 16/11/15 at 03:16 PM |

|
|
Use http://plastigauge.co.uk/
http://www.ppcmag.co.uk
|
|
|
coyoteboy
|
| posted on 16/11/15 at 05:26 PM |

|
|
No markings, and plastigauge relies on you having already bought the shells, which defeats the purpose.
|
|
|
Nickp
|
| posted on 16/11/15 at 06:09 PM |

|
|
quote:
Originally posted by coyoteboy
No markings, and plastigauge relies on you having already bought the shells, which defeats the purpose.
If there's no markings then you can be 99% sure they're STD 
|
|
|
DIY Si
|
| posted on 16/11/15 at 06:14 PM |

|
|
Refit the existing shells, assuming you haven't binned them, with plastigauge and then check the part number on the bearings would be my first
move.
Or, I'd take the crank to a machine shop and see what their kit says.
Let your plans be dark and as impenetratable as night, and when you move, fall like a thunderbolt.
Sun Tzu, The Art of War
My new blog: http://spritecave.blogspot.co.uk/
|
|
|
owelly
|
| posted on 16/11/15 at 06:36 PM |

|
|
Are you micrometers calibrated? Do they come with standards to check? I know you say they're not accurate enough but it's possible to
'feel' the right dimensions if you see what I mean?! Can you use the standards to set the micrometer at a set dimension and then use the
Plastigauge with the micrometer?
http://www.ppcmag.co.uk
|
|
|
coyoteboy
|
| posted on 16/11/15 at 08:13 PM |

|
|
Yep they are calibrated and match their standard bang on but if their manufacturer quoted accuracy is worse than the oil clearance, how the nuts are
you meant to ever know it's right?!
I'm basically stuck with reassembling with the original bearings and assuming they are std, or buying new shells and trying it out. I could take
it to an engine builder but a) it's a matter of pride  and b) I'm not sure how they would be in any different a situation either. I
can't find tools with the accuracy required and I'm pretty sure most builders won't have them either. Or be wanting to waste time on
a freebie measuring. and b) I'm not sure how they would be in any different a situation either. I
can't find tools with the accuracy required and I'm pretty sure most builders won't have them either. Or be wanting to waste time on
a freebie measuring.
|
|
|
perksy
|
| posted on 16/11/15 at 09:05 PM |

|
|
As NickP said 99% certain they are standard if they aren't marked on the back
The mains don't take that much stick, its the big end journals that do most of the work
|
|
|
coyoteboy
|
| posted on 16/11/15 at 09:10 PM |

|
|
Hmm yeah but, assuming that's right, it still doesn't tell me if I have wear on the journals and therefore need a regrind  Bit annoying! Bit annoying!
|
|
|
Nickp
|
| posted on 16/11/15 at 09:13 PM |

|
|
quote:
Originally posted by coyoteboy
Hmm yeah but, assuming that's right, it still doesn't tell me if I have wear on the journals and therefore need a regrind  Bit annoying! Bit annoying!
Do the shells look worn?
|
|
|
perksy
|
| posted on 16/11/15 at 09:16 PM |

|
|
Usual practice is use the micrometer and check for ovality (check at various points around and across the journal)
Visual check first of course
Even if your micrometer was out a little it would still show an ovality error
Using the 'ratchet' on the mic is the supposed standard way of using it, but as said above just about everybody i've worked with
does it by 'feel'
Unless there is surface damage I'd be surprised if they were worn excessively
If it had been ground previously then over sized shells would be fitted and marked on the rear of them
[Edited on 16/11/15 by perksy]
|
|
|
paulf
|
| posted on 16/11/15 at 09:23 PM |

|
|
When I worked for an engine reconditoner we used normal basic micrometers checked against a standard at each end of the range. It is dependent of feel
when measuring something very precisely but im sure that your crank will be standard as it would be very easy to vary by a few tenths of a thou either
way.
|
|
|
coyoteboy
|
| posted on 16/11/15 at 09:28 PM |

|
|
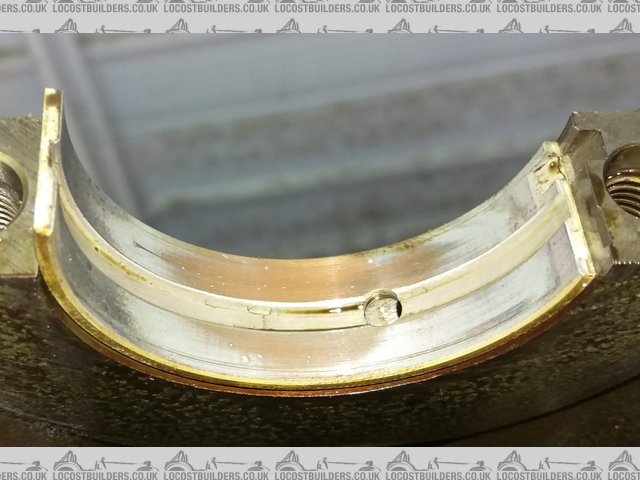
Shells at the timing end are screwed.
 
Main wear
Shells at the fly end are almost spotless.
Journals at both points measure identically with no visible scoring/wear/roughness.
I've been trying by ratchet and by hand just feeling for a bite. There's no ovality that I can sense in the mains, slight in the big ends
but barely perceptible (i.e. 3 at each of two points 90 degrees apart "feels" slightly larger on the mic, but is below the 0.01m
resolution by some way.
The only mark on the rear is "D2J" and a logo which doesnt' seem to tally with any manufacturer I can see (closest to federal
mogul) and the code reveals nothing anywhere online, certainly doesn't match the OEM manual codes. Posted to a forum about the engine one person
seems to be fairly sure it's an OEM shell but that's all.
|
|
|


