Sump requirements
Russ-Turner - 2/9/05 at 08:28 AM
Morning all. My book chassis is well on the way but seeing as i'm using a 1.8 CVH can anyone tell me if i will need to buy a new sump as the
original is profiled to miss the Sierra steering rack. In anyones experience will the inches saved be essential? I'll be making my own mounts so
I will still have some mm to play with
If a new sump is on the cards where is the best place to try first, Burtons? One more quick one...what are the biggest dimensions that I can get away
with for the rad and fan? I doubt that Polo rads are universal in size are you guys using a specific one? Thanks alot, appreciate it!
mangogrooveworkshop - 2/9/05 at 08:51 AM
Speak to mad4x4 he has that motor in his car
donut - 3/9/05 at 08:22 AM
So does Surrey Dave
Russ-Turner - 3/9/05 at 12:10 PM
Thanks for that mate, Mad4X4 hasn't been on i don't think.
Surrey Dave - 3/9/05 at 02:35 PM
Love that Schumacher Avatar!!
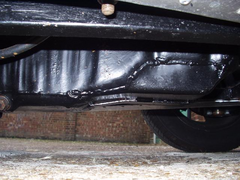
I used the original sump , but shortened it so that it was the same depth as the bellhousing, also used the original front shape as an internal
baffle, also shortened pick up pipe.


Rescued attachment sump2.jpg
Russ-Turner - 3/9/05 at 07:02 PM
Thanks for the reply Ahh, didn't think of that (new to this building lark you see) I don't suppose you can MIG it?! 
Surrey Dave - 3/9/05 at 10:10 PM
Some say no , but I MIG'd mine and it had no leaks , still hasn't...........
Russ-Turner - 4/9/05 at 08:21 AM
Plenty to think about, cheers mate. 
DarrenW - 5/9/05 at 08:12 AM
I modded my Pinto sump in a very similar way, details courtesy of Mark A. (hope you dont mind me attaching it)
Bottom plate of sump = 3mm. Angled up at the front to act as a kind of skid plate. Internally the orivginal base was left in and drilled to act as a
sort of baffle. The part i cut off was inverted and put back in to form another baffle.
Attachment is not mine - it is very good tho'. I migged mine up. Had problems with sealing. I found that in the end i left it full of water
overnight - next day you could see where water beads had come through but not ran out - left a rust spot. I re-welded and left overnoght a few times
unitil happy no leaks. I then cleaned very well, covered all joints with bond and seal then painted approx 3 coats of smoothrite.
Refitting can be tricky. I was lucky, distortion was minimised cos it was bolted to some flat worktop for the main welding. Some of the holes had to
be opened up no more than 1mm to fit the sump bolts.
[Edited on 5/9/05 by DarrenW]
mad4x4 - 11/9/05 at 12:19 PM
I have dropped the 1.8CVH in favor of the 1.6CVH (XR2) as I found I was struggling to do the electrics (Dizzy was the biggest problem due to the
MAP)
and then found that tunning parts were limited.
Now have 1.6CVH with twin 40's.
As for SUMPS, I'm running standard Sump. Will make a "Skid plate" to protect itand will just have to watch the ground clearence at the
moment it is about 3-4 inchs (guessing from memory as the car is on the other side of the world)
Yeap I'm writting your reply from Singapore where i'm working 
Maybe post some photos when I get back in a week or two
mad4x4 - 11/9/05 at 12:21 PM
I used the rad off of a Suzuki Jeep (found at a scrappy) and a Fan off of ??? again found at scrappy
Total cost £10
NS Dev - 11/9/05 at 01:22 PM
quote:
Originally posted by Surrey Dave
Some say no , but I MIG'd mine and it had no leaks , still hasn't...........
Mig welding the sump is no problem at all. You just need to make sure that when you stop on a run (or corner or anywhere lese for that matter) you
start about 8-10mm "back" on the previously welded seam. By doing this, the weld will be pentrating properly by the time you reach the
unwelded bit......if you see what I mean!
Mig welds always start with a "cold lap" because the wire feed starts before there is enough heat in the workpiece for the weld to penetrate
properly. As long as you take account of this when welding something that needs to be sealed then there is no problem.


