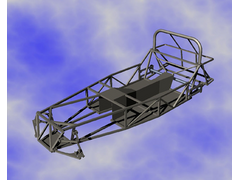
 ) So i
thought i would share the new one again (Im not trying to get my post count up
  ).
). Let me know what you think, and if anybody else is working on the 3D models it would be good to see them.
Cheers


Rescued attachment 3d Chassis postable.jpg

A while ago I posted my 3D CAD drawing I had done of the chassis. Now it is finished (until i can work out how to add in a couple of bits  ) So i
thought i would share the new one again (Im not trying to get my post count up
  ).
).
Let me know what you think, and if anybody else is working on the 3D models it would be good to see them.
Cheers 


Rescued attachment 3d Chassis postable.jpg
The front of the gearbox tunnel looks a bit weak. I think it needs the two struts between the front of the floor and the battery shelf to finish off
the triangulation in that area after the middle of the bottom rail has been cut out.
yours, Pete.
Also to increase strength at the front stick an extra triangulation in between the FU bars from next to the bottom front wishbone mount to above the top rear wishbones mount.
Thanks guys  like i say I know there are some bits missing, like some triangulation at the front. Unfortunately i cant work out how to create the
workplane to put them in at the moment
Will sort it 
Cheers
Wot software are you using??
In Solidworks, you can create a plane at an angle to a line on an existing one, do a cross section sketch on the plane, and then extrude it up. Create
some more planes at the ends of the tube, and chamfer it!
Sorted.
Ed.
P.S. it gets a bit trickier to make chamfer planes at the ends of round tube, cos there isnt a planar edge to relate the new plane to. A tangential
relation might do the trick??
Of course, if youre not using solidworks, this probably makes no sense at all.
Thanks Ed
Right i think i have got that figured 
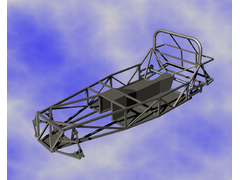
See new pic  have put in more triangulation at the front, and the uprights around the trans tunnel.
Cheers
[Edited on 17/2/04 by flak monkey]


Rescued attachment 3d Chassis postable.jpg
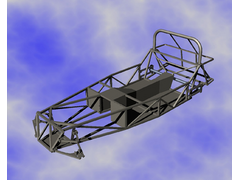
looks nice david! you could further strengthen the end of the foot well by welding steel sheets onto the end, the passanger one wouldnt need any holes
so this is quite easy, and the o/s would only need a few for the controls to go thru. should stop a lot of possible flex though.
Thanks Joel  I have seen several (well ok most) people have welded in plates, stops all the crap coming into the car too!
Right...now I've just got to make the damn thing...easier said than done at the moment!
Cheers for the advice 


Rescued attachment 3d Chassis postable.jpg