Any duratec Strikers out there?
R1 STRIKER - 17/2/13 at 07:11 PM
Has anyone built a duratec striker yet? I know there are a few fury's but I'm trying to work out if the bonnet will clear and what i may
need in the way of shortened sump and rocker cover if I went this route.
Many thanks.
Ben.
perksy - 17/2/13 at 07:28 PM
iirc there was a lad called Darren Cudd who was building one ?
He used to have a big horsepower cossie in a Westfield and then sold that and started building the Striker with a nice spec Duratech.
Also thought Mel at RAW had built a Striker with a big horsepower Duratech in it as a development car and it was at one of the shows ?
It was in a Black bodied Striker iirc
INDY BIRD - 17/2/13 at 08:03 PM
Link
http://home2.btconnect.com/rawstrikernorth/strikernoble.html
Looks like the bonnet has been made different to accommodate the engine,
Higher and squarer edges,
Member seeing this car at the show awesome kind of made me like the strikers hence why I have one now,
Mines better of course 
Cheers
Sean
Ps got a k series in mine fits fine if you use as I have direct to head throttle bides this saves alot of room,
R1 STRIKER - 17/2/13 at 08:22 PM
Thanks guys. I have seen the black car you are talking about. It was built by raw north, not Mel and also had a huge bonnet which i would like to
avoid. I know Martin at Raw did build a s2000 car but it was very tall and a lot of work. There current preference is for super charged zetecs but
I'm not a fan of the zetec.
If the duratec isn't going to work, any other ideas? Looking for something capable of at least 200 bhp and lighter the better. Quite happy to
give something different a go. So far i've had 4age, r1 and ford sigma.
perksy - 17/2/13 at 09:36 PM
ZZR 1400 or Tuned Busa ?
Remember having a chat with Mel and he said the Vauxhall XE will fit, Although i'm biased 
To be fair the Duratech is pretty light though, but i'm not too sure how tall it is ?
R1 STRIKER - 17/2/13 at 10:11 PM
It's a hard choice!
I've just managed to put a few pics of my old striker in my archive (only taken 6 years!). Can't work out how to put them in a post yet! It
started life with a 4age before the r1.
snapper - 18/2/13 at 07:21 AM
Looks like the supercharger gubbins sticks up higher than the rocker covers
This quote from the web site worried me though
quote:
Fondling Rob by appointment only
clanger - 18/2/13 at 08:09 AM
I'm building one, it will fit............will try and get some pictures up for you...
I've completely stripped mine down and rebuilt from chassis up. Had to make a few mods on the chassis to get it where I wanted it, but
there's plenty of headroom under the standard bonnet for it (well 5mm anyways......)
I took the opportunity to upgrade to the new look scuttle at the same time, the bonnet is the same height as the old version. any other info you need
just give me a shout
[Edited on 18/2/13 by clanger]
clanger - 18/2/13 at 10:19 AM
a few for you..............
gimme a shout if you need anymore?


R1 STRIKER - 18/2/13 at 07:15 PM
Thanks for the pictures. looks good. I see it needed a little work around drivers footwell. which bellhousing and box are you using?
clanger - 19/2/13 at 06:59 AM
yeah had to take a small 5-8mm section of the footwell back a tad, does not affect the inside where the clutch is. I wanted to get it as far back as
possible. you could technically leave it and not bother with the footwell mod, but there's a possiblity of the fuel rail catching on the part
where the bonnet dips down to the nose cone and whatever induction setup up you chose. wnat to get mine all under the bonnet with no ugly cut-outs so
chose that way to do it.....
bell housing was from rallydesign
gav2612 - 8/12/15 at 10:20 PM
Thread revival. I'm doing similar, but mating the duratec to an mx5 mk3 box. The gerarbox fits well into the tunnell,but I could do with getting
the bellhousing back another inch or so if possible. When you cut the notch out of the drivers footwell upright, did you just weld a patch in it to
retain strength? I Was thinking about notching out both the driver and passengers side patching them and welding in another upright behind them to
support. Not sure if that's overkill? Also not sure if I could just get away with removing the passenger side upright and welding another back in
40 or 50mm further out or if that would mess up how the loads are transferred through the frame. an extra 20 to 30mm clearance each side would make a
huge difference
peter030371 - 29/12/15 at 10:03 PM
quote:
Originally posted by gav2612
Thread revival. I'm doing similar, but mating the duratec to an mx5 mk3 box. The gerarbox fits well into the tunnell,but I could do with getting
the bellhousing back another inch or so if possible. When you cut the notch out of the drivers footwell upright, did you just weld a patch in it to
retain strength? I Was thinking about notching out both the driver and passengers side patching them and welding in another upright behind them to
support. Not sure if that's overkill? Also not sure if I could just get away with removing the passenger side upright and welding another back in
40 or 50mm further out or if that would mess up how the loads are transferred through the frame. an extra 20 to 30mm clearance each side would make a
huge difference
I have got clangers car/chassis now. I will try and get a picture of that mod and post it up for you next week. The car is still not finished yet but
1) I am fussy and 2) I have a business to run so little or no spare time!
gav2612 - 30/12/15 at 10:42 AM
That'd be great thanks
Gavin
peter030371 - 30/12/15 at 03:59 PM
Not with the car at the minute but this shows the cutout


Footwell cut
I can get some more pictures next week without the engine if you want?
CosKev3 - 30/12/15 at 05:10 PM
quote:
Originally posted by peter030371
quote:
Originally posted by gav2612
Thread revival. I'm doing similar, but mating the duratec to an mx5 mk3 box. The gerarbox fits well into the tunnell,but I could do with getting
the bellhousing back another inch or so if possible. When you cut the notch out of the drivers footwell upright, did you just weld a patch in it to
retain strength? I Was thinking about notching out both the driver and passengers side patching them and welding in another upright behind them to
support. Not sure if that's overkill? Also not sure if I could just get away with removing the passenger side upright and welding another back in
40 or 50mm further out or if that would mess up how the loads are transferred through the frame. an extra 20 to 30mm clearance each side would make a
huge difference
I have got clangers car/chassis now. I will try and get a picture of that mod and post it up for you next week. The car is still not finished yet but
1) I am fussy and 2) I have a business to run so little or no spare time!
Very nice car that will be 
I viewed it and sent him a deposit,he changed his mind the next day and refunded it 
When did you buy it?
peter030371 - 30/12/15 at 07:11 PM
quote:
Originally posted by CosKev3
Very nice car that will be 
I viewed it and sent him a deposit,he changed his mind the next day and refunded it 
When did you buy it?
I have had it a couple of years now. Lots came with it but whenever I spot a bargain I grab it and I have added to the original parts.....from
memory;
quick rack
fully rebuilt quaife diff with new CWP and seals
Omex ECU with Duratec loom
Dash2 Pro with link to ECU and GPS option
BGH heavy duty, low ratio gearbox
Hi-spec rear calipers
13" Team Dynamic wheels plus Toyo R888 tyres
Quick release steering wheel with electrical connection for the 8 wheel mounted buttons
LED rear lights
Procomp shocks
Carbon mirrors
lightweight flywheel and ARP bolts
Raceline short sump
lighter/ black powder coated timing cover
Cosworth throttle bodies with carbon intakes and filter back plate
Tiny alternator and stuff for fitting it on the intake side
Its cost over twice the original price but my last Striker I kept for 18 years 5 months and 30 days (sorry I don't know the hours and minutes) so
to me its a good investment 
So far the aluminium paneling is complete and then I changed some to carbon (see below) which I am half way through cutting/ fitting. All the
suspension is on and she will roll around on her wheels if I put them back on. The brakes are all fitted and fully bleed..originally I fitted sierra
rear calipers but the hi-spec ones came up at a good price so the fully refurbed sierra ones came back off and the new ones went on before she had
ever used them!
From the rear bulkhead back is finished, all plumbing including fuel pumps, filters tank and all wiring comes forward to under the dash and is tested.
Over the next few months I will get the carbon tunnel sides and tops fitted (well ready to rivet in once the prop is in), seats and belts in and then
crack on with the loom. Other than for the engine I will make the loom from scratch to link up my stop/start system, auto cancel indicators and fancy
steering wheel 
My wife, as and when she gets time, has cleaned the engine and given it a look over. It looked 'OK' without taking the head off so she has
fitted the sump, flywheel and timing cover (once the car is up and running we will plan an all new Duratec engine build and swap that in later). Now
we can fit the other bits and bobs to it, get the clutch and gearbox on and then once I have finished the loom around the engine bay drop the engine
in....then it gets close to starting her up 
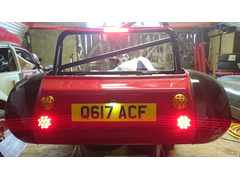
Complete rear end all 'lit' up like a Christmas tree


back side
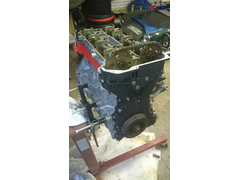
Clean engine with sump and new timing cover, we have an alloy cam cover (another ebay buy) to modify the oil filling point to fit under the bonnet as
I suspect it will touch by a few mm, then we will get that cleaned and painted to match the timing cover.


Engine1
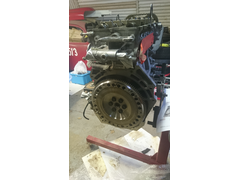
Flywheel, very sexy pity it will soon be hidden from view!


Engine2
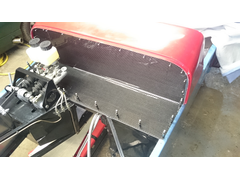
Some of my tarty carbon panels, now doing the tunnel sides and top to match. Just noticed, this picture shows the cutout on the drivers foot-well for
the bell housing/ bolts to fit into.


Tarty Carbon
The kit was a great starting point but nothing is a standard fit and everything has to be modified to fit hence it is taking so long. I am refusing to
give a finish date. The car is a 20-30 minute drive from home so just doing half an hour every evening has never been a possibility really. I am
enjoying the build so it will be done when its done 
[Edited on 30/12/15 by peter030371]
CosKev3 - 30/12/15 at 07:18 PM
Looking good.
Lynsey had done a lot of nice little mods to the chassis from what I remember 
gav2612 - 4/1/16 at 09:37 AM
Thanks for the Pics, Really useful. Good luck with the build
peter030371 - 4/1/16 at 01:39 PM
quote:
Originally posted by gav2612
Thanks for the Pics, Really useful. Good luck with the build
If you need any more just shout....I have hundreds and the car is still a long way from being finished!


