Winston Todge
|
| posted on 17/2/06 at 12:13 PM |

|
|
Yeah, having Marc Nordon on hand would certainly help building a Marc Nordon Racecar... 
|
|
|
|
|
amalyos
|
| posted on 22/2/06 at 03:43 PM |
|
|
Its gone very quiet, I assume everyones busy building
Just fitted the body, it actually looks like a car now
 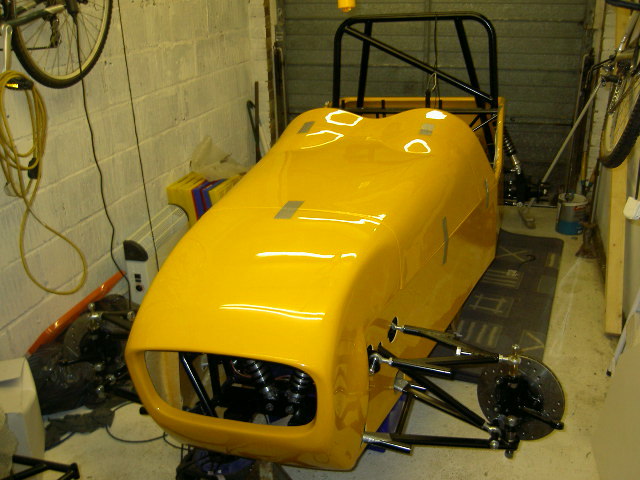
Rescued attachment PICT1488.JPG
|
|
|
olv
|
| posted on 22/2/06 at 05:07 PM |
|
|
looking good.
extremely useful thread this
|
|
|
Winston Todge
|
| posted on 22/2/06 at 06:21 PM |
|
|
Looks great amalyos!
At what stage did you put the bodywork on? After loom, lines and pedal box?
Also did you find it hard to line up the nose, bonnet and scuttle?
Did you sikaflex the body down to the chassis?
Ta mate,
Chris.
P.S. The chassis and tub are finally making their way down to Bristol on Saturday! Woohoo! Finally finished the garage last night and ready to start
abuildin'!
|
|
|
RichieC
|
| posted on 22/2/06 at 06:30 PM |
|
|
Looks like in just about exactly the same state as mine Amalyos.
Re bodywork Chris, you need to fit it after loom, lines but before you fit any suspension.
It was around 3 days work before I was ready for bodywork, including things like pedal box, scuttle cover, interior panels handbrake etc.
Lining it all up is easy enough. Obviously you need to copy the shape of the nose cone onto the front of the side panels then its a case of lying
the bonnet and scuttle on (lined up with the kink in the side panels) to check the gaps.
Sounds like theres a few of us at the same stage at the mo, youre all going to pull away now though as Im out of the country for 2 months as of next
weekend 
Rgds
Richie
Edited to add, I am not going to Sikaflex the bodywork on, nor does Marc reccomend it. A few rivets are more than adequate and allows for easy
removal if you so desire, Sikaflex all but precludes this as its a horror to get off.
[Edited on 22/2/06 by RichieC]
|
|
|
Winston Todge
|
| posted on 22/2/06 at 07:03 PM |
|
|
That's a coincidence Richie! I was just reading your diary about the bodywork fitment.
Sad to hear about you leaving the country for a few months. But atleast you'll return with a poo load of enthusiasm to finish the build!
Interesting about the Sikaflexing. Always curious as to what happened if you wanted to remove it!
Ta, Chris.
P.S. Maybe I'll have caught up with you by the time you get back!
|
|
|
RichieC
|
| posted on 22/2/06 at 07:13 PM |
|
|
Hope it all makes sense
If you feel you need some extra security for the bodywork, use silicone. It comes off dead easy but will achieve a similar effect to Sikaflex. I
treat S/flex as a permanent adhesive.
Not had any time in the garage last 3 days, but Im about a days work away from my rolling, steerable, brakable chassis with bodywork aim within the 2
weeks I set out.
Having a week off work and all of the bits ready to go on was my greatest help.
Rich
[Edited on 22/2/06 by RichieC]
|
|
|
amalyos
|
| posted on 22/2/06 at 10:55 PM |
|
|
I wondered how you had progressed so quickly. I'm a bit stuck at the moment, as I have some 1/2" bolts missing
I need to give Marc and Chris a call tomorrow.
Steve.
|
|
|
Dillinger1977
|
| posted on 23/2/06 at 08:56 AM |
|
|
ive not bonded OR rivetted my body on yet.
the side/back panels are extremely snug around the back and dont move a bit.
the side parts are loose, but once you have the scuttle+nose+headlight bar rivnutted though it it , the top part is rigid. i think it'll only
need a rivet through the bottom front to stop that part moving about.
-Rog
|
|
|
Agriv8
|
| posted on 23/2/06 at 11:43 AM |
|
|
I have just placed 2 rivets in the bottom of the tub onto the bottom rail to stop the sides flapping. probably add 2 more next time the car is
elivated.
Probably need a couple at the rear as mine moves a little.
Personally I would use as few as you can get away with the nature of the one peice tub is to hold itself in place rather than the three peice design.
A little felx may be a good thing as to will let the chassis bodywork move while it expands / contracts as every material does.
Agriv8
Taller than your average Guy !
Management is like a tree of monkeys. - Those at the top look down and see a tree full of smiling faces. BUT Those at the bottom look up and see a
tree full of a*seholes .............

|
|
|
Winston Todge
|
| posted on 23/2/06 at 12:55 PM |
|
|
Another good tip from you lot! Thanks.
Just curious as to whether anyone has had problems with flapping body panels or resonance when driving?
Resonance, in the sense that with no silicone or sikaflex or a rivet every 6 inches, wouldn't the panel resonate against the chassis at certain
speeds or revs?
Or is this negligible due to other louder noises like wind around your helmet, or sock filters on air intakes ( I won't start that debate up
again! ), or 'not for road use' cans, or screaming passengers...
Chris.
|
|
|
smart51
|
| posted on 24/2/06 at 05:13 PM |
|
|
Another tip for vortx builders
I've been having problems with my clutch pedal sticking sometimes. It would either stick open or closed but a good tap with the left foot would
free it. Every time I looked, there was nothing wrong with it. I found it today. The bottom of the clutch pedal comes within 2 or 3 millimetres of
the floor. There was a small stone that would sometimes catch between the floor and the pedal.
For those building a BEC, you want the clutch cable to be as close to the pivot as possible to get a reasonable pedal movement over the biting range.
cut a bit off the bottom of the pedal. You don't need it.
|
|
|
Winston Todge
|
| posted on 4/4/06 at 12:06 PM |
|
|
Just another one on the pedal box front. The spherical bearing that the balance bar pivots on must be able to slide from left to right within the
mounting tube in the brake pedal. This usually requires a little filing of the powdercoating. This allows the pivot of the balance bar to change and
hence allow the front to rear bias to alter also.
Marc passed this one on and was also mentioned on another thread recently.
Another couple of fairly obvious ones are to notch the interior panels before fitting the scuttle bulkhead and the main bodywork to aid with
access.
And also to fit the brake lines and fuel lines with enough space to fit the tunnel alloy panels in comfortably. (i.e. Don't mount the P-clips
right next to the chassis member running along the floor. Leave a few mil in which to fit the panels.)
Some other tips that I've come across have been to tap the chassis for mounting points on the three and four way brake line adapters. The thread
is three to four deep so will easily take a bolt to a fair torque. It also saves on those rivnuts... Eventually they can work loose over time (in a
solid engine mounted BEC!) and then it's a right faff to replace.
I also reckon that a flexible attachment to a power drill would be invaluable to drilling holes in the hard to get at places!
One other thing I have noticed is that when I pushed the tank hard enough forwards (from the back) you could actually make it slip with the straps
that are mentioned in the build manual. I ended up mounting mine in the same way but tight up against the two chassis members where the tank can
touch. I put some thick rubber in between the chassis members and the tank and the tank is now very solidly mounted. And it will also aid in the
fitment of the rear bodywork without interference from the rear of the tank.
I'm sure more will come out of the woodwork as I progress with the build!
Chris.
[Edited on 4-4-06 by Winston Todge]
|
|
|
Winston Todge
|
| posted on 17/5/12 at 10:21 PM |
|
|
Crikey... How things change... Almost seems like I enjoyed the building bit more than the driving!......
Not quite... 
|
|
|


