andrew-theasby
|
| posted on 6/12/07 at 12:22 AM |

|
|
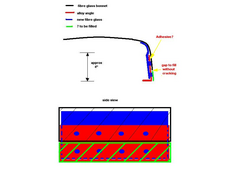
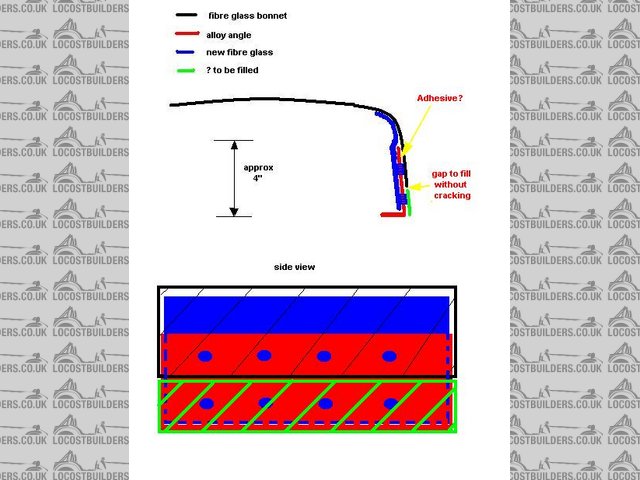
fibre glass to alloy joint. help please
Hi, im planning on extending my bonnet shortly to get rid of the trademark tiger gap, and give a bit more engine clearance. What i propose is to
extend it with an alloy L section bonded on the inside then overlap on the inside with fibre glass cloth. The alloy will have 1"ish holes in it
to create a f/glass to f/glass bond too, and also to stop the joint being in a straight line to help prevent it cracking. This then leaves a roughly
2" section on the outside to be built up, which i arent too sure about, but best i can think of is to fill with glass cloth (or matt) then sand
back to profile, but open to ideas. the car will be painted when its finished, but obviously i want to minimize the chance of cracks ever
appearing.
My questions are:-
1 What to bond the alloy to f/glass with? Seen a few flexible adhesives in b+q that boast good properties such as shock bond, or what about tiger seal
or even araldite(too brittle?)?
2 should the bottom edge of the existing bonnet be cut in a wavey line, to stop flexing cracking it (bit like a dovetail rather than a straight butt
joint)
3 Is there a better way to fill the area on the outside, and if f/glass is the best, should it stop dead at the bottom or curl under with the ally?
Hope you can understand from my diagrams, any comments welcomed as i dont have a great deal of fibreglassing experience myself, and it will be ruined
if it does crack! Thanks in advance...
Rescued attachment bonnet section3.JPG
|
|
|
|
|
Ivan
|
| posted on 6/12/07 at 05:31 AM |
|
|
I'm also no expert but what I would do is use some smooth plastic or something similar clamped to the edge of the bonnet to make a mould then
just lay fiberglass with gel coat against it to the right width of course with a n overlap of about 100mm..
Once its set, remove the mould, and at the joint grind back a strip about 50mmwide and 1,5 mm deep and use fibre glass tape to fill then smooth off
with body filler.
|
|
|
RazMan
|
| posted on 6/12/07 at 07:43 AM |
|
|
The best way is to extend the fibreglass as Ivan explained, forming a 90 degree bend using a bit of ally angle as a former.
If you decide to graft on some ally then PU adhesive is definitely the best imo. Strong and slightly flexible so it wont crack. Wurth windscreen
adhesive is probably what I would go for - there's nothing stronger for this type of bond.
Another idea is to use the TVR method of design - if you can't hide it, make a feature of it. You could paint the ally strip or even polish
it.
[Edited on 6-12-07 by RazMan]
Cheers,
Raz
When thinking outside the box doesn't work any more, it's time to build a new box
|
|
|
2b_pablo
|
| posted on 6/12/07 at 08:31 AM |
|
|
I use tigerseal, its a sikaflex type adhesive should do the job nicely.
a couple of sneaky rivets too maybe?
|
|
|
twybrow
|
| posted on 6/12/07 at 08:56 AM |
|
|
I would approach it somewhat differently, but you would need to get hold of the same gelcoat as your bonnet is currently in. The idea is as
follows:
Roughly mark up where you want to cut the bonnet (the simplest least curved area as possible). Cut the bonnet ensuring you are able to align
everything up to make it square again. Ideally, you would then chamfer all along the two cut edges, to ensure your repair is seamless in the end. Then
you attach a flexible but smooth skin (this could be as simp,e as masking tape, or a gloss finished hardboard sheet, having already applied mould
release to it) on the outside of the gelcoat, to attach the two halves together. You would attach them with some self tappers or even a few bolts.
This will then give you a smooth surface to layup onto. Apply your gel coat to the smooth surface you just attached. Once fully gelled, you layup the
glass onthe back of the gel, ensuring you have a good 1 1/2" overlap onto the original bonnet glass. Then once fully cured, remove the
bolts/self tappers and take the board off. You then just flatten back the join line and fill the bolt holes with gel/glass. I hope thsi makes
sense!
I ahev used this technique on everything from very small mouldings, to large yacht parts with great success.
[Edited on 6/12/07 by twybrow]
|
|
|
onzarob
|
| posted on 6/12/07 at 12:37 PM |
|
|
I think this photo is what twybrow has just explained.
pics form this site http://www.avon-kitcar.co.uk/


|
|
|
Mr Whippy
|
| posted on 6/12/07 at 12:46 PM |
|
|
or as I did here -
http://locostbuilders.co.uk/viewthread.php?tid=62375
Fame is when your old car is plastered all over the internet
|
|
|
twybrow
|
| posted on 6/12/07 at 12:51 PM |
|
|
Exactly - spot on. It works well. I would avoid bonding alloy extensions into my bodywork if possible. Stick with the brush and bucket and you cant go
wrong!
|
|
|
Humbug
|
| posted on 6/12/07 at 01:36 PM |
|
|
Simpler, and avoiding bonding only, would be to bond and rivet/bolt an ali U section to the sides of the bonnet. If you wanted to make all the other
body sections match, you could then do the same for the sides of the scuttle and the sides of the nose cone.
|
|
|
Ivan
|
| posted on 6/12/07 at 08:06 PM |
|
|
Oops -sorry - misread the thread - thought he wanted full flat underbody.
Ok next comment - why bother with just the back when the front is where lift is the problem at speed - by doing the back won't you just compound
the front lift problem?
|
|
|
andrew-theasby
|
| posted on 7/12/07 at 12:42 AM |
|
|
Thanks for all those tips. I should have said though, i cant cut the bonnet to extend it, for some reason mine doesnt curl underneath, which is why i
thought of the ally. Would it be worth me laying up some glass on the ally as a mould, then using the above method? Would matt or cloth be best? Is
gelcoat a good filler for smoothing it off afterwards? And is there any particular release agent to get? Thanks again  Ps, im planning to join
the nose to the bonnet too, so it will be a long joint, should i still go with the wavey edge to avoid it cracking? Ps, im planning to join
the nose to the bonnet too, so it will be a long joint, should i still go with the wavey edge to avoid it cracking?
|
|
|
andrew-theasby
|
| posted on 7/12/07 at 12:50 AM |
|
|
Sorry, just re-read your post razman suggesting forming a fibre glass angle first!
|
|
|
twybrow
|
| posted on 7/12/07 at 04:56 PM |
|
|
Ok no lip - I got ya. Put then alu angle on as a former and use the standard method. Ie make any extension and angle section up, then attach as
previously said and layup.
Chop Strand Mtt (CSM) would do just fine - that is what all are bits are made from as standard. I would go for 300 or 450 g/m2 and use wax as its
cheaper than other alternatives.
Gelcoat can be used as a filler, but it would be brittle. Also it an be hard to get it to go where you want without adding some sort of filler
material. If it is a small gap (less than say 5mm) you could get away with it no problem.
|
|
|
andrew-theasby
|
| posted on 8/12/07 at 11:14 PM |
|
|
What should i use as a filler afterwards then? Thanks
|
|
|