TIG welds
cassidym - 13/10/04 at 10:50 PM
Hello All,
Have'nt yet started on my chassis, still playing around with TIG welding.
After about 10 hours of practice, cosmetically my TIG beads look OK but could be much better.
I've come to the point where at least I can make welds with no contamination.
Upon dissection it seems that I get 100% penetration.
My questions;
a. What else beside penetration should I look out for? I'm a bit worried about bead uniformity on the inside of the tube. Sometimes my beads on
the inside have a lot of bumps inidcating that my speed and dipping technique need some practicing.
b. Is it OK if I reweld the bead on top again at lower amps to smoothen it out or add filler to remove undercut sections.
c. Is it OK if I grind the weld on top smooth to improve appearance.
d. Standard recommendation is to fully tack the chassis first, then weld. This worries me coz as you know TIG needs to be superclean and the tacked
sections may get some dirt. What can I use to seal the tacked sections, that is also easy to clean when the time comes to fully weld it. After tacking
a section can I weld it very very low amps to seal the weld area so that no contaminants can get to it and then coat it with a polyurethane filler?
Then afterwards clean and reweld it fully.
e. Oh yes, what is the recommended amps to weld the 1.6mm tubing? I'm practicing on 2mm and find that 70 Amps is good and I think even 60 will
do.
Thanx for any helpful hints and suggestions.
blueshift - 13/10/04 at 11:44 PM
Wow. Bags I first comment, which is it sounds like your welding is already easily at a sufficient standard to begin welding your chassis. maybe
double-check your penetration when it's time to do the wishbones, but most people bang away with MIG, almost certainly do a much worse job than
you are at the moment (me included) and as I understand it the experienced welders on here would say that's quite sufficient for the chassis.
*takes a breath*
type 907 - 14/10/04 at 12:02 AM
Hi,
IMHO it's best to back the weld with argon.
It really does make a world of difference.
Paul G
cassidym - 14/10/04 at 09:10 AM
Thanx blueshift, I really value the compliment.
Paul, according to your opinion will there be a marked improvement if I back purge? AFAIK it is not necessary to back purge mild steel. I'll have
to get myself a dual flow meter then - does the extra expense justify the end result? Still have to pay for the remote - funds very very low at this
time.
type 907 - 14/10/04 at 07:59 PM
Hi Cassidym,
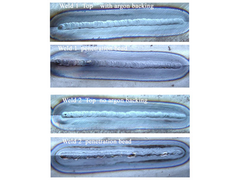
Since "a picture paints a thousand words"
I poped out to garage tonight and ran off a couple
of welds to illistrate the benifit of
argon on the back of a weld, IMHO of course.
They are butts in 1 mm mild steel sheet.
Tig was set at 38 amps for both welds.
The joint was tacked & clamped 5 mm above a
thicker piece of plate, and for
weld 1 the gap filled with argon at 6 lt/min
For weld 2 no backing gas was used.
It is noticable in the bottom pic (unbacked)
that as the weld progresses from right to left, the oxygen is used up
(forming an oxide scale) and the appearance of the penetration bead improves.
What I can't show in a picture is how
much better the molten metal flows when
backing gas is used.
I will let you draw your own conclusions.
Paul G
[Edited on 14/10/04 by type 907]


Rescued attachment argon backing s.jpg
cassidym - 14/10/04 at 09:39 PM
Paul, thanx for the trouble you've gone thro. I'm sold. I'll wait till I can afford a dual flow meter for back purging before I
start.
Give me more time to practice anyways + I eventually plan to ove to stainless so I'll need to purge.
Damn, just wish my beads looked as good as yours.


