jps
|
| posted on 15/12/20 at 09:07 AM |

|
|
Handbrake adjuster / equaliser
I've been trying to work out the fitting for my Sierra handbrake cable into my Haynes.
I had been expecting to fit it like this
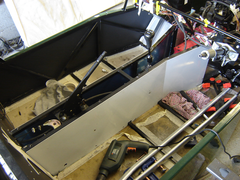 
handbrake details 123
But my handbrake lever is a bit further back, and so I think i'll be a bit short on space to use the cresent moon shaped equaliser AND have
space to re-join the handbrake cable using clamps as above.
It seems a simple solution will be to replace the current equaliser with something more like this:
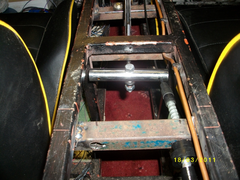 
Handbrake2
With a drilled bolt securing the ends of the inner cables to the equaliser - along these lines:
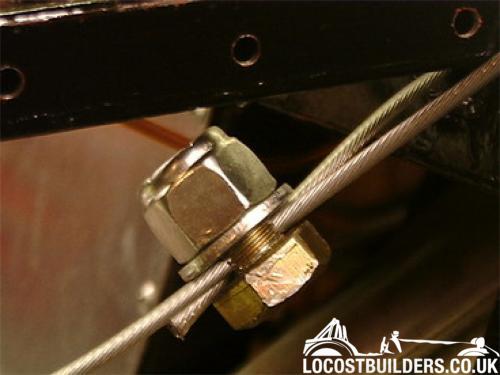
Will it still be acceptable to have the original Sierra tension adjuster on a single side - or will I be left fiddling about adjusting the individual
cable tension where the cables meet the equaliser?
|
|
|
|
|
Mr Whippy
|
| posted on 15/12/20 at 09:18 AM |

|
|
Firstly, have you tried sitting in the car (in the seats) and using the handbrake? On my car the handbrake was so far back I would have had to
dislocate my shoulder just to operate it. It needs to be almost up to the gearlever.
As for your adjuster, simply replace the rod coming from the Sierra handbrake with a new one. It is very easy to make, just a steel rod hammered flat
at the ends (blow torch helps) with two holes drilled, then you can use the standard Sierra equaliser quadrant thing. This is what I did and it was so
easy and the handbrake cable is kept completely standard.
|
|
|
jps
|
| posted on 15/12/20 at 10:46 AM |

|
|
quote:
Originally posted by Mr Whippy
Firstly, have you tried sitting in the car (in the seats) and using the handbrake? On my car the handbrake was so far back I would have had to
dislocate my shoulder just to operate it. It needs to be almost up to the gearlever.
As for your adjuster, simply replace the rod coming from the Sierra handbrake with a new one. It is very easy to make, just a steel rod hammered flat
at the ends (blow torch helps) with two holes drilled, then you can use the standard Sierra equaliser quadrant thing. This is what I did and it was so
easy and the handbrake cable is kept completely standard.
Yes, it's workable and placed to be 'out of the way' so a bit of a reach, but useable.
Good point, not sure why I had dismissed your solution as an option... The link bar between the handbrake and the quadrant seems to be secured to the
handbrake lever by some kind of rivet. Before I drill it out, is there any other way to get that fixing out?
|
|
|
Mr Whippy
|
| posted on 15/12/20 at 10:59 AM |

|
|
I just drilled it out and replaced it with a bolt and nylock. Also use a piece of angle to hold the Sierra cable adjusters rather than square tube as
in the picture. That way you only need two holes with a slots to hold them and no need to cut the cable.
[Edited on 15/12/20 by Mr Whippy]
|
|
|
nick205
|
| posted on 15/12/20 at 11:00 AM |

|
|
jps
The 3rd image in your first post (cables through a drilled set screw + nut) is mine from my MK Indy. I used the Sierra handbrake lever and half moon
arrangement. I didn't the drilled set screw + nut was simply my way of securing the cut ends of the inner cables together from bits I had
available. It also took up minimal space in the tunnel and cleared the prop shaft. I drilled the set screw myself using my pillar drill. It was
free apart from my time spent.
On reflection the handbrake lever was right in the way of the drivers left elbow, which ended up quite annoying. If building again I might try and
figure out another handrake solution to leave the tunnel top clear for that improved driver comfort.
|
|
|
JAG
|
| posted on 15/12/20 at 11:09 AM |

|
|
OR you could move the handbrake lever and make it easier to fit, easier to accommodate the longer standard cables and easier to operate when driving
etc...
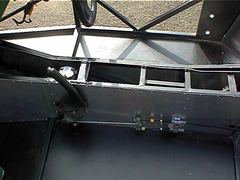 
My handbrake lever installation, non-standard.
This is my car and the handbrake lever is next to the gearstick.
Justin
Who is this super hero? Sarge? ...No.
Rosemary, the telephone operator? ...No.
Penry, the mild-mannered janitor? ...Could be!
|
|
|
jps
|
| posted on 15/12/20 at 11:16 AM |

|
|
quote:
Originally posted by Mr Whippy
use a piece of angle to hold the Sierra cable adjusters rather than square tube as in the picture. That way you only need two holes with a slots to
hold them and no need to cut the cable.
[Edited on 15/12/20 by Mr Whippy]
It's a simple flat plate in my chassis, but I will still have to cut the cable as the standard Sierra one I have is too long. I think i'll
still slot the holes, just to make setting it all up easier, before I cut the cable.
I have seen the replacement ends, for disc calipers, which MK and others do - but don't fancy paying £15 for one when I can use the cheap bolt
solution Nick used!
|
|
|
peter030371
|
| posted on 15/12/20 at 11:30 AM |

|
|
All Sylva designed cars (I think its all of them) are like this for a reason 
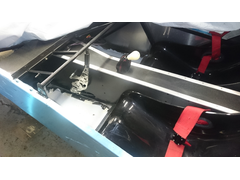 
Tunnel sides
Totally out the way and leaves the drivers elbow room to move about. Some do move it a little closer to the driver but that depends on seat choice and
position.
|
|
|
nick205
|
| posted on 15/12/20 at 03:37 PM |

|
|
quote:
Originally posted by peter030371
All Sylva designed cars (I think its all of them) are like this for a reason 
 
Tunnel sides
Totally out the way and leaves the drivers elbow room to move about. Some do move it a little closer to the driver but that depends on seat choice and
position.
I like that design approach - keeps the tunnel top clear and as you say, space for the driver's elbow!
|
|
|
jps
|
| posted on 15/12/20 at 05:21 PM |

|
|
quote:
Originally posted by peter030371
All Sylva designed cars (I think its all of them) are like this for a reason 
 
Tunnel sides
Totally out the way and leaves the drivers elbow room to move about. Some do move it a little closer to the driver but that depends on seat choice and
position.
I finally understand what people mean by 'handbrake lever under the dashboard' - I always pictured it in my mind as being horizontal -
like it was in the glovebox.
I'll add that development to the LONG list of things i'd do differently for the second car I build! For now I want to carry
on down the path i've started on!
|
|
|
nick205
|
| posted on 16/12/20 at 10:10 AM |

|
|
quote:
Originally posted by jps
quote:
Originally posted by peter030371
All Sylva designed cars (I think its all of them) are like this for a reason 
 
Tunnel sides
Totally out the way and leaves the drivers elbow room to move about. Some do move it a little closer to the driver but that depends on seat choice and
position.
I finally understand what people mean by 'handbrake lever under the dashboard' - I always pictured it in my mind as being horizontal -
like it was in the glovebox.
I'll add that development to the LONG list of things i'd do differently for the second car I build! For now I want to carry
on down the path i've started on!
jps - you have eactly the same thoughts as me! I also thought an "under dashboard handbrake" would be either horizontal or possibly a
pull handle (some tin tops had them years ago). Like me you seem to have a mental list of 2nd time build improvements you'd like to use. Like
me also you want to push ahead with what you're building without major alterations.
"Great minds think alike" - as they say 
|
|
|
jps
|
| posted on 16/12/20 at 12:33 PM |

|
|
quote:
Originally posted by nick205
Like me you seem to have a mental list of 2nd time build improvements you'd like to use. Like me also you want to push ahead with what
you're building without major alterations.
"Great minds think alike" - as they say 
Indeed Nick - finding time to work on my build is a challenge - life has got in the way of my build regularly, hence the slow progress and I sometimes
wish I had gone with a 'kit' like a GBS or similar rather than the Haynes, where it feels like there's so much more definition to
what needs to be done, and less problem solving. Given I haven't, i'd definitely trying to move to a 'good enough' approach -
rather than 'exactly as I'd have liked it...' !
|
|
|
nick205
|
| posted on 16/12/20 at 01:35 PM |

|
|
quote:
Originally posted by jps
quote:
Originally posted by nick205
Like me you seem to have a mental list of 2nd time build improvements you'd like to use. Like me also you want to push ahead with what
you're building without major alterations.
"Great minds think alike" - as they say 
Indeed Nick - finding time to work on my build is a challenge - life has got in the way of my build regularly, hence the slow progress and I sometimes
wish I had gone with a 'kit' like a GBS or similar rather than the Haynes, where it feels like there's so much more definition to
what needs to be done, and less problem solving. Given I haven't, i'd definitely trying to move to a 'good enough' approach -
rather than 'exactly as I'd have liked it...' !
Understand where you're coming from. I built an MK Indy kit, which was pretty well defined in terms of which bits to use and how to use them.
Scratch building, even with instructions, is the next level up.
|
|
|


