tofferson4
|
| posted on 4/5/09 at 11:11 PM |

|
|
irs welding
im am in the process of compleating the irs rear setup as per rorty, but i dont understand how to attach the joints and eyes.
once i have welded all the wish bone tubes do i weld in or just press fit
the ferules
[Edited on 5/5/09 by tofferson4]
|
|
|
|
|
James
|
| posted on 4/5/09 at 11:26 PM |

|
|
Bear in mind very few people have used these plans that I know of. So a few pics of what you're doing would be very helpful! 
Cheers,
James
------------------------------------------------------------------------------------------------------------
"The fight is won or lost far away from witnesses, behind the lines, in the gym and out there on the road, long before I dance under those lights."
- Muhammad Ali
|
|
|
tofferson4
|
| posted on 5/5/09 at 12:55 AM |

|
|
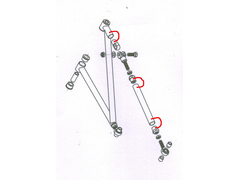
although my set up will be modified this pic shows what im trying to find out.
do the items linked by the red lines press or weld together and if they press together why is this.
 
Rescued attachment LastScan.jpg
|
|
|
Ninehigh
|
| posted on 5/5/09 at 01:13 AM |

|
|
I've no experience of this but that looks like part of the rear wishbone/suspension thingy to me (from the book afaik) and I'm doubtful
that they just press together. I may be wrong but if that's something that's holding the wheels on I'd weld it, unless it screws on
or locks in some other way..

|
|
|
Steve Hignett
|
| posted on 5/5/09 at 06:29 AM |

|
|
Those items you've described are the internally threaded part that accept the rosejoints, and they are usually welded into the tube. Do you have
those parts already? Should be pretty clear on how they go together if you lay them out in that diagram and look at it logically...
|
|
|
Richard Quinn
|
| posted on 5/5/09 at 06:35 AM |

|
|
I would say welded!
The bit in the middle looks a little unecessary to me. If your wishbones are there or thereabouts and your chassis is pretty much square I
would've thought that there would be enough adjustment just on the two rose joints on the outer end to get the toe correct. Ok, so you would
have to drop the bottom of the upright out to adjust toe but it is not something you should have to do every week. At least you do away with a few
more welds and mechanical joints which are potential weak points. All IMHO of course.
|
|
|
907
|
| posted on 5/5/09 at 06:43 AM |

|
|
100% agreement with Richard.
Screwing in or out both rod ends together will adjust camber, adjusting just one will set toe.
Paul G
|
|
|
mad-butcher
|
| posted on 5/5/09 at 08:08 AM |

|
|
I see why the back leg has 2 rose joints, if as richard and paul g say it is uneccesary , when the 2 rose joints were centralised that would be fine
but when you adjust the rear leg (lenghten it )it will go nearer the back of the rear bracket thus needing new spacers, where as with rorty's
design the rose joints will always be central in the brackets, well I know what I mean
tony
|
|
|
MikeRJ
|
| posted on 5/5/09 at 02:05 PM |

|
|
quote:
Originally posted by mad-butcher
I see why the back leg has 2 rose joints, if as richard and paul g say it is uneccesary , when the 2 rose joints were centralised that would be fine
but when you adjust the rear leg (lenghten it )it will go nearer the back of the rear bracket thus needing new spacers, where as with rorty's
design the rose joints will always be central in the brackets, well I know what I mean
tony
Yes I know what you mean. The design above gives a very "pure" engineering solution. Without the extra link in the wishbone you would
either have to use fine shims to pack up the clearance, or just wind it up and put some bending stress into the wishbone.
|
|
|
tofferson4
|
 posted on 5/5/09 at 07:03 PM posted on 5/5/09 at 07:03 PM |

|
|
thanks for the help and replys i will have to machine the parts my self so i think i will deffo weld it up just for Peace of Mind.
|
|
|
greggors84
|
| posted on 5/5/09 at 08:33 PM |

|
|
Also if you use 2 (1 R/H, 1 L/H) rod ends in the rear link you can have a fine adjustment instead of having to settle on 1/2 turns.
Chris
The Magnificent 7!
|
|
|


