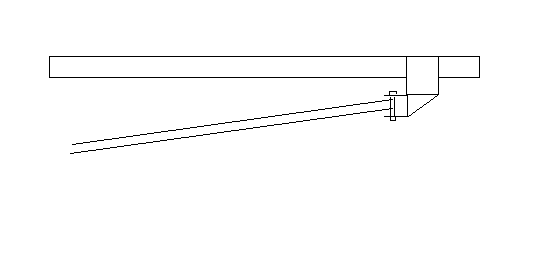
Is this the best orientation for the bracket for my panhard rod?
Pat...

Rescued attachment 1.JPG
Hi,
Is this the best orientation for the bracket for my panhard rod?
Pat...
Rescued attachment 1.JPG
Pic 2:.JPG)
IMHO, i believe so. The alternative would be to only have one side of the bracket welded on, and i can see nothing else to chose between the two ways (ie that way up or rotated 90 degrees).
ooeer Pat,  , think about how axle moves in relation to panhard rod....you might want to turn it 90degs (bracket)...
IMO you need to turn the bracket in your hand over 90 degrees, and put it next to the link bracket.
Fozzie
[Edited on 4/8/05 by Fozzie]
rod ends move ok in that direction too dont they fozzie?! surely the few degrees would be ok.
The misalignment angles of the rose joint are not sufficent to allow the axle to move through its complete travel. The biggest misalignment angles are
probably about 30 degs, but of course depends on the rose joints you have got. Best to check with manufacturers
HTH Fozzie
If mounted 90-degrees from shown you would have trouble installing the bolt. The bolt would have to go into the chassis tube! The hole would
probably not weaken the tube much, but how would you put the nut on?
Another orientation would be to leave the bolt axis as it is shown, but rotate the bracket with it's 'back' against the tube. This
doesn't change the function of the bracket, but it lets you do an 'outside' weld around the bracket rather than trying to weld around
the inside curve. Is this stronger or weaker I don't know. Seems easier though.
HTH
-Andy
Or I could just weld a bolt on like the Isonblade - that didn't break even after the crash!

Rescued attachment rearpanard.jpg
How about with the bracket welded at 90degrees (as per Fozzies said) and weld a nut to the inside of the bracket as well?
Pat...
Pat have you got Uncle Rons book (second edition)?...a lot of it is ...ahem...undesirable, but it will give you the idea on page 75 of how to position
it.
re the isonblade, the rose joint on that is positioned the right way round.
Fozzie
Hi,
Yep, I have the book...I think that is the bracket on a "tapped" thick plate??? - The shock mount looks shocking though!
If I do it like this pic, and tap the brackets behind the nut as well (6mm of plates and and a small air gap between the inside of the bracket and the
axle tube) that will be a nice fim fixing won't it?
Pat....JPG)
Yup Pat ya got it
Yes some of the work shown in the book is a bit...ahem...shocking, I got the book coz I wanted to build a Locost....and race it...lol. I put it away
very quickly..lol. But, it does explain in the picture which way round the bracket and rod should go!
ATB Fozzie
I knew you could use rose joints either orientation, but forgot how much the axle "may" move up and down, so not worth the risk and
it's not too hard to sort out this "new" way.
Just awaiting confirmation from Rorty and then I'll go forth and weld!
Thanks.
Pat...

Fozzie aka Foggie

Pat, you cannot use rose joints in either orientation, they are not designed to work that way!!!!!!!!!!!!!!!!!!!!!!!
Fozzie
ps with rose joint in yer hand, bolt with head in vice sticking upwards, place rose joint over bolt, now try lifting rose joint up and down...will it?
NO. Now spin it round (like helicopter blade) and it will go around 360 degrees how many times ya like! Thats the way its designed to
work!!!!!!!!!!!!!!!!!
[Edited on 4/8/05 by Fozzie]
quote:
Originally posted by Avoneer
Hi,
Yep, I have the book...I think that is the bracket on a "tapped" thick plate??? - The shock mount looks shocking though!
If I do it like this pic, and tap the brackets behind the nut as well (6mm of plates and and a small air gap between the inside of the bracket and the axle tube) that will be a nice fim fixing won't it?
Pat...
Thanks Mike, you have managed to draw this as I had tried to describe in the second posting.
Pat was refering (in your quote) to the book (Ron Chapmans), showing the correct positioning of bracket and rose joint.
Fozzie
Sorry I'm late (as if you were really waiting for me, Pat ).
I like the method illustrated in MikeRJ's sketch.
Rod ends can be made to operate at high angles 90 degrees to the bore's axis (I get 46 degrees out of them for steering), but it's much
simpler doing it the way that's been suggested.
Whilst I would never suggest the IsonBlade performs less than satisfactorily, mounting a rod end, on a lengthy spigot, on a thin-ish bit of sheet
metal, and in single shear, wouldn't be my way of guaranteeing a sound night's sleep.
quote:
Originally posted by Fozzie
ooeer Pat,
IMO you need to turn the bracket in your hand over 90 degrees, and put it next to the link bracket.
Fozzie
[Edited on 4/8/05 by Fozzie]
and cheers Mike for drawing what I said in the third post...memo to self......I must brush up on me computer drawing
skills! Sorry foggie, takes a bit for me to come round to a better way of thinking!
So if I move my bracket in towards the centre of the car to gusset the back of it (like Mike's pic), I'll still have a problem with the
nut.
Can I still weld a nut to the inside of the bracket as per my latest pic and gusset the back?
Pat...
If it was my car I would actually use the first method suggested with the rod end horizontal. This gives the better load paths, is easier to make and
allows you to have a panhard rod as long as possible.
However you must check you do not run out of travel on the joint, ie it does not bind.
Mounting the SRE on a post in single shear ia a bad idea.
Mounting the SRE as in the last picture is a good idea, it is just more complicated to make.
Sperical bearings can operate in any orientation, in certain orientations you have less movement.
Check out most top racing cars that use spherical bearings (such as a Gould hillclimber, you will not find anything bad about this car) and the
sphericals are mounted horizontal at the chassis end.
John
Hmmmm, well having been involved in preparing race cars for many years...and for Le Mans racing...I do have just a wee bit of experience in this....as
I have said before, you want to think of how the axle moves and how the rose joint moves, and then think of why you are putting it there. The
Isonblade as per picture (green springs) has the rose joint in the correct orientation. Yes it should be on a 'better' bracket, but I am not
going to criticize on that point, the isonblade is not the matter in question here.
Mikes drawing is spot on, the bracket has been made, you just have to turn it as described, and you will have to do a strengthening plate/gusset.
Uncle Rons book is not the best example of how to do things neatly, but the positioning is right.
Now I keep repeating myself.......I'll get me coat!..............................
Fozzie/Foggie
I Heard you Foggie
Pat...
Tee-hee-hee.....
Foggie..aka Fozzie
all i can add is that people have used rod ends in that orientation on race cars for years, and a panhard rod is going to involve less angular movement due to its greater length.
Ok,
Solution so far from the though pool provided:
1) Rear brackets as they are at the moment

Rescued attachment 1.JPG
2) Flat 3mm plate support for the shock bracket - curved to fit the profile of the axle tube and angled lower edge for maximum weld area. Note the
hole!

Rescued attachment 2.JPG
3) Panhard rod bracket which can be fully welded in place and a gusset added to the back to tie it to the trailing arm bracket. Bolt goes all the
way through and you can still get a nut on the inside. Although it is on a slight downward angle, the rose joint will more than cope with this.
[Edited on 5/8/05 by Avoneer]

Rescued attachment 3.JPG
How am I looking?
And yes Rorty, I really was waiting for your reply as I think you have a lot that people can learn from, even if they don't listen.
Pat...
Mine are the wrong way on then. They are set level and can only travel 3" which is well within their range. They've been alright for the
last 4 years so I'm not going to change them now. If you weld a piece of tube to the back of your axle mount then weld your bracket to the back
of it it would be much easier. The way you are showing there looks like a bodge Pat.

Rescued attachment hanger.jpg
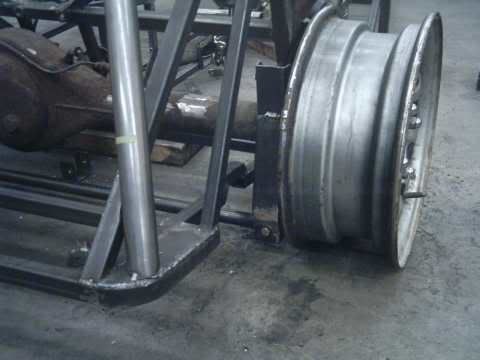
The bolt welded to the axle bracket is a good design, however it is never a good idea to have mounts in single shear, re-enforce the nut end with a small bracket.
Pat, your last photo, while providing a double shear bracket, is a bit messy IMHO. I think the pocket you are creating between the axle housing, the
radius rod bracket and now the Panhard rod bracket will be a dirt and moisture collector which could result in the threads rusting solid, What would
you do then? You'd probably have to cut stuff away to repair it.
I stand by what I said before; a double shear mount is always preferable to a single shear one, but in this case, I think, due to the difficulties of
successfully placing the nut, a single shear spigot would be the better solution.
Having said that, I don't recommend just hacking the head off a high tensile bolt and welding it onto the radius rod bracket. Welding the bolt on
would destroy the temper of the bolt, virtually reducing it to a much weaker bit of mild steel.
The second problem with just welding a bolt onto the rear of the bracket is that it could eventually flex the thin mild steel bracket enough to pull
the bolt and weld out.
A much better solution would be to make a mushroom shaped spigot from something like EN16T (or 4140) and weld that on. The large head would be a much
better load spreader, plus the size and mass of the head would keep the heat from the HAZ away from the all-important spigot and threads.
If you decide to go this route, don't forget to place a safety washer on the spigot before the lock nut goes on. This will prevent the rod end
from coming off over the spigot and nut in the event it separates from its race.

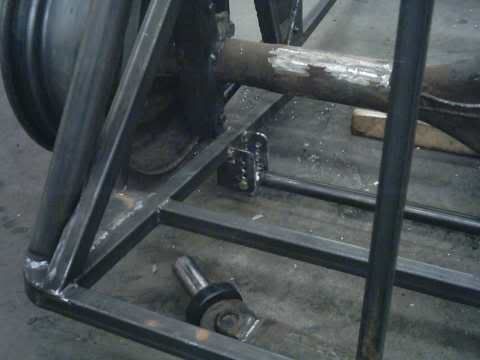
Rescued attachment Panhard_mount_01.jpg
For anyone that's interested, this is my take on a similar fitting for a DeDion set-up.

Rescued attachment DeDion_01.jpg
Damn it! I've been giving this quite a bit of thought. Pat, to go back to your first photo in this thread:
I like the simplicity of it, but it needs a little forethought prior to just welding it on.
Firstly, as can clearly be seen, some spacers will be required to properly position the rod end within the bracket. Do not use washers, because they
are seldom the correct thickness with the result that you will no doubt put some stress on the bracket when the nut and bolt are tightened. Also, the
washers are inherently flat and will foul the rod end when the axle moves up and down.
The ideal spacers for this scenario would be simple hollow cylinders of the correct length with a 30 degree bevel around one end.
The next quandary is the actual functionality of the rod end; in this orientation, will it cope with the angles involved with the travel of the axle?
The answer is probably yes, but it's necessary to confirm the rod end's angular limits. You can either get the info from the
manufacturer's catalogue or your supplier. Once that's established, you then need to define the axle's travel.
Let's say for the sake of this discussion that the axle has a total of 125mm of travel (comprised of 75mm of bump and 50mm of droop). You now
need to plot the arc that the axle end of your Panhard rod travels through for a total of 125mm of travel. If this angle is (well) within the
manufacturer's stated range for the rod end, then mounting the rod end in this way will actually work OK.
If the bump and droop figures were equal, then mounting the rod horizontally (as viewed from the rear) would put the rod end slap in the middle of its
travel zone and all would be well. However, as there will inevitably be more bump than droop, the bracket on the axle may need to be mounted slightly
above the horizontal to off set the higher angularity required for bump and keep the rod end within its range.
It's a simple task to plot the relative travel and angles on a sheet of paper to establish the position of the bracket mid-way in the rod
end's range.
NOTE: This may not be my final word on the matter!
Hi Rorty,
Thanks - a lot of information there for me to pnder on!
I'll get the speck of the rose joint - it's a good one (I think) with carbon fibre insert.
The other end of my panhard rod has the usual tube eye and poly bushes - could turn it round and use this end attached to the back of the axle?
I do prefer (due to the simplicity) the single shear option - I was thinking of welding another piece of 3mm plate right around the trailing arm
bracket from the front edge (over the top of the trailing arm eye) all the way back, down and across the bottom. Then a short, but thick boss welded
onto the 3mm plate and then drilled and tapped all the way through the boss, new 3mm plate and the 3mm trailing arm bracket. And then bolting the rose
joint onto the end of this boss with a big washer.
Not planning on racing the car if that makes any difference to the stresses it will be under - but saying that, shouldn't make any difference as
if it's good enough for racing, it should be good enough for the road.
Pat...
Can always do it like Pete has suggested by welding a section of box vertically onto the back of the trailing arm bracket with two horizontal
"lugs" for the rose joint.
Pat...
I like Pete's solution too and I had thought of doing it that way, but it has the effect of shortening the length of the Panhard rod and it really wants to be as long as is feasibly possible.
So what size box would "do the job"?
If I use 1" square sticking horizontally out of the dead middle of the back of the trailing arm bracket, say for 2" and weld two lugs to
this for the panhard rod, how would that be? Or do I need a right big chunky piece of box?
At least the lugs don't have to be far apart due to the width of the rose joint.
Pat...
if i were to do it petes way, i would use a piece of 50x50x3mm box section, cut to a diagonal and with a 3mm plate on the back. This would ensure that
the bracket fits with no overhang. 
If you need some of this tube, i can bring it to the meet.
How about a backward bracket with two lugs welded on the base of it?.JPG)
That would do, but JoelP's triangular version would be neater and stronger. I would angle the RHS so the tabs are aligned with the Panhard
rod's axis, then sandwich the tabs either side of the rod end and bolt the lot solid before finally tack welding them to the RHS. Only tack the
tabs at this point as you don't want to get any heat into the rod end.

Rescued attachment Panhard_mount_02.jpg
Strangely enough that was my first thought, but I have loads of 3mm 50x50 box and a chop saw burning a hole in my pocket, figuratively speaking. .
If I did this to mine it would make it 30mm shorter which I don't think would have too much overall effect on the arc of the rod end
Cheers guys and Rorty for the pic - that'll be the solution.
Can I mount the panhard rod the other way round with this bracket on the passenger side as this would give me more central clearance for the original
Escort handbrake mechanism???
Both side of the rear "bay" are triangulated unlike the book where only the side that has the panhard rod is.
Thanks.
Pat...
If it's the rod operated handbrake that goes through the loop on the rear of the diff cover you can mount the brake rod to whichever side is most convenient.
Or the panhard rod???
Pat...
Yes, no reason not to if both sides are braced
Thanks Pete and Rory.
I'll update once made.
Pat...
For something a little different, a significantly lower panhard. I think I'm alone on this one.
Greg
Kelowna BC Canada
http://www.gwellwood.com