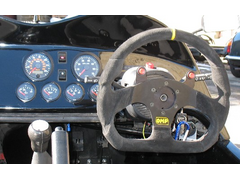
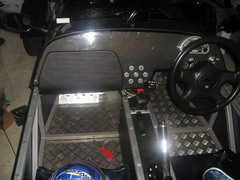
kev R1
|
| posted on 28/7/06 at 06:49 PM |

|
|
MAC 1 DASH RADIUS
Bit worried about this as i thought it would fly through with this dash! anyone no anything about a mentioned crash pad? any ideas on how yo improve
it! i'vegot a week to do it!! help!!
|
|
|
|
|
nib1980
|
| posted on 28/7/06 at 07:06 PM |

|
|
not exactly but what about pipe lagging cable tied to the lower edge?
|
|
|
fesycresy
|
| posted on 28/7/06 at 07:37 PM |

|
|
You need a curved pad, mac1 used to have one and sticky tape it on for the SVA.
Thats probably toast by now, but might be worth a call to Mark.
-----------------------------------------------------------------------------------------------------
The sooner you fall behind, the more time you'll have to catch up.
|
|
|
Howlor
|
| posted on 28/7/06 at 07:43 PM |

|
|
Just acquire a length of door seal. I got mine from Wooleys. It just pushes onto the edge of the dash and the large round section protrudes far enough
for the SVA man. Takes all of 30 secs to fit and remove!
Steve
|
|
|
asn163
|
| posted on 28/7/06 at 09:06 PM |

|
|
Kev, when you find out how to do it, let us know so that we can do the same when we take ours for the retest.
Thanks,
Simon
|
|
|
Agriv8
|
| posted on 28/7/06 at 10:49 PM |

|
|
quote:
Originally posted by Howlor
Just acquire a length of door seal. I got mine from Wooleys. It just pushes onto the edge of the dash and the large round section protrudes far enough
for the SVA man. Takes all of 30 secs to fit and remove!
Steve
i was just about to post that  
can be seen in action bellow actually transit side door seal £2.00 from local scrap yard
 
V8Gauges
ps the sva man likes to think that this is a permenant fixture if you see what i mean 
regards
agriv8
Taller than your average Guy !
Management is like a tree of monkeys. - Those at the top look down and see a tree full of smiling faces. BUT Those at the bottom look up and see a
tree full of a*seholes .............

|
|
|
kev R1
|
| posted on 29/7/06 at 12:52 PM |

|
|
so it's the return edge that needs to be radiussed?
|
|
|
Howlor
|
| posted on 29/7/06 at 02:52 PM |

|
|
No it's the leading edge but the trim also protects the return edge radius as well.
Steve
|
|
|
zxrlocost
|
| posted on 29/7/06 at 04:06 PM |

|
|
go and get some thick rubber hose slice it down the middle and glue it onto the bottom of the dash
did you get my info on the r1 clocks Kev
|
PLEASE NOTE: This user is a trader who has not signed up for the LocostBuilders registration scheme. If this post is advertising a commercial product or service, please report it by clicking here.
|
kev R1
|
| posted on 30/7/06 at 07:11 PM |

|
|
Yes i did mate cheers. mine aren't behind the wheel though so i'll have to put something round them!!! what do ya reckon?
|
|
|
The Doc
|
| posted on 30/7/06 at 11:01 PM |

|
|
On a related theme
This interests me as I have created my dash from 4 mm ali. Yes Yes its a bit heavy but so am I so its academic.
Anyway I'm aware that if you want a dash constructed of entirely 'hard' material a loony radius is required on the bottom edge. Is
the application of something like the sltted hose an alternative ie: hard dash with 'rubbery edge'
Incidentally the thickness allows me to recess all the instrument bezels etc.
Ta
|
|
|
jos
|
| posted on 31/7/06 at 08:09 AM |

|
|
The MAC#1 dash is only 15mm radius and if left uncovered will probably fail SVA
The pipe lagging is one solution although has been considered too temporary for some SVA centres.
The next solution was to cover the lagging in fablon & silicon to the dash which was also judged to be temporary and also caused another problem,
more in a mo.
My final solution was add the pipe lagging to a piece of ribbled plastic and then cover the whole lot in fablon and secure to the dash using the dash
mounting holes. As and added extra I covered the plastic sheet prior to fablon with girl guide bedding roll for a bit more squish - even though its
not needed.
The problem I found with adding the pipe lagging to the bottom of the dash was that when I came to take it off, where I'd beaded the silicon on
the front side of the dash Ive ended up with a scratched and faded strip which I now cover with black insulation tape until I get around to replacing
the dash alltogether.
.: Motorsport / motor racing circuit / track wall art Apex Traxs :.
|
|
|
DarrenW
|
| posted on 31/7/06 at 02:04 PM |

|
|
Im sure the Woodwards fitted a panel on the passenger side from the front face of dash right down to the floor. made the tester a bit uncomfortable
when chacking belts etc but afaik perfectly 'legal' SVA wise. He couldnt test for a radius because there wasnt one visible to test.
I used the Mac#1 stick on panel.
 
Rescued attachment SVA dash cover 1.JPG
|
|
|
kev R1
|
| posted on 31/7/06 at 04:36 PM |

|
|
what did you use on the drivers side?
|
|
|
asn163
|
| posted on 31/7/06 at 07:08 PM |

|
|
Kev, I don't, think you need to worry about the driver's side as it will be in the exempt area.
Simon
|
|
|
DarrenW
|
| posted on 1/8/06 at 09:31 AM |

|
|
quote:
Originally posted by kev R1
what did you use on the drivers side?
Steering wheel - if large enough it gives a good exempt area. Crazy i know but thems the rules. If wheel is too big or too high this can give a fail
for visibility tho so a little care needed when planning.
I have a metal toggle switch on drivers side for indicators - it also passes cos its in the exempt area.
|
|
|
Jasper
|
| posted on 5/8/06 at 03:29 PM |

|
|
Don't forget chaps - if you do have a crash (and I'm speeking from experience) then the bottom radius will stop you or your passenger from
some potentailly nasty leg damage.
On my current build I'm making sure I have a decent soft permanent bottom radius AND covering in the complete area underneath the dash as well
no nothing sharp is sticking down at all....
Some SVA stuff as we well know is a bit ridiculous, but this bit I don't think is at all.
|
|
|


