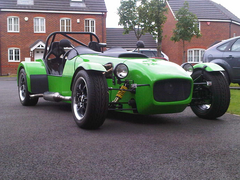
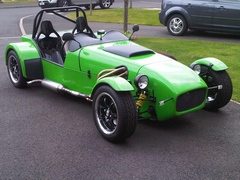
Just finishing off a few things ready for IVA on Tuesday.
Could you have a look to see if i've missed anything. The harnesses are not bolted at the top yet, i'm making covers tonight.


GTS Panther - Front


GTS Panther - Ready for IVA - Side

Hi guys,
Just finishing off a few things ready for IVA on Tuesday.
Could you have a look to see if i've missed anything. The harnesses are not bolted at the top yet, i'm making covers tonight.


GTS Panther - Front


GTS Panther - Ready for IVA - Side
looks pretty good to me - good luck 
I feel a lot is down to the tester.
Nut on the front camber adjuster.
Rear fog light bracket, is it just the little steel bracket at the bottom ? others have failed for it not being ridgid enough. Solution make up a
wedge.
very tidy build 
Where's your rear seat belt mounts?
Can't seem to see them that all.
Cheers
Rich
Just out of curiosity who's are the lower wishbones, is the lower shocker bracket really hanging over the bottom plate?
Cheers
Rich
Hi,
The harnesses have been unbolted so that I can make some covers.
The lower wishbones have been fabricated to the GTS drawings.
Top photo - ball joint nut.
Internal threads showing, that's a no-no!!
Looking good Neil,
Is your n/s front brake flexi hose in a loop?
If it is,it will kink on full right lock.
Good luck with the test
Andy
And as already said,i would glue
some small wedges behind the fog and reverse
lamps.
They need to be fairly rigid.
Andy
Looking neat, I cant believe your having a crack at IVA before me  haha Good luck mate!
Maxi ball joint could need nut covers on top and bottom, well I did anyway.
Cheers
Rich
spring platform may give problems we used a large electrical gland to cover ours
Cheers guys,
The list so far to do/check tomorrow.
Nut covers on maxi ball joints.
Check n/s brake flexi.
Wedges behind fog and reverse lights.
Cover spring platform.
The camber adjuster is now covered with a cut down top from toothpaste pump! Need to paint it black. 
Looks really good mate, I hope you have a successful IVA.
Couple of things:
Fog light doesn't look to be vertical in one of the pics - I think it needs to be beaming out parallel to the road if memory serves.
Your headlights are the same ones I got through SVA with but I rotated my lenses 15 degrees to provide the correct beam pattern. From the
driver's perspective I rotated them 15 degrees clockwise to provide the "kick up" in the pattern at the left as required. The inspector
was happy with this. To do this requires that you file a little notch in the lens holder as there is a bump on the lens which engages with this notch.
Easy to do with some patience.
Apart from that it looks really good. Take some self amalgamating tape, cable ties, bits of old radiator hose etc with you on the IVA so you can cover
up anything else that the inspector spots. Rubber hose covered in self amalg tape is usually considered a satisfactory fix.
Try to make sure your speedo is calibrated okay before the test. I almost failed my SVA due to my speedo being 100% accurate. Seems illogical but you
are allowed to have a speedo which over-reads speed by up to 10% but must not under-read by so much as 1 MPH. I thought I had set mine to be around
5% over but it turned out to be exactly accurate at all measured speeds. Quite lucky I didn't fail on this simple point.
Good luck,
Craig.
Very nice tidy build - you'll get good IVA brownie points for that alone!
Only item I would say is a definite fail has already been picked up - the front camber locknut is insufficiently screwed on - if you can't get
the threads to go right through, you will have to remove the adjuster and put the locknut on the outside of the wishbone.
Good luck!
quote:
Originally posted by austin man
spring platform may give problems we used a large electrical gland to cover ours
hi
not 100% sure but think your gauges need to be recessed into dash to cover radius` problems.
someone else may confirm.
other than that looks really good
good luck
steve