simonk
|
| posted on 23/10/06 at 11:00 AM |

|
|
VIENTO V8 LT77 CLEARANCE
Hello All
Have just fitted my engine and gearbox, (major progress - possibly....) and with the assembly sitting where it looks like it ought to, it looks like
the reverse detent mechanism on the remote gearchange assembly will foul on one of the upright chassis tubes in the tunnel. As far as I can see the
gearbox rubber mounts are tight against other chassis tubes in the tunnel so the assembly won't go any further back.
Before I start swearing and cursing trying to fit the remote is there a trick or a recommended engine/box placement to make this work ?
Thanks all
Simon
|
|
|
|
|
Donners90
|
| posted on 23/10/06 at 11:43 AM |
|
|
I had the same issue, so went for the sherpa remote gearchange. I have chassis #2 and was told by Grant that the early chassis had a narrower tunnel.
If you go for the sherpa remote it'll exit underneath the dash, so a 'swan-neck' type lever is required. Although it may look odd,
it works fine.
Will try to post pic when I get home tonight
HTH
James
[Edited on 23-10-2006 by Donners90]
|
|
|
Paul (Notts)
|
| posted on 23/10/06 at 12:03 PM |
|
|
just about to trial fit the engine and gearbox this week. ( poss wed )
did you attach the gearbox to the engine first and lower the whole lot in or place the gearbox in and then lowere the engine in?
cheers
Paul
|
|
|
simonk
|
| posted on 23/10/06 at 01:04 PM |
|
|
Nailed the whole lot together and slotted it in. It went in OK without too much contact, but take it slowly. Protect the chassis rail above where the
bellhousing will be as contact there is almost impossible to avoid. Keep a close eye on any pipe/cable runs that you already have in place in the
tunnel. I managed to put a nice curve in my beautifully run brake line, thankfully without damage, because I was too busy watching the engine end and
not looking in the tunnel !! Watch out also for anything that is clipped alongside the engine mount plates or bottom chassis rails.
It needs to go in at quite an angle, gradually reducing the angle and moving the car forward under the assembly as you go. As the engine gets lower
you will find that clearance between the back of the heads and the chassis diagonals will get very tight.
It will be a lot easier (if using an LT77 / R380 'box) if you remove the remote first - though be aware that re-fitting the remote looks fiddly.
If the engine is dry you may also want to remove the oil filter. Mine went in with it on, but it is quite exposed at the front and would be one less
thing to think about.
Good luck
Simon
|
|
|
Agriv8
|
| posted on 23/10/06 at 02:47 PM |
|
|
Will be refitting My engine and Box to my V8 MNR hopefully on 'Thursday ' I find that removing the front crank pully helps in getteng the
right angle of dangle  . but again only works if dry. . but again only works if dry.
especially as I always have to tourque it up in situe in gear hand break on as the touque rating is FT and then some 
Regards
Agriv8
Taller than your average Guy !
Management is like a tree of monkeys. - Those at the top look down and see a tree full of smiling faces. BUT Those at the bottom look up and see a
tree full of a*seholes .............

|
|
|
wilkingj
|
| posted on 23/10/06 at 03:47 PM |
|
|
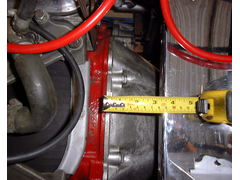
Right, I have a Long SD1 gear extension in, and it fits... JUST!.
You have to fit it as far back as possible so the reverse detent / springs just clear the tunnel upright.
Also fit the reverse switch before putting the gearbox in, and best leave the side panels off the tunnel, despite the manual telling you its the first
ones to put in. Bear this in mind and dont fit the pedal box before the panels either.
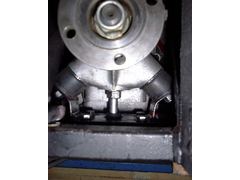
You also need to cut a bit off the welded in gbox mtg plate. (2nd piccy)
Gearbox position relative to the Bulkead (3rd piccy)
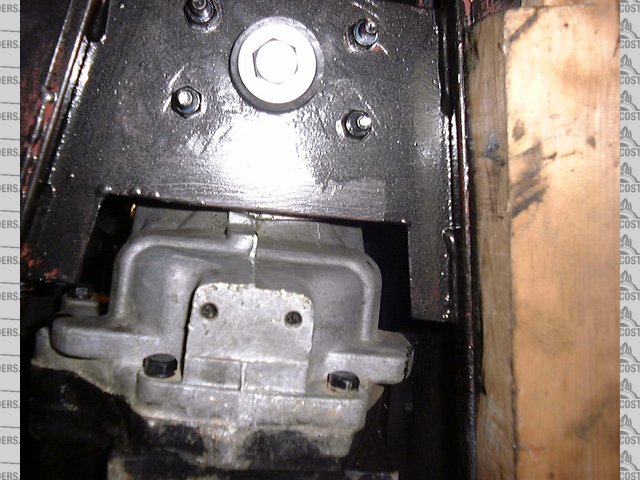
I also fitted the third bolt and rubber to the rear mount, it cost pence, and helps keep the box tied down (needs a locknut as well, as shown). (4th
piccy)
See following piccies.

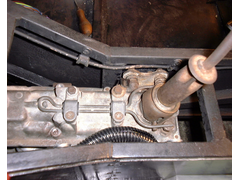 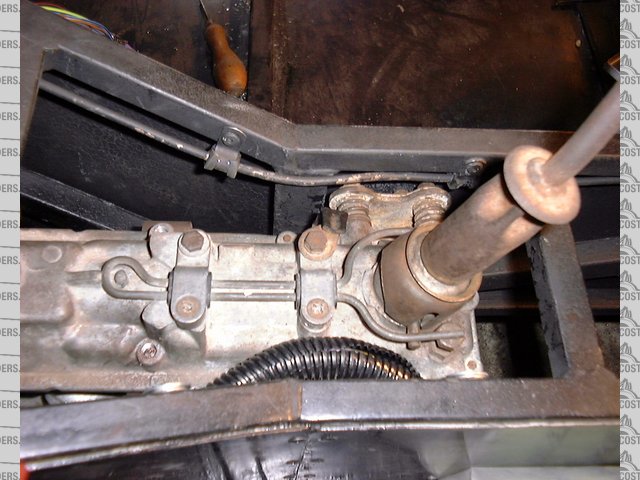
Gear Extn Position
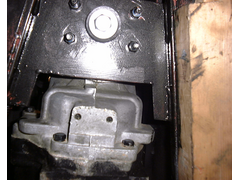 
Gearbox Mtg Cutaway
 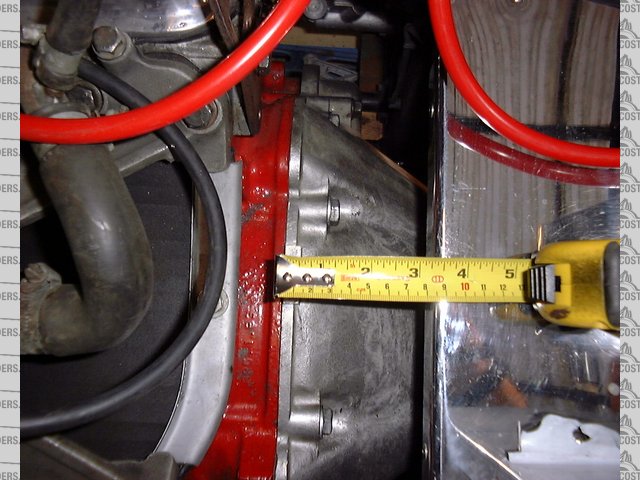
Gearbox position
 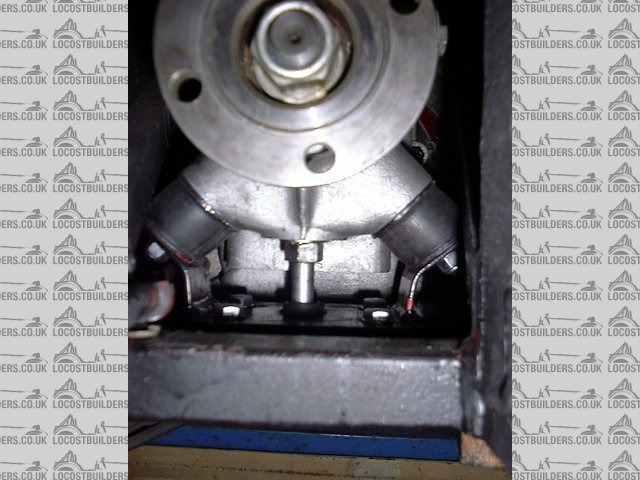
Gearbox Rear mounting
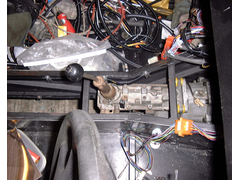 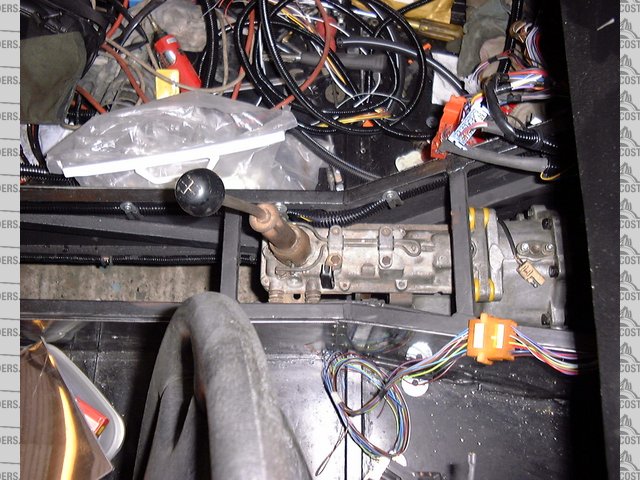
Gear Lever Position3
1. The point of a journey is not to arrive.
2. Never take life seriously. Nobody gets out alive anyway.
Best Regards
Geoff
http://www.v8viento.co.uk
|
|
|
tks
|
| posted on 23/10/06 at 04:06 PM |
|
|
mhhh
that brakeline zone would be better of with some flexy if you ask me!!
TKS
The above comments are always meant to be from the above persons perspective.
|
|
|
wilkingj
|
| posted on 23/10/06 at 04:15 PM |
|
|
quote:
Originally posted by tks
that brakeline zone would be better of with some flexy if you ask me!!
TKS
That wasn't the final position. I can assure you the brake pipe was well out of the way when I had finished with it. Although I do agree it was
a bit close. The photo was taken imediately after I had fitted the box. It had to come out again as I forgot the Reverse Light switch. You cant fit
the switch without removing the gearbox or at least the remote lever housing. Either way there isnt much room... Much cursing went into fitting the
gearbox
1. The point of a journey is not to arrive.
2. Never take life seriously. Nobody gets out alive anyway.
Best Regards
Geoff
http://www.v8viento.co.uk
|
|
|
Paul (Notts)
|
| posted on 23/10/06 at 05:34 PM |
|
|
Cheers Geoff.
Was having a good look at your pics this morning.
I have the cross member off a sd1 and am just cutting it up to make the rear gearbok bracket.
your pics have helped a lot inthe planning stage .
just hope it go's in ok
|
|
|
DanP
|
| posted on 23/10/06 at 06:01 PM |
|
|
I found this a pain in the bum on my car, I almost decided to remove the reverse gate but in the end managed to reduce the width of the box at the
rear by filing down the 2 ali mushroom pieces and shortening the reverse stop plate to match, I managed to remove about 10mm from the width of the
extension - enough to make it fit and leave enough room at the front of the engine for the oil filter.
I used the Sd1 gearbox mount and chopped of two sections to make it fit in the tunnel.
Hope that helps!
|
|
|
Paul (Notts)
|
| posted on 23/10/06 at 06:35 PM |
|
|
altering the reverse stop sound like a good idea before I try and fit it.
was goinig to go into work tommorow but now it looks like I will have to stay at home and do some more work on the car so that I can fit the engine on
thursday.
|
|
|
Agriv8
|
| posted on 23/10/06 at 06:40 PM |
|
|
quote:
Originally posted by Paul (Notts)
altering the reverse stop sound like a good idea before I try and fit it.
was goinig to go into work tommorow but now it looks like I will have to stay at home and do some more work on the car so that I can fit the engine on
thursday.
Thursday V8 fitting Day ! I hope to be dropping ( squeezing / fighting / swearing / persuadine ) mine back in.
regards
Agriv8
Taller than your average Guy !
Management is like a tree of monkeys. - Those at the top look down and see a tree full of smiling faces. BUT Those at the bottom look up and see a
tree full of a*seholes .............
|
|
|
wilkingj
|
| posted on 23/10/06 at 07:52 PM |
|
|
My back Gbox mount was a Luego one bolted to the chassis cross plate.
Glad the piccies were of help...
Thanks what the Forum is all about.
Why re-invent the wheel eh?.
1. The point of a journey is not to arrive.
2. Never take life seriously. Nobody gets out alive anyway.
Best Regards
Geoff
http://www.v8viento.co.uk
|
|
|
simonk
|
| posted on 23/10/06 at 08:12 PM |
|
|
Thanks all for your help and suggestions - particularly Geoff for taking the time to post the pictures - most helpful. I've just got back in
from the garage having taken the reverse detent off the extension to have a good look at how it works. Bloody hell, I know that these things have to
last hundreds of thousands of miles, but its a huge lump of steel for a simple job !!
Before I saw the pics I was thinking about leaving the detent off and making up something a bit more manual along the lines of a gated lockout. Now I
think that I will probably have a good look at the detent mechanism and work out how much I can shave it by without materially affecting its operation
and see if can get the overall dimensions of the extension down to a point where it will fit in the tunnel and maybe tuck the detent behind the
upright. The pics have really helped me to get a perspective on what might work.
Downside is that the tunnel is completely panelled - rivets and bonded - and plumbed and wired, so it will have to be fat-fingered cursing and
swearing time. I thought that I was being clever by getting all the niggly stuff done before fitting the engine, which is all that I have left to do.
The only upside here is that I probably have only a minimum of re-work to do in the tunnel plumbing.  I'll let you all know how I get along -
thanks again. I'll let you all know how I get along -
thanks again.
Simon
|
|
|
simonk
|
| posted on 23/10/06 at 08:14 PM |
|
|
Geoff - whereabouts in Cambridge are you ? I'm about 10 miles due west of Cambridge on the A603 on the western edge of the county
Simon
|
|
|


