StuartA
|
 posted on 30/1/03 at 12:36 PM posted on 30/1/03 at 12:36 PM |

|
|
Gear linkage
Can someone explain how you convert the back and forth motion of the gear lever into the rotation needed to change gear on a bike box after swinging
the mechanism through 90 degrees. I am sure this must be reasonably straightforward as a lot of you must have done it already. Would like to see some
pictures if possible.
Has anyone manufactured something similar to the kliktronics devices that rather than having a physical rod gear change?
|
|
|
|
|
Jasper
|
| posted on 30/1/03 at 02:41 PM |
|
|
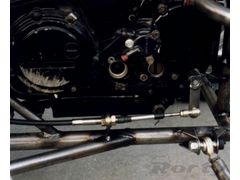
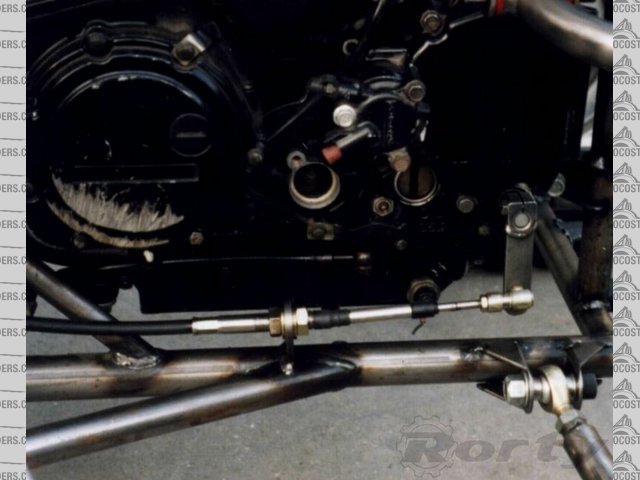
I used a cable system, very simple, bought from Demon Twats. It's a very thick 4 foot long cable used by Nascars, about £50 though. This system is
apparently smoother than a rod system, and used by the mega££££££ racing Caterhams.
I think there are photo's in my section. It just goes along the tunnel, up about the chassis rail where the front of the scuttle meets, and down
vertically to attach with a ball joint to the arm of the gear lever. I bought a £4 steel gear lever for a trails bike from a bike shop that has a flat
edge to mount the ball side of the ball joint into.
For the gear lever I used a piece of 3/4 tube with a 10mm id tube through it horizontally near the bottom. Then bolted this through a cut down
suspension bracket on the inside of the tranny tunnel.
Clear as mud?????
Check out pictures: Gear Cable & Pedal.Column
[Edited on 30/1/03 by Jasper]
|
|
|
ChrisGamlin
|
| posted on 30/1/03 at 04:55 PM |
|
|
If I'd known about the cost of a cable solution beforehand I might have gone that route as its simpler and possibly provides a better action, but
mine has an ST linkage systems which works fine (cost about £60). One advantage I thought with the linkage over a cable is the ability to easily
change the effective ratio of the lever throw, by changing the pivot points of the connecting linkages, do you have provision to do this Jasper by
connecting the cable to different parts of the gear lever?
See this ST locoblade Build Page for some details and pictures on how it
works, basically the main part is a vertically mounted sleeved bar that bolts to the front of the drivers footwell. On the top of this bar is an arm
that goes horizontally across towards the centre of the car, and on the bottom, another arm which goes out horizontally forward. Using the bike
linkage or another suitable method, the lower arm is connected to the selector shaft on the gearbox, and another long linkage connects the top arm to
the gear lever mounted in the tunnel. Pretty simple when you see it, but a bugger to explain!
Chris
[Edited on 30/1/03 by ChrisGamlin]
|
|
|
Macca
|
| posted on 30/1/03 at 07:18 PM |
|
|
I'm hoping to modify the cable linkage from a mk1 mr2(are you reading this fin).I've not seen the set up that jasper has but it maybe quite similar
and I think if you alter the mounting position of the cable in relation to the pivot point of the gear stick this would then alter the throw.
Thats all yet to be put into practice.
Col
|
|
|
Jasper
|
| posted on 30/1/03 at 07:40 PM |
|
|
I have made both ends adjustable by adding extra holes each side of the ones I have set it at as a start point, so it will be a matter of a single
bolt each end to change it. I've welded a piece of flat bar at ffffffffffffffffffffff (sorry that's the cat trying to type) the end of the gear
stick to give a good mounting point fot the cable.
Actually when you see the cable it's mounting becomes very straightforward.
|
|
|
mac#1
|
| posted on 30/1/03 at 10:47 PM |
|
|
Damn good idea Jasper, I like the sound of that. Hows the weather in the deep South?
Mark
|
|
|
Rorty
|
| posted on 31/1/03 at 12:52 AM |
|
|
Cables are smoothe, accurate, and infinitely adjustable, and only need 2 flat tabs to install. Just fit and forget.
I use the quickly detachable ball ends on the cables.
Cheers, Rorty.
"Faster than a speeding Pullet".
PLEASE DON'T U2U ME IF YOU WANT A QUICK RESPONSE. TRY EMAILING ME INSTEAD!
|
|
|
Rorty
|
| posted on 31/1/03 at 12:55 AM |
|
|
Damn!
Rescued attachment R6 gear lever.jpg
Cheers, Rorty.
"Faster than a speeding Pullet".
PLEASE DON'T U2U ME IF YOU WANT A QUICK RESPONSE. TRY EMAILING ME INSTEAD!
|
|
|
ChrisGamlin
|
| posted on 31/1/03 at 09:54 AM |
|
|
Yup totally agree Rorty, think I would go cable next time, does make things easier I'd imagine. With my linkage system, I initially had problems with
mounting the pivot bar, as if you bolted it to the footwell bulkhead, the bulkhead flexed when changing gear, which meant it was really imprecise. Had
to put a plate behind it in the end to re-inforce it.
The only thing I was thinking on mine was that on the engine end, Ive used the standard blade linkage (which means no adjustment to the pivot point),
and in the tunnel, my prop runs reasonably close to the underside of the gear lever, and Im not sure now much le-way I'd have for making adjustment
to the lever ratio at that end. The simple solution is to use an arm like yours on the bike end, and then either make up alternative length versions,
or just drill a couple of alternative holes in it and change the cable mounting point.
cheers
Chris
|
|
|
Jasper
|
| posted on 31/1/03 at 12:19 PM |
|
|
BTW - I have to thank Mark @ Mach 1 for the advice on this set-up, or I'll get grief and no more discount.....
|
|
|
luegobladebuilder
|
| posted on 1/2/03 at 01:36 AM |
|
|
i used a cable from demon tweeks, is yours red and made by b&m, if so watch out----- mine snapped, the threaded end sheared clean off, it was set up
correctly, reply from demon tweeks after investigation was faulty product!!!!!
now have a home made rod system using rose joints, which is alot better than it ever was.
|
|
|
luegobladebuilder
|
| posted on 1/2/03 at 01:37 AM |
|
|
previous message was aimed at jasper who said he had cable from demon tweeks.
|
|
|
Jasper
|
| posted on 1/2/03 at 10:41 AM |
|
|
Yes, mine first one snapped too - but that's becuase I miss-handled it and put sideways force on it, they replaced it with a new one.
These have been used for a while on BEC's now without any snapping problems that I know of - I'll keep you posted.
|
|
|
MK9R
|
| posted on 3/2/03 at 08:11 AM |
|
|
check out the avon gear linkage pictures in my photo section
|
|
|
MK9R
|
| posted on 3/2/03 at 03:54 PM |
|
|
clicky click 1
Clicky click 2
[Edited on 3/2/03 by MK9R]
|
|
|


