
Rear disk pictures?
Northy - 13/2/05 at 05:36 PM
Has anyone got any pictures of a rear disk setup on an Avon? Do the calipers end up on the front or the back of the uprights?
I've tried searching, but can't find anything. I think pictures have been posted before.
Cheers
andrew.carwithen - 13/2/05 at 09:12 PM
Hi Graham,
Look at Lightning's photo archive (rear end chassis and diff).
I think that'll answer your question.
Sorry, dunno how to post his picture onto here.
By the way, did you manage to turn down the ABS teeth on the hubs ok?
Cheers,
Andy.
Northy - 13/2/05 at 09:34 PM
Cheers Andy,
Forgot Lightning had them fitted on his!
I've not done it yet as I want to mount the bearing carriers first so I can see how much to take off. Are you fitting rear disks?
Cheers
andrew.carwithen - 14/2/05 at 07:34 PM
At present have push-in driveshafts and 8'' drums fitted.
But, a few months ago, I bought a complete 3.62 LSD rear end inc. hubs, lobro driveshafts (with ABS teeth!) and calipers for the bargain price of Ł50!
(well worth trawling through your local freeads paper!)
I,ve bought new discs and am awaiting delivery of reconn'd calipers. Diff and shafts need cleaning and painting. (I was thinking of using the
electrolysis method - how did you get on with it?)
I dunno whether to swap the rear end now (no bodywork fitted yet) or wait till after she's on the road and fit it as part of a future upgrade
where I'll also be changing from pinto to fireblade power!
So, if you get your finger out and fit your rear end, you'll be able to tell me how much hassle it was (or not!) and I can make a decision
accordingly!
Cheers,
Andy.
Northy - 15/2/05 at 08:07 AM
I can already tell you, FIT IT NOW!!!! 
It's a twat of a job. Just imagine removing a diff full of oil with the bodywork on and fuel tank in. It's like something off bloody Crypton
factor anyway!
Lightning - 15/2/05 at 03:47 PM
I agree, Andy fit it now........actually no...its a bastard so you better let me have your LSD
I had to muck about with a file and grinder. will be a pig later.
[Edited on 15/2/05 by Lightning]
DaveFJ - 15/2/05 at 04:36 PM
I have a far better idea - as my build is the 'least complete' you should deffinately let me have it 
andrew.carwithen - 15/2/05 at 05:59 PM
quote:
Originally posted by Lightning
I agree, Andy fit it now........actually no...its a bastard so you better let me have your LSD
I had to muck about with a file and grinder. will be a pig later.
[Edited on 15/2/05 by Lightning]
Sorry chaps, The LSD ain't going any where but on my car!
As the refurbed calipers arrived today, it looks like I'll do the swap sooner rather than later.
Steve, what do you mean you had to get out the file and grinder?
Is there a problem in fitting the hubs through the rear uprights on the larger shafts?
Thanks for replies, guys
Andy.
Northy - 15/2/05 at 06:20 PM
As far as I have seen so far the threaded holes in the rear uprights don't line up correctly with rear disk (ie with lugs on for caliper) rear
bearing carriers.
I think I'm going to enlarge the holes in the bearing carriers, unless anyone thinks thats a bad idea 
Lightning - 15/2/05 at 10:36 PM
Thats exactly it...the holes dont quite line up and I had to enlarge the holes. I also had the shaft rub on the hub carrier at the back and had to
dress the hub carrier otherwise it would have grinding all the time.
I understood at the time that it was not a Tiger problem with the holes, more that the hole centres on the disk type hubs are slightly different.
Northy - 15/2/05 at 11:38 PM
I'll compare the bearing carriers when I remove the old ones.
Which bit did you have to dress?
Cheers
Lightning - 16/2/05 at 08:09 PM
The rear of the Tiger hub carrier. The welds on the large tube rubbed on the shaft. Might not on yours. It will be very obvious however if it does as
steel to steel makes a bit of a noise.
Northy - 16/2/05 at 08:15 PM
So did you open up the holes then?
Cheers
Lightning - 16/2/05 at 10:27 PM
I used a round file to elongate some of the holes rather than drill them. This was so that the hub stayed central and there was less chance of lateral
movement.
I'll be interested to see if the two bearing carriers do have a different hole set up. So let us know when you compare the two.
Northy - 18/2/05 at 06:12 PM
Did you have to take the ABS teeth off then? I can't think why you'd need to. I'll try it tomorrow.
Cheers
decay - 21/2/05 at 12:59 PM
Hi
I,ve come to the same problem and found a few sticking points when using the stock avon rear drum upright with disk hubs.
1) The 4 holes of the hub do not line up with the tapped holes in the upright
This has aparently been solved by welding up, redrilling and tapping according to tiger. Just how you are going to drill and tap a hole 15mm? deep is
beyond my ability. You are going to need a neat flat bottom drill bit.
Whilst your at this make sure the holes are dead square around the centre hole or the drive shaft will hit. In its current state it aint pretty.
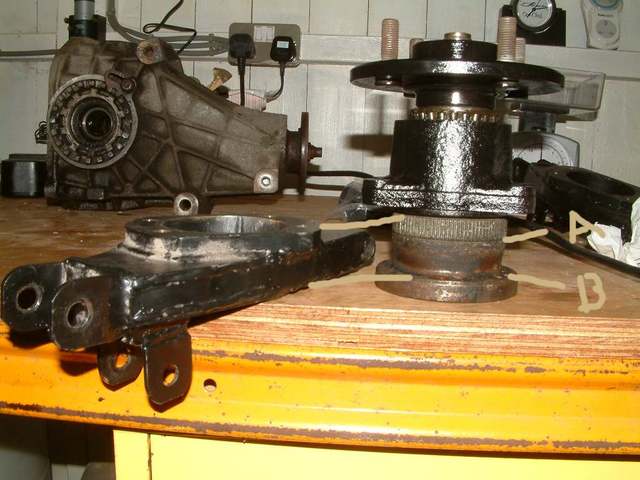
2) The Lobro shaft end is to dam big to fit in the hole. You could lathe it down taking off the ABS teeth so the sides are parallel. POINT A on
photo
3) The Lobro shaft end is to dam short to fit, when the baring is tightened up it pulls the shaft end in to meet the inside edge of the upright,
You would have to lathe some metal off POINT B off the shaft and take back the lip of metal on the inside of the upright.
After much thought I'm going to ebay my uprightd and build completly new ones base on the Luego design of a flat plate that everything is either
welded of bolted to, a vast improvement.

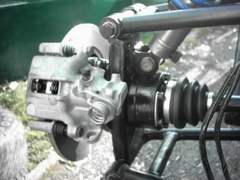
Rescued attachment rearbearing.jpg
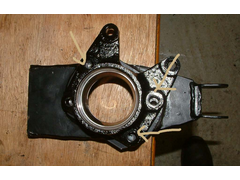
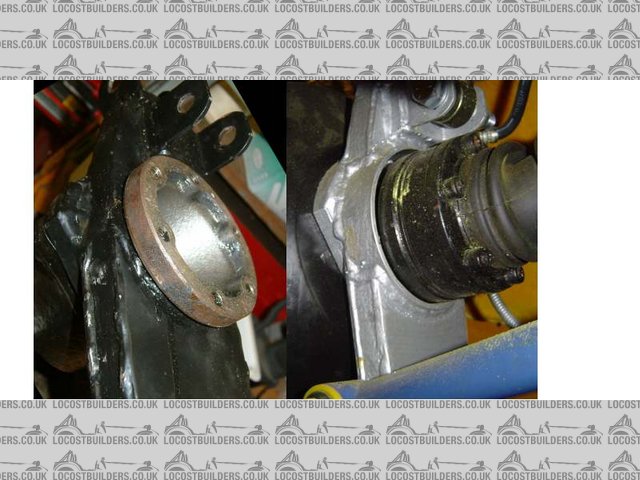
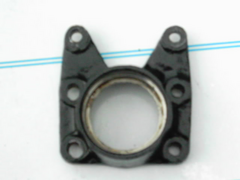
decay - 21/2/05 at 01:01 PM
Sierra disk hub placed on avon rear upright
The Holes do not line up. - bugger.
Rescued attachment hubonupright.jpg
Mix - 21/2/05 at 02:09 PM
Looking at the photos and comparing them to my, (home made) uprights it appears that the hole spacings are the same. It looks like if you were to turn
the carrier 180 degrees the holes would line up. Unfortunately you won't be able to get the calliper on in this orientation.
Mick
ned - 21/2/05 at 02:26 PM
i found that one hole is off centre to the rest on my dedion axle for sierra rear brakes. can you not take the brake bracket plate off and swap it to
the other side, perhaps flipping it over if necessary?
Ned.
decay - 21/2/05 at 03:55 PM
Spinning the hub carrier round 180 degrees makes it worse....
Lightning - 21/2/05 at 05:18 PM
Told you it was a pig.....now do I get that LSD andy?
Where are you in the country Decay???
Glad to see youre putting in a bike engine
[Edited on 21/2/05 by Lightning]
Hellfire - 22/2/05 at 01:23 AM
Unless I read this section of the forum - I never know how lucky we were to buy MK Indy.
decay - 22/2/05 at 09:25 AM
I'm in Peterborough
15 mins from Tiger
5 mins from Luego
Early days yet, still busy planning and buying bits.
decay - 22/2/05 at 09:28 AM
Forgot 7 mins from radical
and 20 mins from extreme engines
andrew.carwithen - 23/2/05 at 08:59 AM
quote:
Originally posted by Lightning
Told you it was a pig.....now do I get that LSD andy?
[Edited on 21/2/05 by Lightning]
Nope...but I would like to come up and see your rear end for meself!!
I'd also like to take measurements of your engine cradle, if I may, and, of course, return your brake flaring kit!
I'm off work now until Monday, so is there a convenient day/time I could come up? (apart from Sat afternoon - Argyle at home etc.)
Cheers,
Andy.
Lightning - 23/2/05 at 08:57 PM
Sunday should be Ok
andrew.carwithen - 23/2/05 at 09:07 PM
Steve,
would Sunday afternoon be o.k - say about 1.30 -2.00ish? (SWMBO's doing a car boot in the morning and so I'll be entertaining the kids.)
Andy.
Lightning - 23/2/05 at 09:09 PM
Yes thats OK. BTW have you got Rob Dukes Tel No.? U2U me
andrew.carwithen - 23/2/05 at 09:31 PM
Sorry Steve,
I thought I had it in an old email - must've deleted it.
But he does sign on this forum as 'robbydee' if you want to U2U him.
See you Sunday....
Andy.
Lightning - 23/2/05 at 09:34 PM
No worries just left a post on SWTOC. Like the sound of a sprint do in Cornwall
[Edited on 23/2/05 by Lightning]
andrew.carwithen - 23/2/05 at 09:56 PM
Yep, sounds great, I tried to find some info earlier on Portreath 'Run what yer brung' with very little success. Only snippet I found states
that spectators and photography isn't allowed! which is a bit of a bummer! May ask for more info on 'events' section.
BTW, did you renew your rear hub bearings? If so, where did you get them from? and did they come with the oil seals?
Did you have to remove the ABS teeth when you fitted the driveshafts?
I've got one of the hubs bubbling merrily away in the electrolysis bath at the mo' so will try to source new bearings tomorrow.
Andy.
Lightning - 23/2/05 at 10:13 PM
no
no
and don't know where
helpful arnt I
Northy - 26/2/05 at 07:11 PM
I've been looking at the bits and doing a fair bit of thinking.... 
I'm just coming up with a cunning plan that will be much less work than fabbing new uprights, but more work than just bolting them on.
I'll look into if its possible tomorrow and hopefully post pictures.
Cheers
Lightning - 26/2/05 at 08:12 PM
Can't wait Baldrick
Northy - 26/2/05 at 09:22 PM
andrew.carwithen - 26/2/05 at 10:31 PM
So Graham,
Have you got rid of the ABS teeth yet?
I've tried to undo the six torx bolts to remove the joint and splined shaft assy from the driveshaft itself but they're stuck fast!
(I've sheared one torx bit trying, already.)
Was wondering if they're a lefthand thread like the L/H retaining nut?
Apart from that, I've had great results de-rusting the hub carriers and drive flanges in the electrolysis bath! It works brilliantly!
Regards,
Andy.
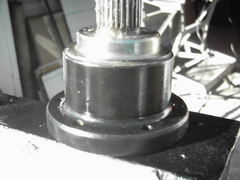
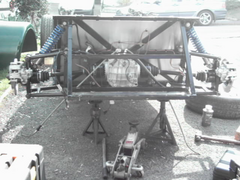
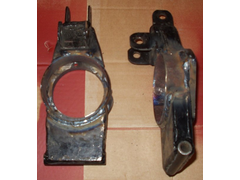
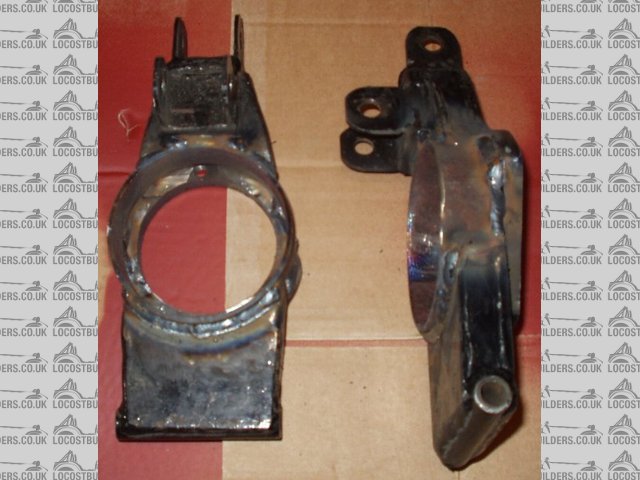
decay - 7/3/05 at 04:05 PM
New rear uprights created:
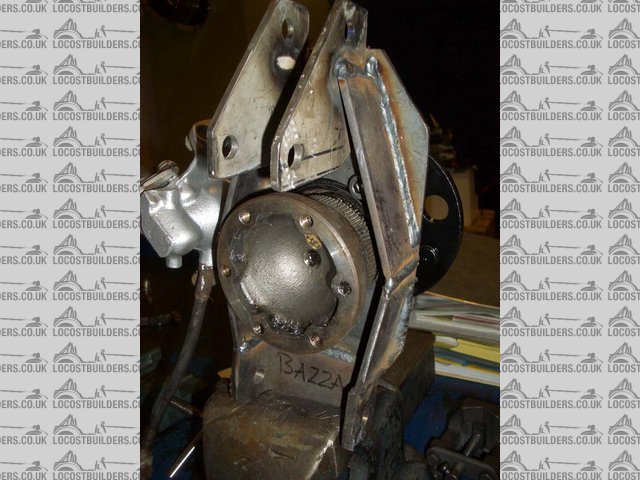
Rescued attachment upright.jpg
decay - 7/3/05 at 04:18 PM
Tigers own compared
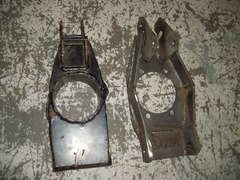
Rescued attachment uprightoldnnew.jpg
andrew.carwithen - 14/3/05 at 08:26 PM
quote:
Originally posted by decay
Hi
I,ve come to the same problem and found a few sticking points when using the stock avon rear drum upright with disk hubs.
1) The 4 holes of the hub do not line up with the tapped holes in the upright
This has aparently been solved by welding up, redrilling and tapping according to tiger. Just how you are going to drill and tap a hole 15mm? deep is
beyond my ability. You are going to need a neat flat bottom drill bit.
Whilst your at this make sure the holes are dead square around the centre hole or the drive shaft will hit. In its current state it aint pretty.
2) The Lobro shaft end is to dam big to fit in the hole. You could lathe it down taking off the ABS teeth so the sides are parallel. POINT A on
photo
3) The Lobro shaft end is to dam short to fit, when the baring is tightened up it pulls the shaft end in to meet the inside edge of the upright,
You would have to lathe some metal off POINT B off the shaft and take back the lip of metal on the inside of the upright.
After much thought I'm going to ebay my uprightd and build completly new ones base on the Luego design of a flat plate that everything is either
welded of bolted to, a vast improvement.
What a pain in the ar.e this disc and LSD conversion is turning out to be!
Firstly, I had the dia. of the stub shaft turned down (inc. ABS teeth) to 75mm along its length so that it passes through the rear uprights no prob.
(Local engineering firm charged a mere Ł10 to do both sides.) Yes, the ABS teeth are hardened but a carbide tipped tool soon made easy work of
them!
Sure enough, the holes in the disc type bearing carrier did not line up with the holes in the upright but, again, use of a round file to elongate the
holes soon fixed that little problem. Although my calipers are going to have to be mounted on the front of side of the hub as opposed to the rear
(like Lightning's)
But the main problem is that when tightening the hub nut, the whole of the stub shaft is pulled through the inboard side of the upright and the lobro
flange is then fouling the upright. This means that the hub nut cannot fully tighten onto the wheel bearings and so there is about 5mm plus play in
the bearings  (same as 'Decay' is experiencing in point 3 of his above thread).
Iwas wondering if the lobro stub shafts on non-ABS disc models are a different design? (Lightning, where are you? I believe you fitted non-ABS type
drive shafts)
Andy.
Northy - 15/3/05 at 07:57 AM
Andy,
Lightning swopped the uprights from side to side to put the caliper at the rear.
Still not done mine
Avoneer - 15/3/05 at 12:10 PM
Told you all - new tube in the upright. An afternoons work and hardly any expense. Job done.
Pat...
Northy - 15/3/05 at 06:11 PM
Pat,
How do you suggestyou do that then Easily?
Don't you think it would be easier to make new ones?
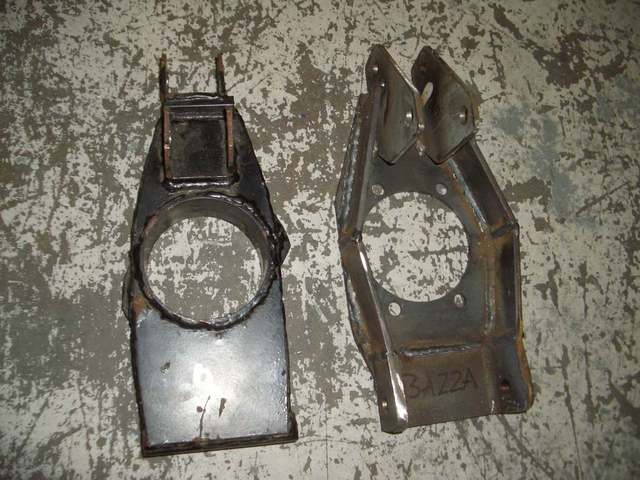
decay - 16/3/05 at 09:57 AM
Check out the photos, of before and after.
me thinks you need a very well equiped workshop to be able to do that (twice) in an afternoon.
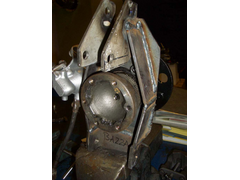
Rescued attachment uprights.jpg
Avoneer - 16/3/05 at 12:34 PM
Maybe a long afternoon then.
carlgeldard - 16/3/05 at 01:22 PM
Hey that my upright on the right.Stripped the suspension made the jig and did the mods in about 3 hrs. It takes longer for the paint to dry.
Come on Graham get you finger out. I will have passed my SVA at this rate.
Carl
PS Thats both in 3 hrs
[Edited on 16/3/05 by carlgeldard]
Northy - 16/3/05 at 06:27 PM
But Carl, aren't you a welder? And didn't you make them from scratch?
As I said, probably easier to make them from scratch, rather than modify existing ones
carlgeldard - 16/3/05 at 06:53 PM
Yes I was a welder in a passed life. The uprights were bought from Tiger thats why I have modified them just like everthing from Tiger.
Things from Tiger that I got
Book & Dimensions (Crap)
Uprights (Also Crap)
Bodywork (words fails)
Steering rack (fine but did'nt fit chassis as the book was wrong)
Graham do you want me to modify your uprights for you.
Carl
andrew.carwithen - 16/3/05 at 07:44 PM
quote:
Originally posted by carlgeldard
Hey that my upright on the right.Stripped the suspension made the jig and did the mods in about 3 hrs. It takes longer for the paint to dry.
Carl
PS Thats both in 3 hrs
[Edited on 16/3/05 by carlgeldard]
Carl,
As you've made up jigs, does that mean you'll be offering an Avon upright modification service to the rest of us? (for a price, of course!)
Andy.
Northy - 16/3/05 at 07:55 PM
Music to my ears!
How did you do it Carl? I don't think I'd trust my welding to suspension parts
Did you alter the mounting plate also to put the holes in the right place?
Cheers
[Edited on 16/3/05 by Northy]
carlgeldard - 16/3/05 at 10:05 PM
Why don't I do Graham's uprights and he can take photos and write a description. Then post the results on here for you to do yourself. A
small price to pay don't you think Graham.
Carl
andrew.carwithen - 20/3/05 at 06:06 PM
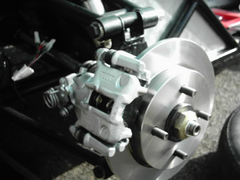
FINALLY!!!!
I've finisned the conversion from to discs and LSD!!!!
This is how I did it:-
Turned down lobro stubshaft to 75mm along its length (cost Ł10 by local engineering firm) as in attached photo....

Rescued attachment p100enginejpg00041.jpg
andrew.carwithen - 20/3/05 at 06:10 PM
...Then I used angle grinder to remove excess weld and protruding ring on inside of rear upright until flush. Trusty powerfile then used to chamfer
inside edge of tube (see attached photo)....

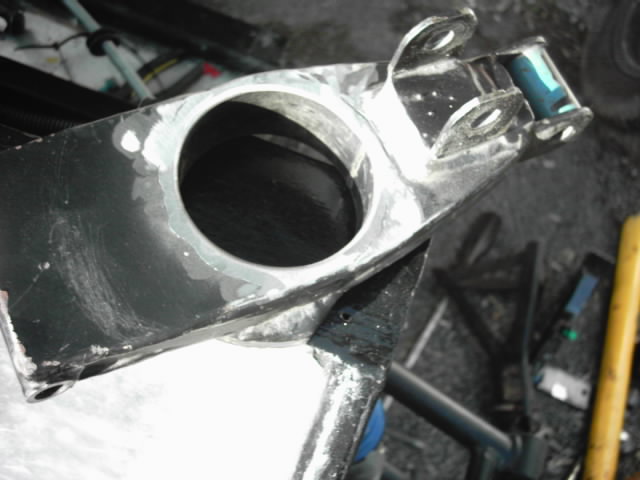
Rescued attachment p100enginejpg00040.jpg
andrew.carwithen - 20/3/05 at 06:13 PM
...Uprights were then swapped from one side to another to enable callipers to be fitted. (photo shows clearance which now exhists between stubshaft
and upright)..

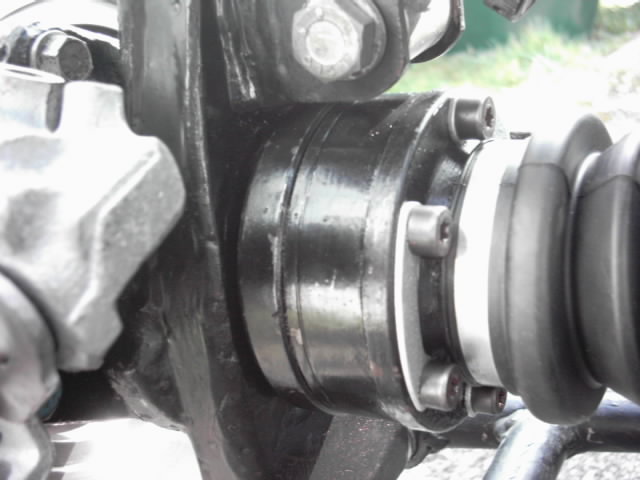
Rescued attachment p100enginejpg00042.jpg
andrew.carwithen - 20/3/05 at 06:14 PM
...pic of L/H rear hub assy..

Rescued attachment p100enginejpg00043.jpg
andrew.carwithen - 20/3/05 at 06:16 PM
..pic of R/H disc and calliper..

Rescued attachment p100enginejpg00044.jpg
andrew.carwithen - 20/3/05 at 06:19 PM
...and finally...pic of complete rear end inc. LSD!..(thanks to Lightning for advice). So it goes to show that it CAN be done with original uprights!
Rescued attachment p100enginejpg00055.jpg
Lightning - 20/3/05 at 06:29 PM
Lookin Good
Its about time that you got a move on.
Are you going to put on a bracket on the rear of the diff?
Went out in mine today...bloody cold
[Edited on 20/3/05 by Lightning]
Northy - 20/3/05 at 06:32 PM
Well done Andrew! Beat me to it!
How did you cope with the holes not lining up?
Northy - 20/3/05 at 06:33 PM
quote:
Originally posted by Lightning
Are you going to put on a bracket on the rear of the diff?
[Edited on 20/3/05 by Lightning]
I've got one on mine, but not sure if I'll re-fit it, is it necessary?
andrew.carwithen - 20/3/05 at 06:59 PM
quote:
Originally posted by Northy
Well done Andrew! Beat me to it!
How did you cope with the holes not lining up?
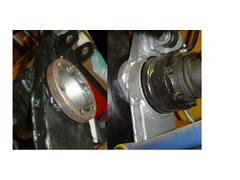
Basically, I found that the two 'lower' holes in the hub carrier would line up with their counterparts in the upright but the two
'upper' holes didn't.
I merely used a round file to elongate both these holes until they did!
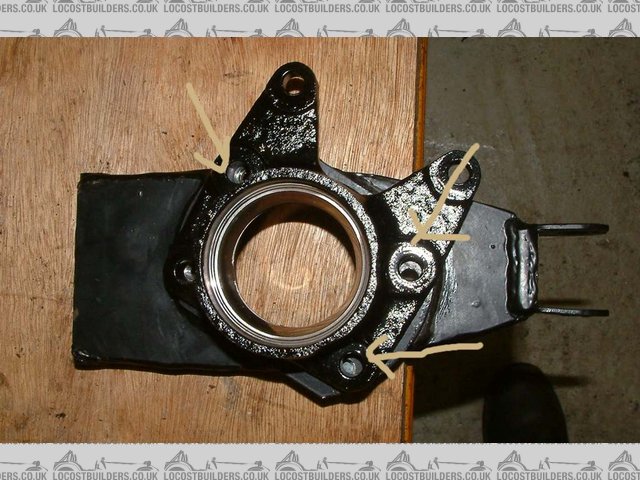
Hopefully, (I'm no David Bailey!) the photo will show the holes I had to elongate (the two to the left in pic!)

Rescued attachment p100enginejpg00056.jpg
Northy - 20/3/05 at 07:44 PM
Andrew,
Did you remove material from A & B? What about C?
How much clearance is there now between the edge of C and the back of the upright?
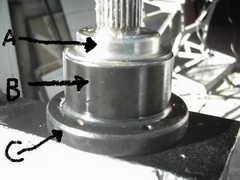
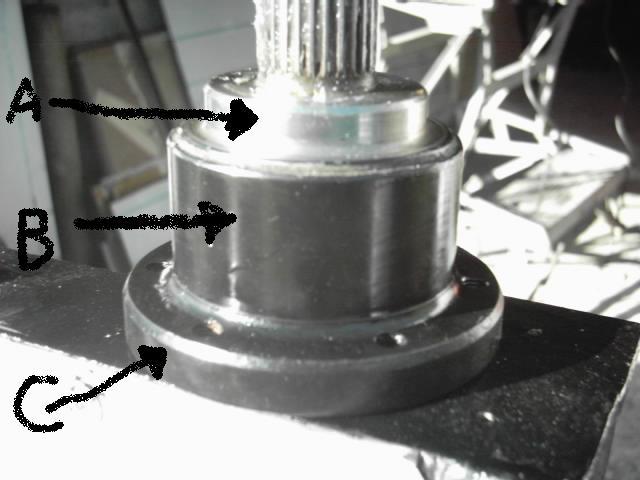
Rescued attachment untitled.JPG
Northy - 20/3/05 at 07:46 PM
What do the teeth (A) actually foul on?
I can't work this out, as B has to go into the upright, and A is much smaller diameter? And it all fitted together on the Sierra!
andrew.carwithen - 20/3/05 at 08:11 PM
quote:
Originally posted by Northy
Andrew,
Did you remove material from A & B? What about C?
How much clearance is there now between the edge of C and the back of the upright?
Graham,
'A' is untouched and is as original.
'B' is the area (which included the ABS teeth) I had turned down to 75mm along its length - which is approx. the diameter where
'B' meets 'C' on the original (there's a taper from the ABS teeth end to this shoulder on original. The ABS teeth are
hardened, but a carbide tipped tool soon makes short work of them!)
This allows stubshaft to pass through upright with approx 3-4 mm clearance all round.
Once the excess weld and protruding lip of the ring are ground back flush with the inner face of the upright and the hub bearings tightened, there is
a clearance again of about 3mm between the flange'C' and the upright. This clearance will not change due to the nature of the Sierra hub
bearings being done up so bleedy tight and so will not change!
I also ground a little away from the weld on the underside of the shock mounting bracket on the upright to aid clearance between it and 'C'.
Its worth a try on your uprights, Graham, as it'll save the hassle of having a larger ring welded in instead.
Regards,
Andy.
Northy - 20/3/05 at 08:18 PM
Just been to look at a stub axel in the garage, I should have done that first!
Do you just take the teeth off for clearance in the tube then?
andrew.carwithen - 20/3/05 at 08:26 PM
quote:
Originally posted by Northy
What do the teeth (A) actually foul on?
I can't work this out, as B has to go into the upright, and A is much smaller diameter? And it all fitted together on the Sierra!
Ah yes,but the Sierra didn't use Tiger uprights!
In theory, the teeth should pass through the upright as they're about 80mm in dia. and (according to the book!) the dia. of the ring in the
upright is 82mm.
BUT...this is assuming that the ring is perfectly central in relation to the four hub carrier holes in the upright! (and when have you known the Tiger
chassis to be that accurate?)
So, the reason for reducing the diameter is to build in a decent 'tolerance' for any inaccuracy in the upright - thus ensuring a good
running clearance.
Andy.
andrew.carwithen - 20/3/05 at 08:31 PM
quote:
Originally posted by Northy
Just been to look at a stub axel in the garage, I should have done that first!
Do you just take the teeth off for clearance in the tube then?
...Yep!..that's what I was trying to explain in my last post!
carlgeldard - 21/3/05 at 11:22 AM
Graham
Well what are you going to do now!!! Its sounds to me that there is more work and cost involved in that solution than just welding larger tubes in.
And removing weld metal from a Joint sounds suspect to me "But I’m only a qualified welder what do I know".
Sorry I don’t mean to offend anybody but weld metal is there for a reason. The last thing anybody wants is to be going around a corner and the upright
fails because the weld metal or reinforcement has been removed, just to save a bit time and effort.
Let me know Graham as I have still to get you some bits of tube today.
Carl
And also Ford must spend millions on research and development only for us to machine material off from what could be a case hardened component that
has been special designed and tested to do a particular job. It also scares me to think that the driveshaft is only 6 to 8 inches from your back and
the petrol tank. You just don’t want a component failure. One last thing to think about is you are going to be driving this car harder than MR average
in his old Serria and you will have more power going to the wheels.
[Edited on 21/3/05 by carlgeldard]
andrew.carwithen - 21/3/05 at 09:11 PM
Carl,
No offence taken, but its precisely because I'm not a qualified welder, that I modified my uprights in this way, rather than attempt welding in
larger tubes. I reckon if I had done, I would definitely compromise the strength of the upright due to my inept welding.
If the tube is so fundamental to the strength of the upright, why is it not welded around its cicumference to the same degree on the outer face of the
upright? Is it possible that its only purpose is to prevent water ingress into the cavity of the upright?
As regards taking material off the stub shaft, the lobro shafts are far more substantial than the push-in type drive shafts that were fitted. They are
not hardened (apart from the ABS teeth) and are merely cast steel.
The amount of power the shafts will have to transmit will be similar to that of a Sierra (I'm going to fit a Fireblade engine - approx 130bhp )
but through a much lighter vehicle and hence due to having to overcome less inertia to get the vehicle moving I would suggest be subject to less
stress?
I also went down this route because 'Lightning' had done this on his Avon last year and has suffered no detrimental effects since (touch
wood!)
As regards cost, the only outlay was the tenner to have the stubshafts turned down by a local engineering firm.
Regards,
Andy.
DaveFJ - 22/3/05 at 03:08 PM
maybe I am missing something - but the 'tube' in my standard rear hubs is actually just a thin strip of metal vary badly tacked (to overlap)
into a circle, from memory I would say it is only about 0.8mm thick. Do I take from opthers posts that their hubs are different to this ?
carlgeldard - 22/3/05 at 05:36 PM
The one's that I modified had I piece of tube in the middle, that had a wall thickness of 3.2mm. This was welded all the way around on the
outside of the upright and was stitched on the inside of the upright but on the outside face of the tube. (Inside the upright and can only be seen
during manufacture or as I did when cutting up the upright.) I still say that this needs to be welded. What I will do when I modifiy Grahams uprights
is to grind off all the weld as what has been done and subject it to visual and destructive tests and then let you know what I find.
I cannot be fairer than that.
Carl
Northy - 22/3/05 at 06:22 PM
quote:
Originally posted by carlgeldard
What I will do when I modifiy Grahams uprights is.......
.......and subject it to visual and destructive tests.......
Carl
Viper - 23/3/05 at 12:21 AM
now because i have been away for a while and because i am a lazy bastard i havent bothered to read all of this thread .
but
all the probs i have seen posted about havent affected me at all, why, because i used a doner that didn't have abs and i made my own uprights
because tigers ones are.... well all who know me know what i think of tigers stuff
carlgeldard - 23/3/05 at 08:12 AM
http://www.fat-pie.com/bfmtrailer.htm
Northy - 26/3/05 at 06:25 PM
Thanks again Carl
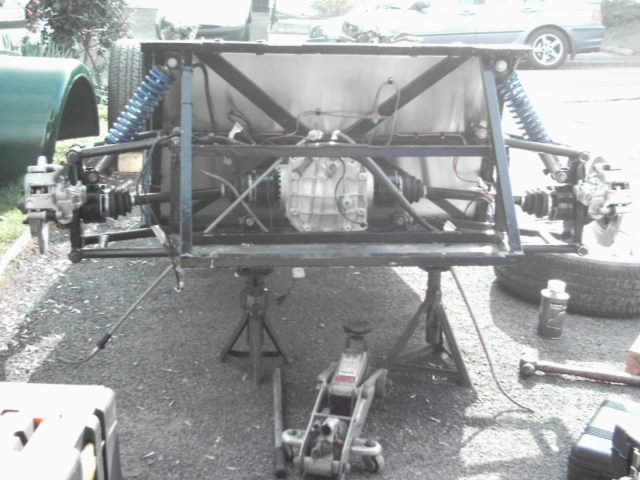
Rescued attachment Modified uprights.jpg
carlgeldard - 26/3/05 at 06:44 PM
From that angle it looks like the tube is welder off centre GOOD JOB IT'S NOT!!!! And you could have painted them first.
Carl
Northy - 26/3/05 at 06:48 PM
Didn't have time to paint them Carl, went shopping remember!
Didn't get to Elvington either.
Will paint them tomorrow and take better pics.
The tube is central everyone, just my crap camera work (my head is filling with snot!)
Northy - 26/3/05 at 06:50 PM
PS only another 1514 posts till you catch me up
carlgeldard - 26/3/05 at 09:08 PM
Well I better start posting crap just to catch up
http://www.fat-pie.com/chavs.htm
Watch tuseday with devvo
Carl
Northy - 27/3/05 at 12:33 PM
quote:
Originally posted by carlgeldard
Well I better start posting crap just to catch up
http://www.fat-pie.com/chavs.htm
Watch tuseday with devvo
Carl
Quality
Viper - 27/3/05 at 05:48 PM
one of mine, modded it a bit soon after this by removing the shock mount...


Avoneer - 27/3/05 at 05:57 PM
And now you're just showing off Viper!
Welcome back,
Pat...
Viper - 27/3/05 at 10:35 PM
hardley showing off, mine is far from finished
Northy - 2/4/05 at 05:21 PM
Andy / Carl,
How have you routed your flexy brake lines and handbrake cable? It looks like my flexy lines will foul on the end of the top wishbone. I might
have to get some bango style ends?
andrew.carwithen - 2/4/05 at 06:12 PM
Graham,
Firstly, did you swap your uprights from one side to the other, so that the callipers are rearmost or kept them as they were in which case, the
callipers will sit in front of the hubs?
(It doesn't make any difference - the flexi hoses will still foul on the upper wishbones!)
I'm also at the stage of sorting out how to fit the hoses.
I reckon there's about 40 mm clearance between the calliper and 'bone - too tight to bend the hoses to fit.
I believe Lightning fitted some sort of pre-formed right-angled bend to his callipers and then fitted the hoses to this. I,ve approached a local firm
who make up hydraulic pipes and hoses and they seem to think they may be able to make up something similar. Problem is, I believe that written
proof/confirmation they're fit for purpose is then req'd for SVA (at Exeter anyway!)
I hadn't thought of banjo unions, as an option. I'll suggest that to them!
I had also thought of swapping the bleed nipples with the flex hose connections so that the hose is clear of the wishbone. But then, it looks like it
would foul on the inner rim of the wheel itself (unless, perhaps, you were using larger dia. 17" wheels!)
The handbrake cable enters the callipers from underneath.
Hope that helps,
Andy.
Northy - 2/4/05 at 06:37 PM
Thanks for the reply Andy. I swoped the uprights so the calipers are at the rear, I think it looks better
I got Stainless braided lines made up by Rally design with the bolt on style ends, so I should be able to take the end off and replace them with bango
style ones Have you seen the Rally design ones? They'll make any length you want, and cheap.
andrew.carwithen - 2/4/05 at 07:16 PM
quote:
Originally posted by Northy
Thanks for the reply Andy. I swoped the uprights so the calipers are at the rear, I think it looks better
I got Stainless braided lines made up by Rally design with the bolt on style ends, so I should be able to take the end off and replace them with bango
style ones Have you seen the Rally design ones? They'll make any length you want, and cheap.
Graham,
The firm I referred to in my last post can also make up braided hoses at approx Ł1 per inch (inc. end fittings).
How does that compare to Rally Design?
What length are your braided hoses?
Have you got any pics of your modified uprights fitted yet?
Did Carl test them to destruction when modifying them?
Andy.
carlgeldard - 3/4/05 at 08:59 AM
As far as a destructive test goes then yes and no. I destructed the upright by cutting out the old tube, this allowed me to view the root of the weld,
this visual inspection showed me at a point there I could clearly see a lack of root penetration. I did'nt cut out a test piece and do a nick
break or macro etch to BS4872 because I was not at work or collage. But what I could see was this welded joint was not suitably prepared and welded to
allow all the weld metal (renforcement) to be ground flush.
Carl
Northy - 3/4/05 at 09:18 AM
Yeah, what Carl said. I fully agree. Here's a picture.
Basically between the metal that is the rear face of the upright and the tube itself there is a gap, as the rear face was welded on last during
manufacture. So when you've ground all the weld away, you've ground all the strength out of it!
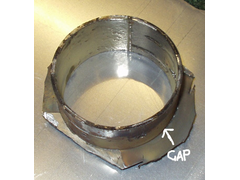
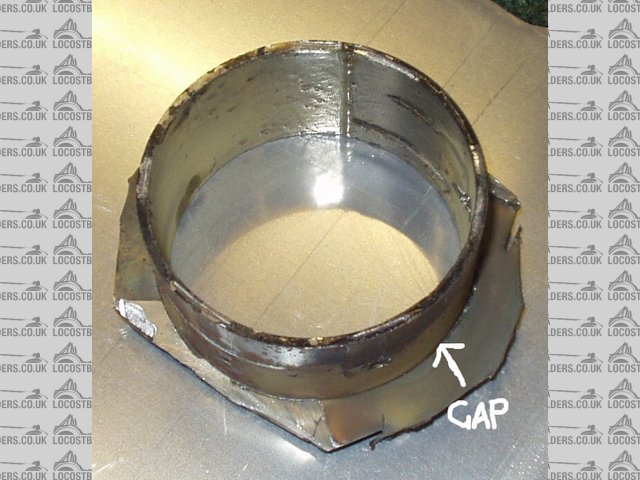
Rescued attachment Upright tube.jpg
andrew.carwithen - 3/4/05 at 09:23 AM
Fair enough, Carl.
When you exposed the inside cavity of the upright, was there a ring of reinforcing weld where the original tube meets the inside of the outer
face of the upright? (obviously can't go on the outside due to the hub carrier needing to sit flush on its mounting plate!)
What dia. larger tube did you fit and was it just mild steel and where can it be sourced from?
Andy.
Northy - 3/4/05 at 10:07 AM
Andy, I can answer some of that!
On mine there was only four 'tack' welds holding the tube to the outer face, as you can see from the picture the tube is perfectly intact.
If you look carefully you can see holes in it about halfway up where Carl drilled the four tacks out.
Can you see in the picture? Shall I mark them?
andrew.carwithen - 3/4/05 at 10:35 AM
quote:
Originally posted by Northy
Andy, I can answer some of that!
On mine there was only four 'tack' welds holding the tube to the outer face, as you can see from the picture the tube is perfectly intact.
If you look carefully you can see holes in it about halfway up where Carl drilled the four tacks out.
Can you see in the picture? Shall I mark them?
Well, that's my point.
If the tube is such an integral part to the overall strength of the upright, then surely it would be as heavily welded to the inside of the outer face
as it is to the outside of the inner face? (I hope that makes sense!) and not just tacked with a few welds?
I'm in no way disputing Carl's knowledge as a professional welder, ( I wouldn't do that on a subject I know little about). I'm
just putting forward what I think is a logical point.
I happily stand to be corrected.
Regards,
Andy.
carlgeldard - 3/4/05 at 03:43 PM
The tack welds on the inside are the just to help the welder hold the assembly together during the fabrication process all the strenght comes from the
welds on the outside of the upright. And one of the largest welds is no longer there.
Carl
Northy - 3/4/05 at 03:47 PM
Carl how did you route your brake lines and handbrake?
Did you use std ends on the brake flexys?
carlgeldard - 3/4/05 at 04:14 PM
I have my calipers at the front and with flexy pipe from a suziki jeep (How do you spell suzuki) not the vitara but the one before. This was the
correct length with a bonjo on one end and an M10 male at the other. As for the handbrake cable it comes across the car and sweeps to the underside of
the caliper.
The steel tube was 4" nominal bore steam pipe and cost me 2quid for a 6"length. The price of a bacon sandwich he must have been peckish.
Carl
Andy
You could try here.
Woodberry Chillcott & Co.Ltd
Unit 6, Eastern Wood Rd, Langage Ind Est, Plympton, Plymouth, Devon PL7 5ET
Tel: 01752 343421
Mcarthur Group Ltd
Unit D3-D4, Cot Hill Trading Estate,Plymouth Rd, Plympton, Plymouth, Devon PL7 1SR
Tel: 01752 339851
[Edited on 3/4/05 by carlgeldard]
Northy - 3/4/05 at 07:08 PM
Cheers Carl,
I'll order some bits tomorrow.
I think this conversion has made the back-end narrower
andrew.carwithen - 3/4/05 at 07:34 PM
quote:
Originally posted by carlgeldard
I have my calipers at the front and with flexy pipe from a suziki jeep (How do you spell suzuki) not the vitara but the one before. This was the
correct length with a bonjo on one end and an M10 male at the other. As for the handbrake cable it comes across the car and sweeps to the underside of
the caliper.
The steel tube was 4" nominal bore steam pipe and cost me 2quid for a 6"length. The price of a bacon sandwich he must have been peckish.
Carl
Andy
You could try here.
Woodberry Chillcott & Co.Ltd
Unit 6, Eastern Wood Rd, Langage Ind Est, Plympton, Plymouth, Devon PL7 5ET
Tel: 01752 343421
Mcarthur Group Ltd
Unit D3-D4, Cot Hill Trading Estate,Plymouth Rd, Plympton, Plymouth, Devon PL7 1SR
Tel: 01752 339851
[Edited on 3/4/05 by carlgeldard]
Blimey Carl,
You came a long way to get your tube!
Thanks for those firms/addresses.
Now, have you any pics of your callipers fitted - especially any that show the flexi pipes fitted to the callipers.
Which way are your callipers orientated? (i.e. with bleed nipple/pipe connection at top or bottom.)
Is the Suzuki jeep you refer to the SJ410?
Cheers,
Andy.
andrew.carwithen - 3/4/05 at 07:37 PM
quote:
Originally posted by Northy
Cheers Carl,
I think this conversion has made the back-end narrower
Eh?!!
Come on Graham, you gotta explain that one!
Andy (confused?)
carlgeldard - 3/4/05 at 07:49 PM
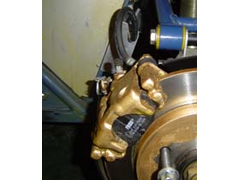
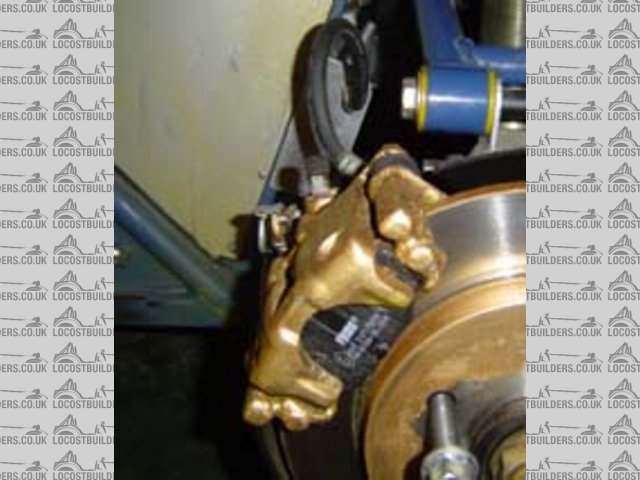
Yes thats the one
Rescued attachment wp2fd3f427.png
carlgeldard - 3/4/05 at 07:50 PM
and here another

Rescued attachment wp77dc3114.png
carlgeldard - 3/4/05 at 08:07 PM
You have to have the bleed nipples at the top as air rise's
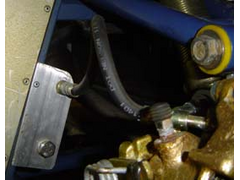
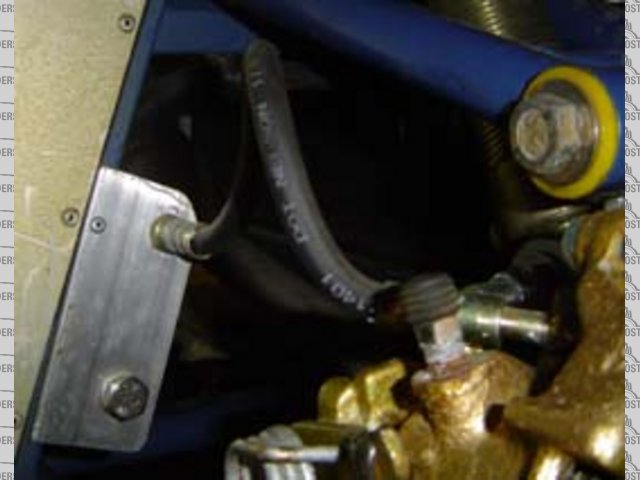
Rescued attachment DSC00340.JPG
carlgeldard - 3/4/05 at 08:09 PM
pipe fixed to chassis
Rescued attachment DSC00341.JPG
carlgeldard - 3/4/05 at 08:10 PM
and the last one
Rescued attachment DSC00342.JPG
carlgeldard - 3/4/05 at 08:12 PM
I think this conversion has made the back-end narrower
What do you mean???????
Carl
Northy - 3/4/05 at 08:13 PM
That the rear track is not as wide is with the 2L drums
carlgeldard - 3/4/05 at 08:36 PM
One word wheelspaces
I didn't know that, next Tiger will offer a Avon XL or a slim line lightwight that is 25mm slimmer to improve aerodynamic around the rear of the
car. You already have one wheel arch (cue pat)
Carl
andrew.carwithen - 3/4/05 at 08:50 PM
quote:
Originally posted by carlgeldard
You have to have the bleed nipples at the top as air rise's
That's how mine are orientated - with the nipples at the top.
But have a look at pics of rear callipers on some MK's and you'll see they're upside down!
Andy.
Northy - 3/4/05 at 09:01 PM
Does that make them crash? ONLY JOKING
andrew.carwithen - 3/4/05 at 09:04 PM
quote:
Originally posted by Northy
That the rear track is not as wide is with the 2L drums
Still not convinced, Graham.
Width between uprights hasn't changed. The disc hub and drum hub look to be the same size (though admittedly, I haven't measured them to
confirm). Same amount of thread exposed through hub nut when tightened etc....
....So, are inner rims of your wheels now fouling on the wishbones or something, for you to say that?
If so, personally for me, might be a good thing, (may mean that edges of wheels now won't protrude past outer edge of rear Arches!)
Got any pics of yours fittted? ( may throw up some light? )
Andy.
Northy - 3/4/05 at 09:09 PM
I only noticed it because the end of the stub axle and locknut stopped me fitting the centre cap in the centre of my rear wheels before, and after
fitting the wheels today it now looks even worse. I think mr Grinder and some thin spacers will cure it.
To be perfectly honest there doesn't look to be much in it.
andrew.carwithen - 3/4/05 at 09:09 PM
quote:
Originally posted by Northy
Does that make them crash? ONLY JOKING
Now, now Graham,
That's naughty! Mind, does seem to be the BEC varity of MK that's susceptible to spinning off.
Very worrying for me as I'll be fitting a blade engine now.
Hope its a trait that isn't contagious!
Andy.
andrew.carwithen - 9/4/05 at 11:17 AM
quote:
Originally posted by carlgeldard
I have my calipers at the front and with flexy pipe from a suziki jeep (How do you spell suzuki) not the vitara but the one before. This was the
correct length with a bonjo on one end and an M10 male at the other.
Carl,
I took my rear calliper into a hydraulic pipe manufacturers today, explaining I need a flexi with an end to clear the upper wishbone/upright mount.
I suggested using a banjo union but he reckoned that the calliper would have to be machined to suit the banjo bolt!!
I'm not convinced, however, and was wondering where you sourced your Suzuki flexi hoses and did they come complete with the banjo bolt and
washers?
Are your brakelines fully fitted and operational? (I presume you have no leaks at the rear calliper?)
Thanks,
Andy.
carlgeldard - 9/4/05 at 05:03 PM
I got the flexy hose's from a local motorfactors, than went to a motorcycle shop and got 2 banjo bolts and 4 copper washers. I got advice from an
hydraulics engineer at work first as I wanted to source the bolts and washers from him (foc but he didn't have any) The set-up works fine but the
calipers and the surface where the copper washers go were and are in good condition.
Carl
andrew.carwithen - 9/4/05 at 08:17 PM
Thanks, carl.
Andy.
Northy - 9/4/05 at 11:09 PM
I've just got some bango ends for my stainless brake pipes this week from Rally design. I'm hopefully going to fit them tomorrow, and bleed
the brakes. But this might not happen as we have our triplet nephews around tomorrow and tey will all want to have a play at driving the car!


