mike smith1
|
| posted on 29/5/07 at 11:57 AM |

|
|
Fuel Gauge
Hi,
Has any one installed a fuel guage after there build? We havent got one (obviously) and was wondering if possible the best way to install one
after.
I have seen the two style sensors the lever arm and the dip tube, any ideas appreciated, if not we'll just have to keep and eye on the
mileage.
Would just like a guage for the longer journeys
Mike

|
|
|
|
|
rayward
|
| posted on 29/5/07 at 12:08 PM |
|
|
what about installing a low fuel warning lamp instead, maybe easier and cheaper
Ray
|
|
|
mike smith1
|
| posted on 29/5/07 at 12:11 PM |
|
|
quote:
Originally posted by rayward
what about installing a low fuel warning lamp instead, maybe easier and cheaper
Ray
Yes anything is considered really, what bits would i need for the low fuel lamp?
Mike
|
|
|
rayward
|
| posted on 29/5/07 at 12:39 PM |
|
|
just a switch and and a dash indicator,
think jacko on here fitted one using a switch from RS components( www.rswww.com )
part number 338-9722
Ray
|
|
|
02GF74
|
| posted on 29/5/07 at 12:53 PM |
|
|
there are I guess to parts to do.
1. how do you fit the sensor to the fuel tank? Most guage sensors are screwed in so you need to somehow "thicken" the tank around the
hole to fit screws (not self tappers). Wleding a ring inside would be best but that has to be done prior to constructing the tnak. Wleding on the
ouside afterwarss is ok if you can ensure a air tight weld BUT YOU MSUT PURGE THE TAHNK OF ALL PETROL FUMES for obvious safety reasons.
Search the site and you will find that folks have used bolts fitted from the inside to sealed rivets.
2. secondly the guage and sender. the sender it usally a wire wound resistor, the slider being attached to an arm with float. The arm is like a
pievce of coat hanger wire so can be bent/shortened/extened to whatever fits (I have done this) into the tank. Obviously the sender will be most
accurate for the original arm and original tank shape but will still be effetive, although non-linear, if you shape the arm for the max and min fuel
level positions.
Best choose the guage that is designed to work with the sender - most senders are about 30 ohm fuill to 330 empty; if you have a mismatch eitehr it
won't workj at all, works in oposite direction or will be inaccurate.
not sure if that has helped or not.
oh, the vertical tube type are ££££.
|
|
|
mike smith1
|
| posted on 29/5/07 at 01:15 PM |
|
|
quote:
Originally posted by rayward
just a switch and and a dash indicator,
think jacko on here fitted one using a switch from RS components( www.rswww.com )
part number 338-9722
Ray
I take it the switch is an external mount type?
I'll drop him a u2u
Mike
|
|
|
flak monkey
|
| posted on 29/5/07 at 01:18 PM |
|
|
The float switches are fitted through a 23mm hole from the outside of the tank. You dont need access to the inside at all.
They work by compressing a nitrile seal on the inside and outside of the tank when you tighten the nut up on the outside.
For a standard fuel gauge you can use a split and tapped ring to bolt the sender in. No mess, no rivnuts, no welding and it wont leak.
Job done.
David
[Edited on 29/5/07 by flak monkey]
Sera
http://www.motosera.com
|
|
|
mike smith1
|
| posted on 29/5/07 at 01:29 PM |
|
|
quote:
Originally posted by flak monkey
The float switches are fitted through a 23mm hole from the outside of the tank. You dont need access to the inside at all.
They work by compressing a nitrile seal on the inside and outside of the tank when you tighten the nut up on the outside.
For a standard fuel gauge you can use a split and tapped ring to bolt the sender in. No mess, no rivnuts, no welding and it wont leak.
Job done.
David
[Edited on 29/5/07 by flak monkey]
Sorry for my numptyness have you any details of this split ring?
I like the idea of the low level light but i want to consider everything
Mike
|
|
|
flak monkey
|
| posted on 29/5/07 at 01:31 PM |
|
|
Just make a ring from say 5mm ali, with holes drilled and tapped the correct PCD to suit your sender. Cut away about 5mm of the ring's
circumference. This will allow you to pop it into the tank and hold it in with a couple of long bolts through your sender while still being able to
hold the ring in with one hand. Once you have the couple of long bolts in, you can use short ones for the rest.
Does that make sense?
I'll get a picture.
David
Sera
http://www.motosera.com
|
|
|
flak monkey
|
| posted on 29/5/07 at 01:35 PM |
|
|
Pic
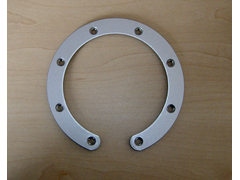 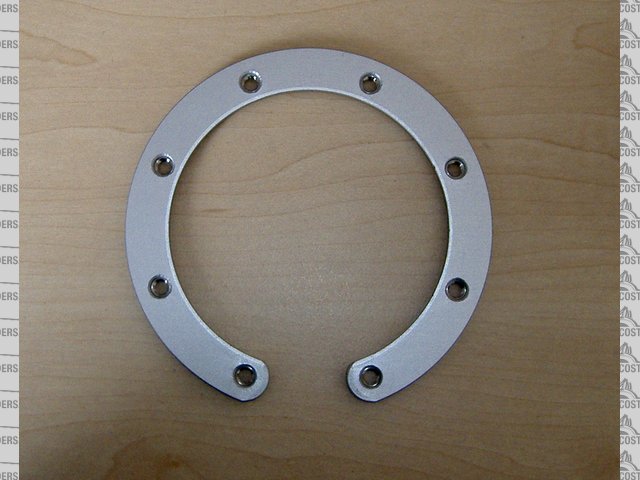
Rescued attachment ring.jpg
Sera
http://www.motosera.com
|
|
|
mike smith1
|
| posted on 29/5/07 at 01:38 PM |
|
|
quote:
Originally posted by flak monkey
Just make a ring from say 5mm ali, with holes drilled and tapped the correct PCD to suit your sender. Cut away about 5mm of the ring's
circumference. This will allow you to pop it into the tank and hold it in with a couple of long bolts through your sender while still being able to
hold the ring in with one hand. Once you have the couple of long bolts in, you can use short ones for the rest.
Does that make sense?
I'll get a picture.
David
Thanks David, Appreciate that matey,
Mike
|
|
|


.JPG)


