DIY Si
|
 posted on 29/4/06 at 08:49 AM posted on 29/4/06 at 08:49 AM |

|
|
nearly there
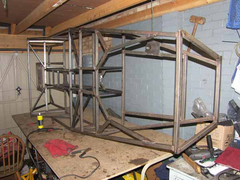
Just thought I'd post a few pics of progress so far. Feel free to cmment on anything you think I've missed/got wrong.
 
Rescued attachment PROGRESS2.jpg
|
|
|
|
|
ned
|
| posted on 29/4/06 at 08:52 AM |

|
|
quote:
Originally posted by DIY Si
Feel free to cmment on anything
how did you get the mallet to balance on the chassis like that? 
looking good so far 
Ned.
beware, I've got yellow skin
|
|
|
DIY Si
|
| posted on 29/4/06 at 08:56 AM |

|
|
Should've known that was coming. It's actually on two slightly iffy nails banged into the wall. I ran out of bench space and rawl pulgs.
|
|
|
mookaloid
|
| posted on 29/4/06 at 09:28 AM |

|
|
quote:
how did you get the mallet to balance on the chassis like that? 
   
Good job
|
|
|
theconrodkid
|
| posted on 29/4/06 at 09:43 AM |

|
|
the tube that looks like its at the bottom of the dash could collide wth your knees,should be round as 19mm dia rule aplies there
who cares who wins
pass the pork pies
|
|
|
Peteff
|
| posted on 29/4/06 at 09:54 AM |

|
|
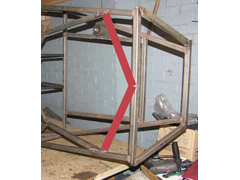
The two bits at the front.
 
Rescued attachment PROGRESS2.jpg
yours, Pete
I went into the RSPCA office the other day. It was so small you could hardly swing a cat in there.
|
|
|
Humbug
|
| posted on 29/4/06 at 09:59 AM |

|
|
Looks like you need to swivel through 90 degrees it so that you don't tip out when sitting in it 
|
|
|
DIY Si
|
| posted on 29/4/06 at 10:12 AM |

|
|
The two front rails are going in when the front wishbones/Fu's are in place. Should be able to get a better placement of them that way.
The tube that will be under the dash will be covered in roll cage foam to meet the rules. And it's actually more than half way down my legs,
since the seat'll be against the rear sloping bit. The chassis's +4 in the passenger bit so I wanted little more tubing in that area.
Might have gone a bit OTT, but it can't hurt. I hope.
|
|
|
omega0684
|
| posted on 29/4/06 at 11:03 AM |

|
|
alright simon, chassis looks great, i wish i could weld like that, when my car is done i will have to come round so you can teach me how to weld ,
maybe then i can start manufacturing some of my own stuff ,
maybe then i can start manufacturing some of my own stuff
ATB Alex
I love Pinto's, even if i did get mine from P&O!
|
|
|
DIY Si
|
| posted on 29/4/06 at 12:02 PM |

|
|
Blimey, praise indeed! But I'll see what I can do. It's realy not as hard as it looks. I only got my cheap (read rubbish) welder in
oct/nov time, but I'm happy enought to start building a de-dion kit when it arrives. Once the chassis has a floor and the kit's complete
for the back I'll be making a start on some wide track wishbones to suit my granada rear track width, which is something like 10" wider
than escort, and wider than sierra. But I'll see what I can do. It's realy not as hard as it looks. I only got my cheap (read rubbish) welder in
oct/nov time, but I'm happy enought to start building a de-dion kit when it arrives. Once the chassis has a floor and the kit's complete
for the back I'll be making a start on some wide track wishbones to suit my granada rear track width, which is something like 10" wider
than escort, and wider than sierra.
|
|
|
coozer
|
| posted on 29/4/06 at 04:00 PM |

|
|
Crack on lad, don't let it go off the boil. If only lager was banned I would have built hundreds of them by now!!
1972 V8 Jago
1980 Z750
|
|
|
Friberg
|
| posted on 4/5/06 at 08:58 AM |

|
|
I wonder why you haven't made a Y-tube at the bottom of the engine bay like you have at the top?
An engine without turbo sucks!
|
|
|
DIY Si
|
| posted on 4/5/06 at 07:15 PM |

|
|
Because there'll be a welded 16 swg plate below the two tubes running there. I'm going for a fully welded full in as many places as poss.
Probably going to have the engine bay bottom, tunnel floor and boot floor at the back removable.
|
|
|


