wicket
|
| posted on 16/3/05 at 02:07 PM |

|
|
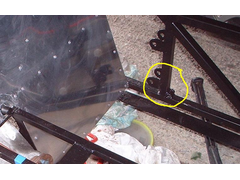
Seat belt fixing point
I need some advice on the bottom outer fixing point.
The original idea is to use the lower trailing arm bolt which goes through the fully welded triangular plate, but this needs longer bolts, but the
next bolt length up means the threaded section is not long enough and the shouldered bushes need boring out to fit the M12 bolts.
So I am considering drilling a new holes to use the correct size 11/16" UNF bolts in the position shown in the attached pictures, the outer
trailing arm bracket is fully welded to the 1" sq section tube and to the panelled section.
Comments on the idea would be much appreciated.
Eric
|
|
|
|
|
tom_loughlin
|
| posted on 16/3/05 at 03:11 PM |
|
|
mine has a welded threaded tube sitting on the joint by the rear suspension mounts - hope the pic helps - if it attaches!
Rescued attachment sb bracket.JPG
|
|
|
britishtrident
|
| posted on 16/3/05 at 03:22 PM |
|
|
It will be pretty solid although it has the disadvantage of attaching the belt to the suspension but this is diificult to avoid Mark Allanson did
some nicely engineered seat belt mounts with Mark's usual first class finish.
[Edited on 16/3/05 by britishtrident]
|
|
|
Rob Lane
|
| posted on 16/3/05 at 03:35 PM |
|
|
I seem to recall that it was an SVA fail to mount it under a suspension bolt.
|
|
|
mangogrooveworkshop
|
| posted on 16/3/05 at 03:46 PM |
|
|
If u take a hit to the suspention and it rips this bit off......mmmmm there goes your mounting.
For a couple of hours and ten pence worth of plate ....
|
|
|
MikeR
|
| posted on 16/3/05 at 04:45 PM |
|
|
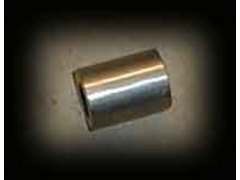
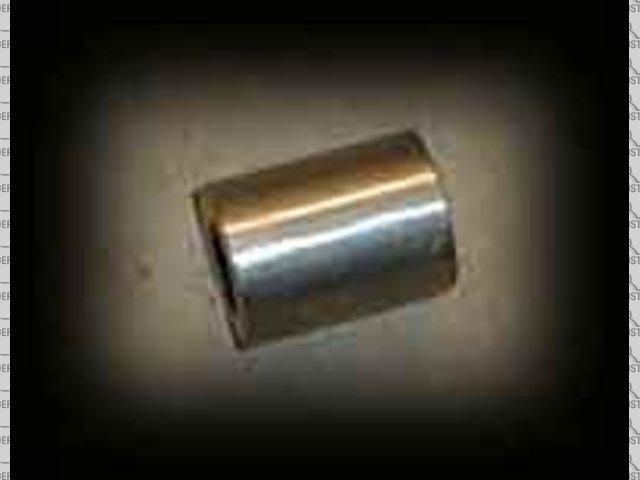
where did you get the threaded tube from as i need 8 x 1" for mine.
|
|
|
britishtrident
|
| posted on 16/3/05 at 05:58 PM |
|
|
Marc Norden supplies threaded tube http://www.mnrltd.co.uk/Brackets.html
[Edited on 16/3/05 by britishtrident]
Rescued attachment seat-belt-boss-weld-on.jpg
|
|
|
clbarclay
|
| posted on 16/3/05 at 06:21 PM |
|
|
steel stock, a drill and tap
Heypresto threaded tube, just like the top front wishbones.
Then again you might have bought ready made wishbones and don't fancy the work just for a few seatbelt mounts.
|
|
|
MikeR
|
| posted on 16/3/05 at 07:02 PM |
|
|
 yep i bought my wishbones a few years ago - in fact i think i was one of tritons first customers waaay before they teamed up with GTS. yep i bought my wishbones a few years ago - in fact i think i was one of tritons first customers waaay before they teamed up with GTS.
although having checked the web site MNR's are 3.50 ...... heck i wasn't expecting to pay that much!!!! any one know of cheeper?
|
|
|
clbarclay
|
| posted on 16/3/05 at 08:02 PM |
|
|
You could weld a thick triangular plate into the corner, drill a hole in the plate use a nut+bolt to mount the seat belt.
This should work for the lower belt mounts.
|
|
|
ned
|
| posted on 16/3/05 at 10:19 PM |
|
|
I'm after some threaded tube for the top seatbelt mounts. Darren has them listed onthe gts site at 1.95, i have emailed him and am awaiting a
reply. Unless there is a better option this is probably what i'll go for as i need the its in about a week as i plan on finishing the chassis
over easter and will need all the bits to finish it off before powder coating..
Ned.
beware, I've got yellow skin
|
|
|
MikeR
|
| posted on 16/3/05 at 10:26 PM |
|
|
where abouts, i hunted and couldn't find them. £1.95 is what i'd expect to pay ..... so it looks like darren gets my money
|
|
|
Triton
|
| posted on 16/3/05 at 10:29 PM |
|
|
MikeR......Am i right in thinking you haven't finished it yet!!!.....you collected those in 2001 not long after i set up in that dodgy unit in
Northampton.
Mark
|
|
|
Triton
|
| posted on 16/3/05 at 10:32 PM |
|
|
You will need 8 of those 20mm dia doodahs with 7/16 unf threads
|
|
|
ned
|
| posted on 16/3/05 at 10:35 PM |
|
|
in the chassis section, look hard as its a small 1 line bit with a broken pdf link and no picture, think it's just under the pedal boxes...
I only need 4 for the tops as i've done the bottom mounts out of triangles of 3mm plate..
Ned.
beware, I've got yellow skin
|
|
|
MikeR
|
| posted on 16/3/05 at 10:37 PM |
|
|

note the type of car i'm building - slowcost!
Organising the midlands meeting takes a lot of time + there are girls to chase and ..... errm .... well no i've not finished
but i will one day, hopefully going to redo the side triangulation of the engine bay to tie it up with the nearside diagonal i'll add which will
then allow me to fit the caterham exhaust i've got.......
then its seat belt mounts,weld in the rad mounts i've had made for a year (although i'll probably remake them), make my fuel tank, get NS
DEV to sort out my roll bar, paint it, wire it up, redo lots and ..... ooh, make my brakes and ... and ... etc etc
|
|
|
MikeR
|
| posted on 16/3/05 at 10:38 PM |
|
|
quote:
Originally posted by ned
in the chassis section, look hard as its a small 1 line bit with a broken pdf link and no picture, think it's just under the pedal boxes...
Ned.
Found it, but they are 2.95 not 1.95  oh well... oh well...
|
|
|
ned
|
| posted on 16/3/05 at 10:40 PM |
|
|
oops! sorry, at least they are slighlty cheaper than mnr's..
maybe darren can do us a bulk discount lol
unless anyone else out htere would be willing to supply some suitable threaded tube for a cheaper but reasonable remuneration?
Ned.
beware, I've got yellow skin
|
|
|
Triton
|
| posted on 16/3/05 at 10:42 PM |
|
|
3mm plate with 7/16 unf full nuts (unplated)welded on then but won't look as neat unless you get fancy with the brackets especially for the ones
on show.
|
|
|
ned
|
| posted on 16/3/05 at 10:46 PM |
|
|
i was gonna use threaded tube to try and get a bit of extra height to make sure the required seat base to harness height is correct for sva.
the plate and nut idea is a good one (though i only have nylocks which will melt during welding!) as it could be hidden by a tonneau style boot cover,
will have to see.
Thanks Mark..
beware, I've got yellow skin
|
|
|
Triton
|
| posted on 16/3/05 at 10:52 PM |
|
|
Make a channel section with a 7/16unf clearance hole....shape it so it looks like it was thought about then weld that on.
You shouldn't have to raise the mounts if you have low seats....besides taking the mounts too high has all sorts of other problems.
|
|
|
MikeR
|
| posted on 16/3/05 at 11:00 PM |
|
|
I remember a guy years ago raised his mounts. The birmingham test centre made him brace the mount as it was adding a bending motion onto the top rail.
|
|
|
britishtrident
|
| posted on 17/3/05 at 08:29 AM |
|
|
quote:
Originally posted by clbarclay
steel stock, a drill and tap
Heypresto threaded tube, just like the top front wishbones.
Then again you might have bought ready made wishbones and don't fancy the work just for a few seatbelt mounts.
Rather you than me centre drilling round bar on a drill press --- a lathe is really the tool for the job likewise the lathe chuck makes tapping it
much easier.
|
|
|
britishtrident
|
| posted on 17/3/05 at 08:38 AM |
|
|
quote:
Originally posted by MikeR
I remember a guy years ago raised his mounts. The birmingham test centre made him brace the mount as it was adding a bending motion onto the top rail.
If I was an SVA inspector I wouldn't pass the raised mount shown in edition2 of the book,
With seat belt mounts the way I look at if it dosen't look strong enough to attach a tow rope to without causing damage it is nowhere near
strong enough for a seat belt anchorage.
I am using a Westfield style "camel hump" seat belt mount --- member "O" is made of 25x25x2 with the hump also made of
similar material. If starting a fresh I would use 30x30x2 and make the chassis 25mm deeper front and rear.
[Edited on 17/3/05 by britishtrident]
|
|
|
MikeR
|
| posted on 17/3/05 at 08:40 AM |
|
|
whats the westfield camel hump - have you got any pictures?
|
|
|