Avoneer
|
| posted on 19/1/05 at 10:29 PM |

|
|
Front bone brackets
Right guys,
I have 8 brackets and 4 bones.
What's the best way to get everything aligned correctly and which bracket shall I start with first.
Cheers,
Pat..
No trees were killed in the sending of this message.
However a large number of electrons were terribly inconvenienced.
|
|
|
|
|
Northy
|
| posted on 19/1/05 at 10:34 PM |
|
|
Got any bush? 
Graham
Website under construction. Help greatfully received as I don't really know what I'm doing! 
"If a man says something in the woods and there are no women there, is he still wrong?"
Built 2L 8 Valve Vx Powered Avon
|
|
|
Mix
|
| posted on 20/1/05 at 09:10 AM |
|
|
I made an 'H' shaped assy with holes driled in the legs to accept threaded rods the same distance apart as the upper and lower mounts. The
brackets were secured to the threaded rod at the required separation with nuts. I then tacked the lower brackets in position, rotated the
'H' frame around the lower pivot to bring the upper bracket in contact with the chassis and tacked them.
I've seen examples of another jig to ensure the lower two pairs of brackets remain parallel but I didn't find it too difficult to achieve
this by accurately clamping the chassis to the baseboard and marking out on that.
Mick
|
|
|
James
|
| posted on 20/1/05 at 12:45 PM |
|
|
Pat,
These any good?
Image deleted by owner
Image deleted by owner
I would use the lower, rear bracket as the datum point and work from there.
Hope that helps,
James
|
|
|
ned
|
| posted on 20/1/05 at 12:48 PM |
|
|
I did the same as james, but with some old bits of ply/mdf i had floating around. also remember to mark the centre lines of the cross members of the
jig and align these with the centreline of the chassis so the brackets are correctly positioned in all planes. Plenty of g-clamps come in handy, start
with the bottom wishbone, bottom bone rear mount is the easiest to position first imho as it sits flat on the lower chassis rails....
oh, and measure it lots of time before tacking it up
Ned.
 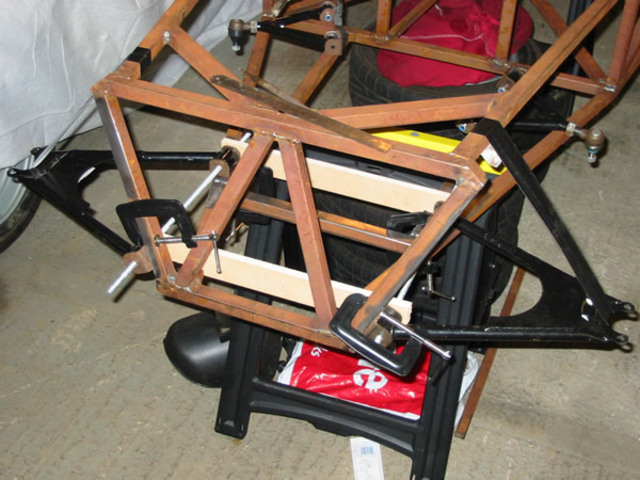
front lower jig
[Edited on 20/1/05 by ned]
beware, I've got yellow skin
|
|
|
Mix
|
| posted on 20/1/05 at 03:13 PM |
|
|
Oh and I almost forgot!!!
I fitted FU 1&2 at the same time as the brackets. 
Mick
|
|
|
James
|
| posted on 20/1/05 at 03:22 PM |
|
|
quote:
Originally posted by Mix
Oh and I almost forgot!!!
I fitted FU 1&2 at the same time as the brackets.
Mick
Nah, it's much more fun just to drop lucky like I did and have them in exactly the right place!
James
|
|
|
Mix
|
| posted on 20/1/05 at 03:34 PM |
|
|
Looks like theres's a bit of a gap on that right hand upper rear.
Mick
|
|
|
Mix
|
| posted on 20/1/05 at 03:46 PM |
|
|
Ned
The book is wrong !! 
Please check the position of your top bones before going much further
Mick
|
|
|
Avoneer
|
| posted on 20/1/05 at 04:36 PM |
|
|
Cheers guys.
That's everything I need to know.
And I agree, Ned has definately got his front top bones in the wrong place.
Pat...
No trees were killed in the sending of this message.
However a large number of electrons were terribly inconvenienced.
|
|
|
ned
|
| posted on 20/1/05 at 04:45 PM |
|
|
Ahem - pic was 'work in progress' and i must say they have progressed a little closer to the front of the car now!! i've also
replaced my 'gaffa tape special' shocks.
Ned.
beware, I've got yellow skin
|
|
|
James
|
| posted on 20/1/05 at 05:31 PM |
|
|
quote:
Originally posted by Mix
Looks like theres's a bit of a gap on that right hand upper rear.
Mick
Hey, I'm not that lucky!
James
|
|
|


%20(WinCE).JPG)


