Piledhigher
|
| posted on 23/1/04 at 08:12 PM |

|
|
New build
New builder
Hello all,
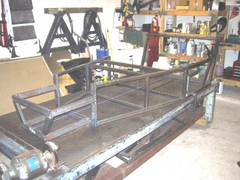
I have been lurking around this site for several months listening and learning, thanks by the way. Have started my chassis build and would like some
feed back on the designed front end.
Thanks for your input.
Cory
Houston, TX
 
Rescued attachment Chassis.jpg
|
|
|
|
|
Kitlooney1000
|
| posted on 23/1/04 at 09:04 PM |

|
|
its different!!
whats the purpose of the modification?
|
|
|
Hellfire
|
| posted on 23/1/04 at 10:36 PM |

|
|
is it a trike in disguise?
Or maybe a "rodder"?
I GIVE IN - WHAT WILL IT BE?

|
|
|
200mph
|
| posted on 23/1/04 at 10:58 PM |

|
|
If he's american, he has a very very very long right leg
and a normal sized left one??
  
|
|
|
JoelP
|
| posted on 23/1/04 at 11:00 PM |

|
|
i know why hes done it like that!!!! makes it easier to line up the suspension brackets because the mounting points are parallel!!! gonna have a
closer look now...
looks nice with the oversized tubes. i would add an X shape in front of the engine, ideally at the bit where it steps down to the nose bars, plus a
flat x at the bottom to stop it flexing in corners. i appreciate that you may well have planned to do these anyway, just thought id mention it!
mines much like that BTW, 'cept with inch tubes and LOADS of diagonals. Should work fine, i hope!!
[Edited on 23/1/04 by JoelP]
|
|
|
Piledhigher
|
| posted on 23/1/04 at 11:20 PM |

|
|
JoelP
You are right on the mark. This design should allow for easy a-arm alignment and adjustment. I do plan on intalling an x-brace in front of the
engine as you suggest. I will use 18G sheet for the bottom to stop any side-to-side flex.
I used 1x2 tubing 0.083 wall for increased strength in the front end because I plan on installing the shocks inside the frame.
Also, the rear will mirror the front end for the IRS.
Cheers.
Cory
[Edited on 23/1/04 by Piledhigher]
[Edited on 23/1/04 by Piledhigher]
|
|
|
JoelP
|
| posted on 23/1/04 at 11:34 PM |

|
|
looks nice, keep us posted!!
|
|
|
liam.mccaffrey
|
| posted on 24/1/04 at 10:17 PM |

|
|
when i first saw it I thought it was to enable parrallel suspension mounting points
but was afraid to say!
[Edited on 24/1/04 by liam.mccaffrey]
|
|
|
Bigfoot
|
 posted on 27/1/04 at 12:08 PM posted on 27/1/04 at 12:08 PM |

|
|
Hi Cory,
Don't be offended by some of the replies, the resident comedians on this forum are one of it's more enjoyable features.
Although my chassis is much larger, and does not look at all like yours ( or the book) I too have opted to use parallel chassis mounts. It is (IMHO) a
much better layout, the book chassis looks like the suspension mounts were an after-thought, rather than a design feature. (that theory should get
shot down pretty quick).
Like you I have also kept the top and bottom chassis tubes parallel, rather than drawing the lower one in at the front. This buys you some valuable
foot room, and you can not tell the difference when the panels are on.
It may just be the way it is photographed, but you do seem to have a rather narrow chassis, but there are no rules (are there?) you can build what you
like.
I always do, and I've built lottsa cars.
Cheers
Bigfoot
|
|
|
Simon
|
| posted on 27/1/04 at 12:32 PM |

|
|
"If he's american, he has a very very very long right leg
and a normal sized left one?? "
What makes you think the seat is on the left. It may be centrally mounted and he has a very large middle leg
Cory,
Seriously - Like your thinking, but my concern is mountings for wishbones and height of upright. Will you be able to mount brackets in the right
places.
Seem to be talking gibberish, but hopefully you get my point.
ATB
Simon
|
|
|
Dale
|
| posted on 27/1/04 at 01:25 PM |

|
|
Here is another rather overdone front for mulitiple mounting possisions -also strong enough to put two bumperett shocks mounted to. The front of my
car is only 18 inches at the grill so the mounting points had to be brought quite inboard.
Dale
http://www.locostbuilders.co.uk/upload/Resize of build pictures oct16 2003 008.jpg
|
|
|
Dale
|
| posted on 27/1/04 at 01:31 PM |

|
|
try again
http://www.locostbuilders.co.uk/upload/tackweldfront.jpg
Dale
|
|
|
Dale
|
| posted on 27/1/04 at 01:33 PM |

|
|
I think I need much more coffee
 
Rescued attachment tackweldfront.jpg
|
|
|
Piledhigher
|
| posted on 27/1/04 at 03:46 PM |

|
|
First, I would like to thank everyone for their input, especially the long middle leg comment.
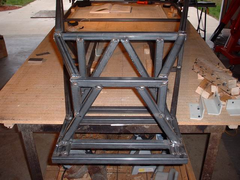
It is hard to tell from the attached pic but the top and bottom suspension arm mounting bars are parallel but not the same width. The bottom
"box" is only 15" wide while the top "box" is 23" wide. This will allow for uneven length suspension arms. The
suspension arm mounting bars are 17" long, which will allow ~15" wide suspension arms (at the mounts) to better distribute the forces
produced by the tires across the entire front of the car. BTW, I plan on using rod ends on the suspension arms.
The proportions of the frame may look a little off at the suspension mounting points but the frame is 2" taller than the book height behind the
suspension mounting bars.
The differential carrier and rear suspension mounting bars will have the same dimensions as the front (IRS setup). I have not yet constructed the
center tunnel as this must carry most of the acceleration/suspension forces from the rear of the car and must be stronger in an IRS car than that
proposed in the book, in my opinion.
I will heading off to the Rolex 24hrs at Daytona Thursday (our version of Lemans) for additional inspiration. Hope to get back on the car next
weekend.
Cheers,
Cory
[Edited on 27/1/04 by Piledhigher]
|
|
|
Piledhigher
|
| posted on 27/1/04 at 03:56 PM |

|
|
Take a look at my photo archive for a better idea of the front end design.
Cory
|
|
|
Peteff
|
| posted on 27/1/04 at 04:10 PM |

|
|
Have you sorted out a steering rack for use in it yet. With the taper finishing early and the front bars parallel you will not have much room for the
steering column without resorting to some u.j. trickery. It will also be difficult to line up the connection to the column unless your joint is
somewhere near the centre, which not many are.
yours, Pete.
yours, Pete
I went into the RSPCA office the other day. It was so small you could hardly swing a cat in there.
|
|
|
Piledhigher
|
| posted on 27/1/04 at 04:27 PM |

|
|
A right handed steering rack should work fine. The rack does not necessarily need to be mounted below the steering arm of the upright. It can be
mounted above with the tie rod pointed down if the tie rod mounting hole of the steering arm is appropriately altered. This should give me a fairly
straight shot from the steering wheel to the rack. If not, old Porsche 914 steering racks are center units and can be found in the US fairly
cheaply.
Cory
|
|
|
JoelP
|
| posted on 27/1/04 at 05:07 PM |

|
|
i must say i like your approach. when doing my front end i made the bottom and top bars parallel but followed the book for the widths, to make the
camber change in bump more similar to the book, which assumedly has been though out and works well (though not guarenteed!).
as for the steering rack positioning, i dont think it will be hard to get on suitable, or at least modify one, but do be careful of the bump steer
which will result from having it much above (or below/infront/behind) of the steering taper on the hubs. having said that its not hard to place.
all the best anyway, Joel.
|
|
|


