Wishbones under bending loads
jambojeef - 24/6/05 at 11:58 PM
Hello,
Ive been reading topics about this but cant quite seem to find an answer to this one.
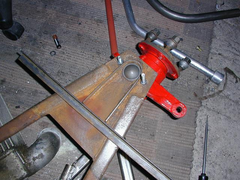
Look at the picture of the underside of my front lower bones - you can see the area where the suspension bracket is mounted on the other side and the
strengthening ribs and plate that were there when i bougth the part-finished chassis.
How do I best stiffen the plate to take the susp mounting since its a bit further out?
What do you think of my angled steel idea? Might make an upside down"U" shape and lead the angle down the wishbones beyond the point where
the plate stops to give a progressive distribution of the bending load.
I know it aint ideal but what would you do?
Geoff


Rescued attachment lower bones.JPG
JoelP - 25/6/05 at 07:26 AM
on the bright side, a bike engine is quite light so the bones are under less stress. HOwever, the suspension point is a long way in from the end, and
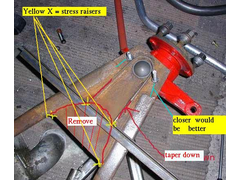
a more fussy person would point out that the square end of the plate acts as a stress raiser. You could actually cut a semi circle out and make it
stronger (the area where it wants to bend would not be focused so much). I would also attempt to get the bracket further out, maybe use a push
rod?!
Or alternatively, you could just give it a stiff shakedown when finished to make sure it wont fail in normal use 
ps, very tidy by the way, well made!
[Edited on 25/6/05 by JoelP]
cymtriks - 25/6/05 at 07:41 AM
The book wishbone is 13.4 inches long and has the spring mounted 4.3 inches from the centre of the hub pivot. This amount of offset isn't good.
The maths suggests that the wishbone is overloaded but experience suggests that only a small number of cars have any problems at all. There have only
been a small number of "bent wishbone" issues on this forum for example.
If you move the spring mount closer to the hub things will get better. If you move it further away things will get worse.
Caterham put their spring mount centre about 2 inches from the hub pivot centre and they use a V shaped wishbone with the hub pivot at the end of the
V as opposed to the Locost design with the hub pivot between the tube ends. The Caterham design is good.
If you can it is much better to move the spring mount closer to the wheel than to try to strengthen a mount further from the hub.
britishtrident - 25/6/05 at 08:17 AM
try this


Rescued attachment lower2.jpg
jambojeef - 25/6/05 at 09:13 AM
Hello,
Thanks for your replies gentlemen. Your suggestions would be perfect but i cant move the suspension mounting further outboard! And BTs suggestion of
curving the plate to avoid stress raisers would also be ideal but as you'll see from this picture I can only curve it so much.
I initally hoped I could do what you've all suggested but the suspension mount has to stay where it is.
So its a case of strengthening and spreading the load from its existing point of application im afraid!
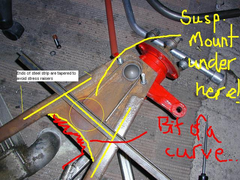
How about this:
A bit of a curve to prevent stress raising - a kind of I-beam shape which is very messy with bending loads and stuff unfortunately but I cant think of
another way!
Geoff
[Edited on 25/6/05 by jambojeef]


Rescued attachment lower bones2.JPG
cymtriks - 25/6/05 at 01:04 PM
Can you shows or just tell us why the spring mount needs to be so far from the hub?
The spring/damper units will work perfectly well at normal 7 angles of about 40 degrees from the vertical. If damper length is an issue then get
longer dampers! They work better and your wishbone will be sorted.
The Caterham puts its springs as close to the hubs as possible. If you need more evidence look at any race car. You will see that the push rods are
mounted as close to the hubs as possible. There are very good reasons for this!
jambojeef - 25/6/05 at 01:16 PM
Hi Cymtriks,
You're completely right of course - the solution is to get longer dampers or run them further out at a shallower angle.
I initially wanted the shocks at a minimum 45 degress to avoid falling rates but my subsequent research seems to suggest this isnt such a big deal on
7s?
Is there a way I can use this set up and strengthen things a little or do you think its just not possble?
Geoff
JonBowden - 25/6/05 at 02:52 PM
cymtriks
have you or anyone else published a better wishbone design - I would be interested to see one (and eventualy use one)
Dale - 25/6/05 at 03:59 PM
I would agree that the spring load should be as close to the ball joint as possible. From reading the threads on bent wishbones it looks to me that
most of the failures (not many) was on loaded braking. This is a worry for me as my wishbones are a fair bit longer - and maybe for those using +442
chassis where the track is 4 inches wider but the nose is the same width as the book. I am getting a FEA package next week to try and figure out my
loads but have also considered a 3rd arm on the wishbone coming back at much more of an angle to the back side of the car to follow the arc of the
wheels movment- this would take up more than enough strain on braking and may give a good place to mount the sway bar on.
Dale
britishtrident - 25/6/05 at 07:54 PM
Best advice on making lower wishbones is buy a set of pre-cut from any the estabished and respected names. I bought mine from Darren but it was a
finely balanced choice.
cymtriks - 26/6/05 at 08:05 AM
The front suspension is rising rate. I was surprised by this when someone else posted that fact on this forum but spread sheet the math and see for
yourself, rising it is.
You won't get falling rate by moving the lower mount outboard by a couple of inches.
The design I'd copy is Caterham. The main two points are to get the spring mount closer to the hub and to make the wishbone more V shaped so the
the outer ends of the wishbone tubes are closer together at the ball joint.
If you can then replacing a standard lower ball joint with the Caterham style lower sperical bush is a small improvement but will require a bit more
maintenance such as greasing and checking for play. This step probably isn't worth it for a Locost.


