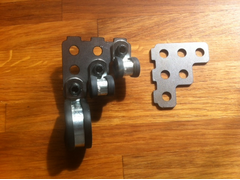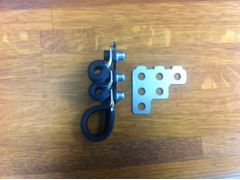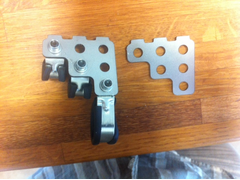
look at my shiny laser cut p-clip brackets
FuryRebuild - 3/8/12 at 10:56 AM
So, now that I've almost finished all the surgery on the chassis, I need to do a quick rebuild of the car to understand where all the cables,
pipes, etc need to run.
Rather than drill holes in the chassis and use self tappers, I thought I'd make some weld-in brackets to hang the p-clips off instead.
For this test, I've used m5 socket-headed cap screws, secured in m5 nutserts. The holes themselves are cut to 6mm, and to use the nutserts I just
ream them out to 7mm. I don't fully trust nutserts, so I'm going to experiment a little to secure each one with a tiny weld tack. If I get
concerned about vibration loosening the cap-screws I'll go for locktite.
Of course, I could use m6 cap screws and nylock bolts, but sometimes getting back there to tighten a nut is a faff, and better if I can prepare all of
this on the bench before welding in. The three tabs on the top are for welding to. My plan is to prevent the heat from the weld getting too close to
the holes which would increase the risk of warping or mis-shaping the holes.
Each bracket is 2mm mild steel, and weighs 19g naked and 64g fully configured with the three p-clips in the pictures.
As ever when getting things laser-cut, the cost of a larger run isn't that much more than a minimal run, so I had 60 made.
Here they are - this is the front on view.


Description
side on view:


Description
and finally the back view:


Description
maccmike - 3/8/12 at 11:02 AM
hehe that is nice
cost?
FuryRebuild - 3/8/12 at 11:04 AM
70p each in runs of 60, not including design time, and the one hour round trip to collect.
I can price-up the p-clips, nutserts, and cap-screws as well but I don't have the invoice for them; I tend to buy in bulk (100 off at a time) so
I don't have to worry about losing any, and it means every nut I take off gets stored in the bin without ever the temptation to reuse it.
loggyboy - 3/8/12 at 11:22 AM
Are you selling or just showing off?!
FuryRebuild - 3/8/12 at 11:25 AM
I'm not a trader if that's what you mean.
I don't mind selling some on if anyone has need.
I was also thinking of making the same brackets, but rather than have weld-tabs, putting a 1cm 90 degree folded tab instead, with a couple of screw
holes cut in for those that won't be able to weld in, but can screw to their chassis. In that case I'd also reccommend they bonded the
bracket in with epoxy to be double-sure they don't trap moisture into the chassis.
FuryRebuild - 3/8/12 at 11:26 AM
so, showing off 
Daddylonglegs - 3/8/12 at 12:53 PM
Nice neat solution 
adithorp - 3/8/12 at 12:58 PM
Isn't there a danger of the pipe through one P clip, rubbing on the bolt for the next one? Looks that way in the photo.
I have to say I'm not a fan of P clips anyway. Damn fiddly things to fit and remove and far better off with pastic snap in pipe clips as used by
mainstrean manufacturers.
FuryRebuild - 3/8/12 at 01:03 PM
They are a little close. I have several options:
1) use some headed cap screws (I've got lots of them  )
)
2) not use the middle row of holes
3) ensure the p-clip brackets are bent a little out of the way
4) step off with a washer.
So, yes I acknowledge it's a little close.
Hellfire - 3/8/12 at 02:16 PM
Sorry but I have to ask why? It just seems like complete over-kill to me and lots of effort for very little/no gain.........
I'm struggling to understand what benefit this will give? It's not like there's hundreds of holes required in your chassis for P-Clips.
Since drilling and pop-rivetting our's, we've never since had to move/remove any of them.
Phil
FuryRebuild - 3/8/12 at 04:31 PM
Hi Phil
I really don't like self-tappers, and don't like drilling the chassis. They're stress-raisers and whist they're replacing metal
for metal, there's now a boundary layer between the two. Furthermore, I want to neaten the runs for pipes and cables and have options as to how
and where I attach things, and have the ability to change my mind later.
As a result, I'm welding closed the self-tapper holes I have, and will be hanging everything from these brackets.
One of the reasons I'm doing the rebuild is the poor state of the powder coat, and I'm doing what I can to not repeat those issues (caused
in the original chassis build when they cut corners powder coating it).
This gives me options to change my mind without drilling more holes, adds little weight and gives me the strongest chassis I can have. I'm going
as far as I can with sensible race-prep approaches.
The rivets selected to secure the ally panels are often too soft. The rule is, if you can put them in with a hand-riveter then they're too soft.
So in this case when my panels go back in, they're being epoxy bonded to the chassis and I'm using advel rivets. My current choice is
avibulb steel stemmed, cherry or bollhoff varibolts.
Typically, the rivets you get from halfords and other outlets have a sheer strength of 700N and tensile of 450N, but the varibolt (automotive
specification) has a sheer force spec of 6200N and a tensile force spec of 4800N. Cherry SST aerospace sheet rivets are good for 4500N and 2000N
respectively. I think Fisher originally took the view that the panels were mainly there to keep the water out. However, for a few changes in rivets
and a bit of epoxy I can turn them into a structural component.
nick205 - 3/8/12 at 06:24 PM
I like them. I'm not a fan of drilling more holes than absolutely necessary in the chassis rails either. If I build again I'd look to do a
dry build to work out all the pipe, hose and cable runs then weld on tabs for either P clips or plastic snap in clips for the final build.
Neat solution and nice attention to detail IMHO 
FuryRebuild - 3/8/12 at 06:28 PM
It's the kind of thing any manufacturer could do - piece of cake to add to a chassis when its in the jig.
avagolen - 3/8/12 at 08:21 PM
I agree a nice set of brackets like that fitted at chassis build would be great.
I cannot weld and at present building on a 'new powder coated chassis'.
Here is my solution to the problem.
Only 1 hole for all three p clips.


P_clip_bracket
Len.
FuryRebuild - 3/8/12 at 08:24 PM
That's a nice job Len - it's really tricky to get these things neat. I suppose the grief of the crappy powder coat means I get the rare
treat of doing it again, and doing a better job.
My welding has come on leaps and bounds with the right gear and plenty of metal from the scrap bin.
I've just put the nutserts into five of these brackets and tacked each nutsert twice from the back. There's no way could I have been that
accurate with my old mig outfit, but tig is much better.
Canada EH! - 3/8/12 at 08:50 PM
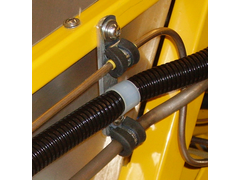
I am doing the same as the yellow chassis, but with brake and electrical on one side of the tunnel and fuel on the other. Always been nervous of fire
in a racecar, especially beside my hip. The brackets are held on by aviation grade rivnuts and screws for easy removal before painting and final
assembly.
FuryRebuild - 3/8/12 at 10:46 PM
The trick is to beware of brake-fluid. You can drop a match into petrol and it won't ignite (high flash point). Brakefluid will ignite if spilled
onto your exhaust manifold though (caveat it being hot, for the pedants out there).
That's why one of my my plumbed in firex outlets points to my exhaust manifold. saying that though, I now have the opportunity to move it over to
the passenger side away from the exhaust.
Thanks for reminding me of that issue - I'll redesign around it. I'm building this as close to track-race standards (loose definition, I
know). It's been hill-climbed a lot, but I'm looking for much higher speeds and higher lateral G this time around, so I'm investing
heavily in safety (hence T45 roll cage, chassis strengthening, etc).
AND you're right - aviation grade is the way, not cheap stuff off the high-street. Have you read
Nuts, Bolts, Fasteners and Plumbing by Carrol Smith? It's a brilliant read, and is the definitive source of advice if you're going
to put a hole or a nut anywhere.
Cheers
Mark


