Since doing that work I've finished off flowing/smoothing the ports. I've blended the valve seats into the chambers/ports and I've cut back the valve guides so that they protrude far less in to the ports.
I've then cleaned all 16 valves and lapped them into their respective seats and re-assembled the head.
16 valves,
16 springs,
32 spring seats/washers,
32 valve colletts,
16 Hydraulic adjusters,
2 Camshafts,
10 bearing caps and 20 M6 bolts.
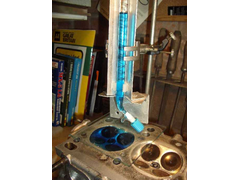
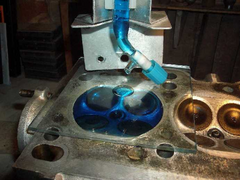
This last weekend I got around to checking the combustion chamber volumes - mostly to ensure they are all the same size. Within a tolerance of course. My research suggested +/- 0.5cc was a good start.
Well I borowed the burette and stands from work and set to. This is how it looked;


Combustion chamber volumes


Combustion chamber volumes
..... and the results are;
Cyl' 1 = 39.6cc
Cyl' 2 = 39.8cc
Cyl' 3 = 40.2cc
Cyl' 4 = 39.7cc
Each cylinder was measured a couple of times and overall I'm very pleased

Just got to fit it to the car, replace all the necessary gaskets and fit a new cam belt, pulleys, oil and oil filter and I can find out if it works any better

Things to remember for next time.
1) Don't set the head up level! Set it with a slight gradient across each chamber. This will help the air escape from under the glass plate thereby ensuring more accurate measurements.
2) Put the hole in the glass above the highest point in each chamber - the head is not set level - see 1)
3) Smear a little grease around each chamber so that the glass seals properly.
4) Use antifreeze as your fluid - it's a nice, easy to read colour and has a minimal meniscus.
5) Always take the reading from the same place on the meniscus.
6) Once the chamber is full wait for the burette reading to settle down - maybe 5 minutes. This is caused by fluid flowing down the inside of the tube after the level stops moving. It was about 0.5cc change between just after filling and 5 minutes later.
7) Make sure all the valves are closed in each chamber before you start!! With cams fitted it's a bit more difficult to be 100% certain.
I do hope that all this work was worth it


[Edited on 27/3/07 by JAG]
